User Guide
Chapter
Getting Started
Product Features
High Performance Notebook Computer
Sophisticated Design for Increased Usability
Before You Start
User Guide Information
Utilizating the User Guide
Installation Guide
Safety Precaution Notations
Text Notations Precautions for Operating System Support
Copyright
Icon Notation
Contents
Chapter 2. Using the Computer
Chapter 3. Using Microsoft Windows XP
Chapter 4. Using the Network
Safety Precautions
Installation Related
Power Related
Do not touch the mains plug or power cord with wet hands
Do not use a damaged or loose mains plug or power cord or power outlet
Do not unplug the power cord out by pulling the cable only
Use a wall outlet or multi-plug with a grounding part
Battery Usage Related
Usage Related
Do not connect a phone line connected to a digital phone to the modem
Upgrade Related
Never disassemble the power supply or AC adapter
Custody and
Movement Related
Upgrade Related
Failing to do so, may cause electric shock
Installation Related
Battery Usage Related
Do not throw or disassemble the battery and do not put it into water
Use only a battery authorized by Samsung Electronics
Take care not to drop the product while using it
Usage Related
Do not place a candle, lighted cigar, etc. over or on the product
Do not use a damaged or modified CD/Floppy Disk
Upgrade Related
Take care when touching the product or parts
Check CDs for cracks and damage prior to use
Take care not to throw or drop a computer part or device
Custody and Movement Related
Cautions on Preventing Data Loss Hard Disk Management
Do not operate or watch the computer while driving a vehicle
Take care not to damage the data on a hard disk drive
Proper Posture During Computer Use
Proper Posture
Adjust the heights of desks and chairs appropriate to your height
Eye Position
Hand Position
Keep the monitor or LCD away from your eyes by at least 50cm
Keep your arm at a right angle as shown by the figure
Volume Control Headphones and Speakers
Use Time Break Time
Illumination
Operation Condition
Important Safety Information
Safety instructions
Setting Up your System
The Instruction On Safety Operation of NotePC
Care During Use
Replacement Parts and Accessories
Battery Disposal
Laser Safety
Power Cord Requirements
Connect and Disconnect the AC adapter
General Requirements
Do not unplug the power cord out by pulling the cable only
Wireless Guidance
Regulatory Compliance Statements
Page
USA and Canada Safety Requirements and Notices
Other Wireless Devices
United States of America
Unintentional Emitter per FCC Part
Intentional emitter per FCC Part
FCC Part 68 If fitted with a modem device
Canada
Unintentional Emitter per ICES-003
Intentional Emitter per RSS
Page
European Union
European Union CE Marking and Compliance Notices
European Directives
Translated Statements of Compliance
English
Danish
General
Belgium
France
WEEE SYMBOL INFORMATION
Correct Disposal of This Product
Waste Electrical & Electronic Equipment
CALIFORNIA USA ONLY
Overview
Front View
10 Power Button
6 Status Indicators
Status Indicators
Wireless LAN
6 Power
2 HDD
Right View
1 Infrared Port
3 CD Drive
2 IEEE 1394 Port
Left View
4 Wired LAN Port
1 TV Output Port
2 Monitor Port
Back View
2 DC Jack
1 USB Port
3 Security Lock Port
Bottom View
1 Battery Latches
4 X-Dock
2 Hard Disk Drive Compartment Cover
Turning the Computer On and Off
Turning the computer on
Turning the computer off
Refer to the Installation Guide
Using the computer
Chapter
Keyboard
United Kingdom United States
Shortcut Keys
Wireless LAN Touchpad Num Lock Scroll Lock
Function
REST
Volume Control
Screen Brightness Control
Numeric Key
Other Function Keys
Touchpad
Before You Start
Touchpad
Scroll Area
Moving the cursor on the screen
Double-Click Function
Click Function
Right Button Function
Drag Function
Touchpad Scroll Function
Touchpad On/Off Function
Move
CD Drive
Inserting and Ejecting a CD
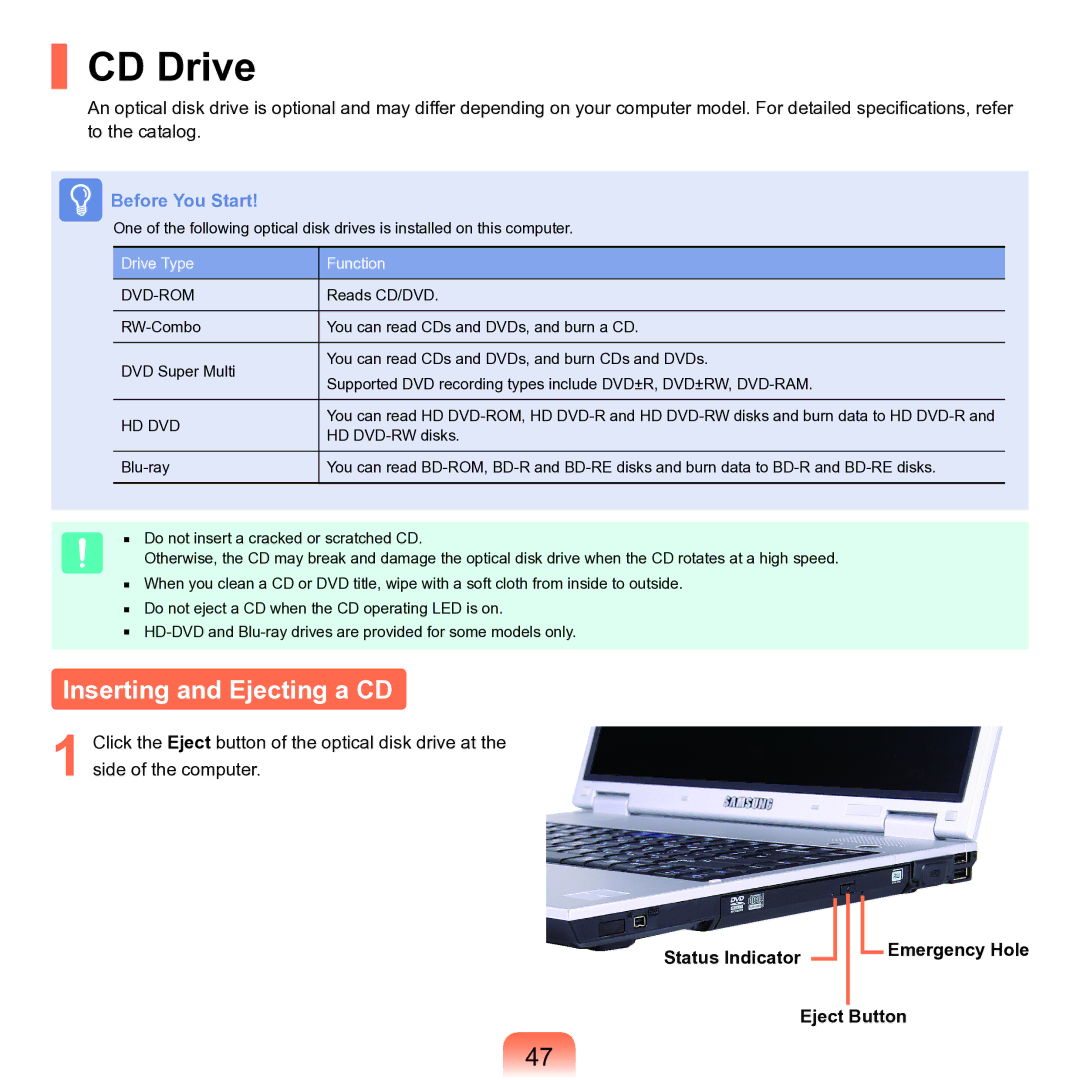
Status Indicator
Before You Start
Burning a CD
HD DVD
Supported Disk Types
HD DVD
Function
About HD DVD
Menu Menu Functions
Blu-ray
Supported Disk Types
Blu-ray
Function
About Blu-ray
double-click the CyberLink BD Solution
Menu Menu Functions
Multi Card Slot
Supported Cards
Before You Start
Memory Stick
To Insert and Use a Memory Card
Example SD Card
To remove a memory card
To format a memory card
1 Click Start My computer
Using the PC Card Slot
To insert a card
To remove a PC card
3 When Stop a Hardware Device dialog box appears, click OK
Connecting a Monitor / TV
Connecting a Monitor
Before You Start
Connecting a TV
Connecting to the Monitor port
Connecting to the TV Output port
Switching the Display Device using the Shortcut Key
Viewing Through a Monitor
Example Selecting LCD+CRT Dual View
Using Dual View to View Extended Screen
Deactivating Dual View Mode
1 Primary2 Secondary
Using Digital Output S/PDIF
What is Digital Output S/PDIF?
Before You Start
Connecting 5.1 Channel Speakers
S/PDIF 5.1 Channel Speakers Decoder S/PDIF Cable
Setting the Sound to Digital Sound Output on the Computer
Selecting Digital Output in the DVD Player Program
Adjusting the Volume
Adjusting the Volume using the Keyboard
Using EDS
Adjusting the Volume using the Volume Adjustment Program
Using Recorders
7 Click Start All Programs Accessories
Entertainment Sound Recorder
Using Microsoft Windows XP
Chapter
About Microsoft Windows XP
Tour Windows XP
Or, click Start All Programs Accessories Tour Windows XP
Click Start Tour Windows XP
Help and Support
Click Start Help and Support
Windows XP Screen Layout
Desktop
Shortcut Icons
Start Menu
Start Menu
Items that are pined to the Start menu User account name All Programs
Frequently used programs
My Documents folder My Computer Control Panel Help and Support Search
Window
Click Start My Computer
Menu Bar Title Bar Toolbar Fast Operation Window
Minimize button Close button Maximize button Folder Icon
Control Panel
Running Control Panel
Programs Sounds Speech, and Audio Devices Performance and Maintenance
Click Start Control Panel
Running the Control Panel
and Regional Options Accessibility Options Security Center
Click Start Control Panel
Printers and Other Hardware User Accounts Date, Time Language
How to Add a User Account
User Account
1 Click Start Control Panel
2 Click User Account and Create a new Account in sequence
How to Switch a User
To Delete User Account
Click Switch User
1 Click Start Control Panel User Account
Changing Resolution and Color
Themes Change the screen resolution
1 Click Start Control Panel Appearance and
Using the Network
Chapter
Wired Network
Before You Start
Click Start Control Panel Network and Internet
Connections Network Connection
6 Configure IP settings
Using both DHCP and a fixed IP simultaneously
1 Click Start Control Panel Network and Internet
2 Select Internet Protocol TCP/IP and click Properties
Wireless Network
Types of Wireless LAN Connections
Before Use
AP Connections
Connecting to Wireless LAN
To check the network connections
1 Click the Wireless Network Connection
Networks
Connecting to computer-to-computer networks peer-to-peer or ad hoc
Step 1. Setting up a computer-to- computer network
1 Right-click on the Wireless Network Connection
6 Enter the network name e.g. samsung, and unselect ‘The key is provided for meautomatically’. Enter the encryption key in the Network key field, and click OK
Step 2. Connecting to the configured computer
1 Right-click on the Wireless Network Connection
icon on the taskbar, and the connection status is displayed
Wireless Network Setup Using the Wireless LAN Setup Program
Atheros Wireless Network Adapter Device
Select System Software Media User Installation
Using Samsung Network Manager
Perform Network Settings
Easy configuration for your network and printer. p. 89~91
Enabling the movement-free feature. p
6 Select a device and configure IP settings. Then, click Next
IP Settings
5 Select Internet Direct Connection and click Next
Choose Device
Saved Locations Current Place Information Menu
Using the network after moving location
Sharing Internet Access
How to Connect the Client to the Server
How to Set up Sharing Server
IP address setting
Determining whether to use a firewall
Select a network device
How to Set up the Sharing Client
4 Select Sharing Client Wireless and click Next
To connect to the Internet from the Sharing Client
2 Run Samsung Network Manager on the sharing client computer
Checking Network Status
1 Run Samsung Network Manager
2 Click Check Auto Diagnosis on the Manage menu
Connecting with a Modem
Before You Start
Bluetooth
Bluetooth Functions
File Transmission Network Access
Network Access through a Phone Connection Data Sync Synchronization
Bluetooth Software Setup
Double-click My Bluetooth Places icon
3 If the driver installation is complete, the next step proceeds which searches for nearby Bluetooth devices. Since you do not have to search while setting up, click Skip and finish the settings
Using Bluetooth
Bluetooth Help
Exchanging Files between Bluetooth computers
2 In the Select Device window, click a computer to be connected hereafter Computer B
Connecting Keyboard, Mouse, Joystick and Headset devices
2 Double-click the My Bluetooth Settings
View devices in range
Stopping a Bluetooth device
Use Instructions
Infrared Communication Optional
Establishing an infrared connection
Transmitting data through the infrared link
Before You Start
Changing Settings
Using Applications
CyberLink PowerDVD Optional
Samsung Update Plus Optional
Chapter
Introducing Programs
Before You Start
Multi Media Functions
Management Functions
CyberLink PowerDVD Optional
Samsung Battery Manager Optional
Troubleshooting Functions
Easy Display Manager Optional
Easy SpeedUP Manager Optional
SAMSUNG Magic Doctor Optional
CyberLink PowerDVD Optional
Start All Programs CyberLink PowerDVD CyberLink PowerDVD
PlayConfiguration
Before You Start
Samsung Update Plus Optional
To update the software and drivers
2 Click Search and Install Updates and click Search for New Updates
Before You Start
Updates that must be installed separately
Settings and Upgrade
Chapter
Adjusting LCD Brightness Using Keyboard
Adjusting LCD Brightness Samsung Battery Manager
LCD Brightness Control
Battery Manager Samsung Battery Manager
BIOS Setup
Entering the BIOS Setup
Before You Start
3 After a moment, the BIOS setup screen appears
The items in the BIOS setup may differ depending on the product
Setup Menu Help
Setup Items
The BIOS Setup Screen
System Setup Keys
In the Setup, you have to use the keyboard
Setting a Boot Password
Setting a Supervisor Password
In the Set Supervisor Password item, press
Before You Start
Setting a User Password
Activating the Booting Password
Setting up a Hard Disk Drive Password
Deactivating the Password
Changing the Boot Priority
2 Press Enter on the Boot Device Priority item
Upgrading Memory
Adding a Memory Module
Before You Start
4 Close the memory compartment cover and fasten the screw
Removing a memory module
Battery
Installing/Removing the Battery
Before You Start
Charging Battery
Checking Battery Residual Amount
Using Shortcut keys
Viewing in Battery
Using Battery Longer
Guide to the battery lifecycle
Using Samsung Battery Manager
Maximum Battery Mode
General Mode
Maximum Performance Mode
User Settings Mode
Enabling Battery Calibration
Disabling Unused Devices
3 Select Boot Menu Smart Battery Calibration and press the Enter key
Using the Security Lock Port
Appendix
Chapter
Using McAfee SecurityCenter Optional
Scanning and Curing Viruses
Before You Start
1 Click Start All Programs McAfee McAfee SecurityCenter
Using Samsung Magic Doctor Optional
Diagnosing the System
Before You Start
Select Start All Programs Samsung
Reinstalling Software
Running the system software Media
Before You Start
Installing drivers and programs
Questions and Answers
Windows Related
Display Related
QThe system does not shutdown properly
QIn the following cases, the screen blinks or displays noise for a short time This only applies to nVidia graphics card. Click the Graphics Related tab, Change Resolution, Change Display Device, Remove the AC Adapter, Restart the System, Change PowerMizer level
QI cannot set up Dual View properly. For Intel Graphics only
Sound Related
QHow to install and uninstall the sound driver
Samsung EDS
Modem Related
QI cannot hear the modem sound
QI cannot make a call using an extension line
QHow do I use my modem when dialing from overseas?
Wired LAN Related
QWake On LAN function
To use Wake On LAN function
Wireless LAN Related
QI cannot find an AP
View the properties of the corresponding AP in the
Check the AP settings
Check the TCP/IP settings
Games and Programs Related
Q3D game is not executed, or some functions are not working
QFn + Key combination does not work
QRunning speed of a game is too slow or fast
Click Start Control Panel Performance and
QSome part of a game image is not displayed or is displayed in black
QThe game screen is displayed small
For these games, set the screen resolution to
QThe game play screen frequently stops and starts
QThe picture is not displayed properly for some games
1024x768, and the color quality to 16 bit
Bluetooth
QI cannot find or connect the headset
Configuring Sounds and Audio Devices in the Control Panel
Bluetooth icon Check the version in the General tab
Bluetooth icon Check the version in the Hardware tab
QI have connected the headset, but I cannot hear sound normally
QCan I burn a HD DVD disk using a general CD-RW or DVD-RW drive?
QCan I burn a HD DVD disk using the CyberLink DVD Solution?
HD DVD
QIs it compatible with the existing CD/DVD formats?
QCan I burn a Blu-ray disk using a general CD-RW or DVD-RW drive?
QCan I burn a Blu-ray disk using the CyberLink DVD Solution CDS?
Blu-ray
QIs it compatible with the existing CD/DVD formats?
Security Center
QWhen you see a Windows Security Alert icon
Other Questions
Q4GB memory capacity is not properly recognized by Windows
Product Specifications
Wireless LAN Specifications 802.11ABG Card
IntelR PRO/Wireless 3945ABG Network Connection Device
Detailed Specifications
Specifications
Radio Specifications
Standard Output Power
RF Band
Supported Channels
Wireless LAN Specifications 802.11ABG/N Card
Detailed Specifications
Specifications
Power
RF Band
Supported Channels
Device
Modulation Scheme
Registered Trademarks
About the Product Capacity Representation Standard
Macrovision Certification
Glossary
Backup
Client
Device Manager
Hibernation Mode
Power Schemes
Firewall
Icon
Sleep Mode
Quick Launch
Server
Share
Windows
Windows Media Player
Index
Contact SAMSUNG WORLD WIDE
Customer Care Center
Web Site
U.S.A
ITALY Contatta SAMSUNG
Customer Care Center
Web Site
ITALY