AD68-0?????
SC-D963/D965
ContentsÍndice
Advanced Recording
Contents Índice
Notas relacionadas con la pantalla LCD, visor, objetivo
Notas referentes al giro de la pantalla LCD
Notas referentes a la limpieza de los cabezales de video
Nota
Notas referentes a la videocámara
Servicing & Replacement Parts
Notas referentes a los derechos de reproducción
Servicio y piezas de repuesto
Características
Features
Accesorios básicos
Basic Accessories
Front & Left View Vistas frontal y lateral izquierda
Left Side View Vista lateral izquierda
Jacks
Right & Top View Vistas superior y lateral derecha
Terminales
Jack Cover Jacks See below
Rear & Bottom View Vistas posterior e inferior
Lithium Battery Cover
Usable Memory Cards
Tarjeta de memoria utilizable
10. œ / √ Direction
Remote Control SC-D965 only Control remoto sólo SC-D965
Using the Hand Strap & Lens Cover
PreparationPreparación
Utilización de la empuñadura y la tapa del objetivo
Instalación de la pila de litio
Lithium Battery Installation
Utilización de la batería de iones de litio
Using the Lithium Ion Battery Pack
Battery Pack Management
Battery Level Display Indicador de carga de la batería
Gestión de la batería
Amount of continuous recording time available depends on
Notas referentes a la batería
Preparación
Preparation
Uso de Quick Menu
Using the Quick Menu
OSD in Camera Mode
OSD in Player Mode
OSD On Screen Display in Camera/Player Modes
Encendido / apagado de OSD presentación en pantalla
Turning the OSD On Screen Display On/Off
Ajuste del reloj Clock Set Ajuste Reloj
Setting the Clock Clock Set
Camera/Player/M.Cam/M.Player modes.
Set the Power switch to Camera or Player
Ajuste del Beep Sound Sonido Beep
Setting the Beep Sound Beep Sound
Ajuste de Shutter Sound Sonido Obtur
Setting the Shutter Sound Shutter Sound
Selección del idioma de OSD Language
Selecting the OSD Language Language
Viewing the Demonstration Demonstration
Initial Setting System Menu Setting
Adjusting the LCD Screen LCD Bright/LCD Color
Displaying the Date/Time Date/Time
Visualización de la fecha y hora Date/Time Fecha/Hora
Off, Date, Time, Date&Time
Camera/Player/M.Cam/M.Player. pág
Initial Setting Display Menu Setting
Grabación básica
Basic Recording
Various Recording Techniques
Basic Recording Grabación básica
Técnicas diversas de grabación
Grabación en general
Making your First Recording Primera grabación
Grabación con borrado para principiantes Modo EASY.Q
Recording with Ease for Beginners EASY.Q Mode
Reviewing and Searching a Recording REC Search
Revisión y búsqueda de una grabación REC Search
Record Search REC Search
Búsqueda de grabación REC Search
Memory
00000
Control remoto, la grabación se pone en marcha
Tele
Using the Tele Macro Utilización de la Macro telescópica
To Stop Recording use Fade In/Fade Out
To Start Recording
Comienzo de la grabación
Detención de la grabación Con la función Fade In/Fade Out
BLC Off BLC On
Using Back Light Compensation Mode BLC
Utilización de Color Nite Color Nite
Using the Color Nite Color Nite
√ Color N /30, Color N /15, Color N /8 and OFF
√ Color N /30, Color N /15, Color N /8 y OFF Notas
Selecting the Record Mode & Audio Mode
Advanced Recording Grabación avanzada
Selección del modo de grabación y audio
Cutting Off Wind Noise WindCut Plus
Or Auto
Auto
Selección de la función Real Stereo
Selecting the Real Stereo
Recommended Shutter Speeds when Recording
Setting the Shutter Speed & Exposure
Ajuste de la exposición y la velocidad del obturador
Grabar
Enfoque autom. / Enfoque manual
Auto Focus / Manual Focus
Auto Focus
Enfoque automático
Sports mode
Auto a mode
Portrait Mode
Spotlight Mode
Ajustes de EA de programa
Setting the Program AE
Indoor
Setting the White Balance Ajuste del balance de blanco
Outdoor
Custom WB
Aplicación de Visual Effects Efectos visuales
Applying Visual Effects
Selecting the Visual Effects Selección de efectos visuales
Pastel2, Emboss2, Mirror or Mosaic mode
Setting the 169 Wide Ajuste del modo 169 Wide
Off
El menú 169 Wide en Off
Ajuste del Estabilizador digital de la imagen DIS
Setting the Digital Image Stabilizer DIS
DIS menu to Off
DIS en Off
Zooming In and Out with Digital Zoom Digital Zoom
Selecting the Digital Zoom
Selección del zoom digital
Still Image Recording
Advanced Recording
Grabación de imágenes fijas
Searching for a still image
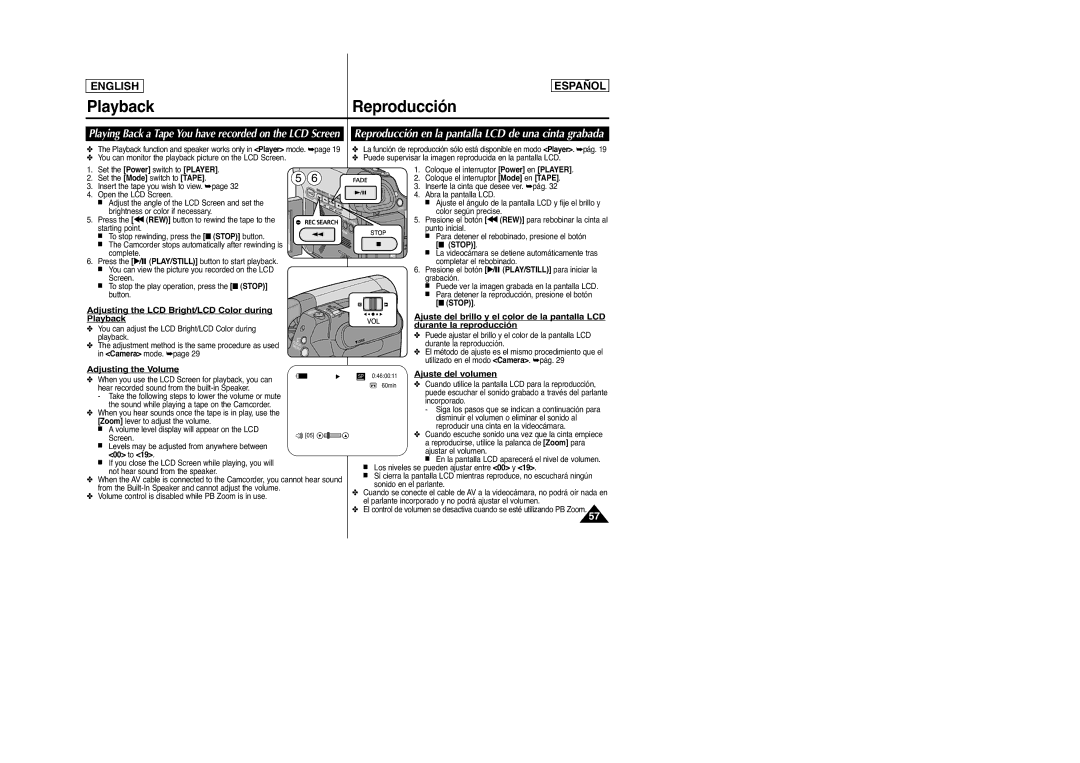
Adjusting the Volume
Adjusting the LCD Bright/LCD Color during Playback
Ajuste del volumen
PlaybackReproducción
Diferentes funciones en el modo Player
Various Functions while in Player Mode
SC-D965 only
X2 Playback Forward/Reverse
Reproducción X2 Adelante/Atrás
Reverse Playback SC-D965 only
Zoom lever
Playback Reproducción
Botón PB Zoom o Stop
Zoom or Stop button
Audio Dubbing Mezcla de audio sólo SC-D965
Audio Dubbing SC-D965 only
Presione el botón √ / PLAY/STILL
Para iniciar la mezcla
Reproducción de una cinta con audio mezclado
Dubbed Audio Playback
Reproducción de una cinta
Tape Playback
Connecting to a TV which has no Audio/Video Input Jacks
Playback
Reproducción
Menu
Audio Effect
Ajuste de AV In/Out Ent/Sal AV sólo SC-D965
Setting the AV In/Out SC-D965 only
AV In, S-Video In then press the OK button
Set AV In/Out menu to Out
Funciones de la tarjeta de memoria
Memory Card Functions
Inserting a Memory Card
Ejecting a Memory Card
Formato de imágenes
Image Format
Moving Image
Video
Mode switch to Tape or Memory
Mode switch to Memory
Selecting the Memory Type
Selección de Memory Type Tipo memoria
Selecting the Photo Quality
Mode switch to Tape
Selección de Photo Quality Calidad Foto
Select the Image Quality Selección de la calidad de imagen
1152x864 or 800x600 , then press the OK
Selecting the recording Photo Size
Ajuste de File Number Número de archivo
Setting the File Number
Captura de imagen fotográfica Jpeg en la tarjeta de memoria
Taking a Photo Image Jpeg on the Memory Card
Utilización del flash incorporado
Using the Built in Flash
Flash Select
Selección de flash Flash Select
Visionado de imágenes fotográficas Jpeg
Viewing Photo Images Jpeg
To view a Single Image
Visionado de imágenes una a una
Protección contra borrado accidental
Protection from accidental Erasure
Deleting Photo Images and Moving Images
Message Do you want to delete?
Aparece el mensaje Do you want to delete?
Supresión de todas las imágenes de una vez
Deleting All Images at Once
Message Do you want to delete all? is
Aparece el mensaje Do you want to delete all?
Atención
Saving Moving Images onto a Memory Card
Tarjeta de memoria
Almacenamiento de secuencias de video en la
Tarjeta de memoria M.Play Select Selec.M.Play
Reproducción de secuencias de video Mpeg en la
Grabación de imágenes fijas desde una cinta
De memoria Photo Copy Copia Foto
If This File or All Files is selected
Removing the Print Mark
Marking Images for Printing Print Mark
Eliminación de la marca de impresión
Desired option All Off , This File or All Files
Connecting To a Printer
Printing Your Pictures Using the PictBridgeTM
PictBridgeTMPictBridgeTM
Impresión de imágenes Uso de PictBridgeTM
Setting the Date/Time Imprint Option
Setting the Number of Prints
Canceling the Printing
Selecting Images
Connecting to a PC
Connecting to a DV Device DVD Recorder, Camcorder, etc
Conexión a un PC
System Requirements
Transferencia de datos Ieee
Ieee 1394 Data Transfer
Recording with a DV Connection Cable
Grabación con un cable de conexión DV
USB Interface Interfaz USB
Using USB Interface Utilización de la interfaz USB
USB Connection Speed depending on the System
System Requirements
Computer or Printer, then press the OK
Selecting the USB Device USB Connect
Program Installation
Installing DV Media PRO Program
Instalación del programa DV Media PRO
Instalación del programa
Disconnecting the USB Cable
Connecting to a PC
USB Interface
Conexión a un PC
Utilización de la función PC Camera
Using the PC Camera Function
Using the removable Disk Function
Using the USB Streaming Function
Utilización de la función de disco extraíble
Utilización de la función USB Streaming
After Finishing a Recording Tras finalizar una grabación
MaintenanceMantenimiento
Usable Cassette Tapes
Cintas de casete utilizables
Cleaning the Video Heads
Cleaning and Maintaining the Camcorder
Limpieza y mantenimiento de la videocámara
Limpieza de los cabezales de video
Utilización de la videocámara en el extranjero
Using Your Camcorder Abroad
Self Diagnosis Display
Troubleshooting Resolución de problemas
Pantalla de autodiagnósticos
Moisture Condensation
Troubleshooting Resolución de problemas
Self Diagnosis Display in M.Cam/M.Player Modes
Pantalla de autodiagnósticos en los modos M.Cam/M.Player
Síntoma Explicación/Solución
Symptom Explanation/Solution
Main Sub Menu Functions Available Mode
Setting menu items
Ajustes del menú
Submenú Funciones Modo disponible
103
SpecificationsEspecificaciones
Model Name SC-D963/D965
Nombre del modelo SC-D963/D965
Deleting 77~78
Index Índice alfabético
Contact Samsung World Wide
Customer Care Center Web Site
Póngase en contacto con Samsung World Wide
This Camcorder is Manufactured by Videocámara Fabricada POR