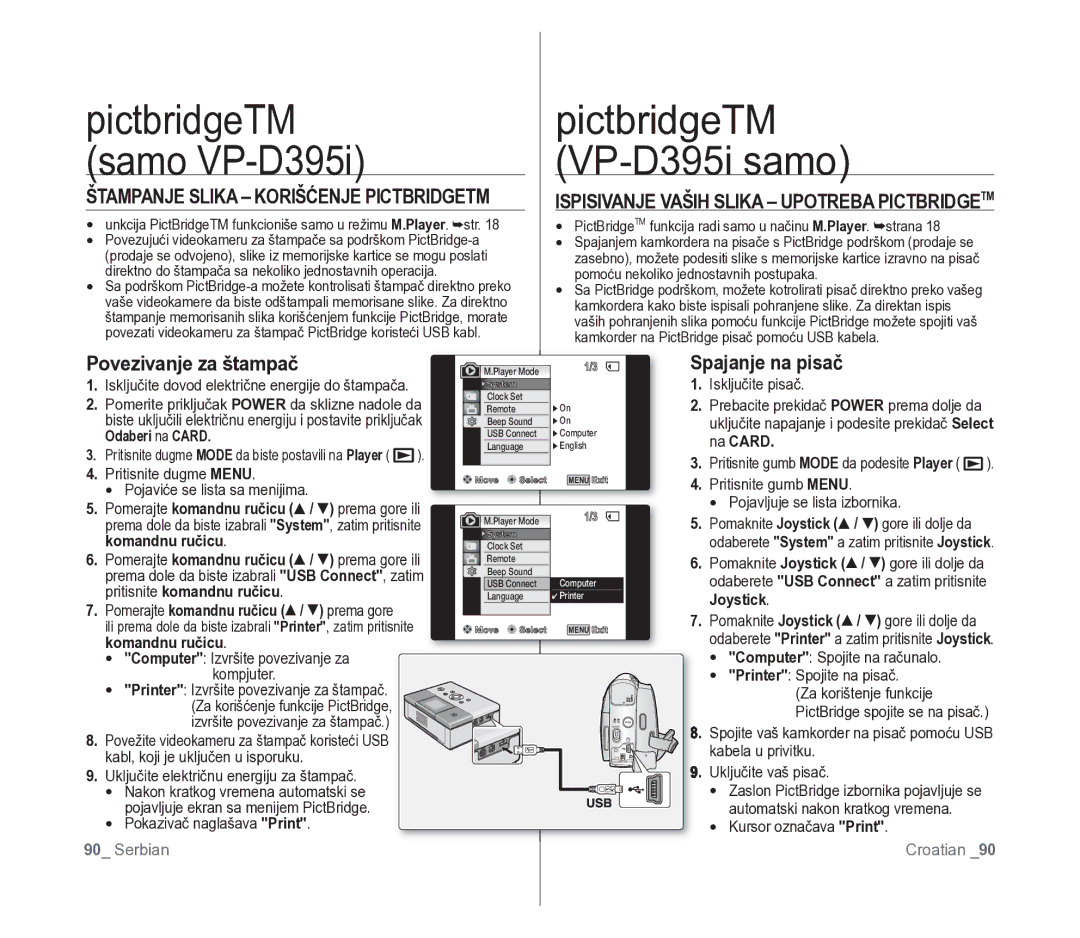
Samsung VP-D391/EDC manual PictbridgeTM Samo VP-D395i VP-D395i samo, Povezivanje za štampač

Models: VP-D391/EDC

1 113
Download 113 pages 8.64 Kb
Page 94
Image 94

pictbridgeTM

pictbridgeTM

(samo VP-D395i)


(VP-D395i samo)

ŠTAMPANJE SLIKA – KORIŠĆENJE PICTBRIDGETM


ISPISIVANJE VAŠIH SLIKA – UPOTREBA PICTBRIDGETM

unkcija PictBridgeTM funkcioniše samo u režimu M.Player. str. 18

PictBridge funkcija radi samo u načinu M.Player. strana 18

TM

Povezujući videokameru za štampače sa podrškom PictBridge-a

Spajanjem kamkordera na pisače s PictBridge podrškom (prodaje se


(prodaje se odvojeno), slike iz memorijske kartice se mogu poslati


zasebno), možete podesiti slike s memorijske kartice izravno na pisač

direktno do štampača sa nekoliko jednostavnih operacija.

pomoću nekoliko jednostavnih postupaka.

Sa podrškom PictBridge-a možete kontrolisati štampač direktno preko

Sa PictBridge podrškom, možete kotrolirati pisač direktno preko vašeg


vaše videokamere da biste odštampali memorisane slike. Za direktno


kamkordera kako biste ispisali pohranjene slike. Za direktan ispis


štampanje memorisanih slika korišćenjem funkcije PictBridge, morate


vaših pohranjenih slika pomoću funkcije PictBridge možete spojiti vaš


povezati videokameru za štampač PictBridge koristeći USB kabl.


kamkorder na PictBridge pisač pomoću USB kabela.

Povezivanje za štampač


M.Player Mode

1/3

Spajanje na pisač


1.

Isključite dovod električne energije do štampača.


System


1.

Isključite pisač.


2.

Pomerite priključak POWER da sklizne nadole da

Clock Set

￿ On

2. Prebacite prekidač POWER prema dolje da


Remote


biste uključili električnu energiju i postavite priključak

Beep Sound

￿ On


uključite napajanje i podesite prekidač Select


Odaberi na CARD.


USB Connect

￿ Computer


na CARD.


3.

Pritisnite dugme MODE da biste postavili na Player (

).

Language

￿ English


3. Pritisnite gumb MODE da podesite Player (

).

4.

Pritisnite dugme MENU.


Move

Select

MENU Exit

4. Pritisnite gumb MENU.


Pojaviće se lista sa menijima.


5.


/

) prema gore ili


Pojavljuje se lista izbornika.


Pomerajte komandnu ručicu (


1/3

5.

Pomaknite Joystick (/ ) gore ili dolje da


prema dole da biste izabrali "System", zatim pritisnite

M.Player Mode


komandnu ručicu.


System


odaberete "System" a zatim pritisnite Joystick.

6.


Clock Set


Pomerajte komandnu ručicu (/ ) prema gore ili

Remote


6.


/

) gore ili dolje da


prema dole da biste izabrali "USB Connect", zatim

Beep Sound


Pomaknite Joystick (


USB Connect

Computer


odaberete "USB Connect" a zatim pritisnite

7.

pritisnite komandnu ručicu.


Language

Printer


Joystick.


Pomerajte komandnu ručicu (/ ) prema gore


7. Pomaknite Joystick (/ ) gore ili dolje da


ili prema dole da biste izabrali "Printer", zatim pritisnite


Move

Select

MENU Exit


odaberete "Printer" a zatim pritisnite Joystick.


komandnu ručicu.


"Computer": Izvršite povezivanje za


"Computer": Spojite na računalo.


kompjuter.


"Printer": Spojite na pisač.


"Printer": Izvršite povezivanje za štampač.


(Za korištenje funkcije


(Za korišćenje funkcije PictBridge,


PictBridge spojite se na pisač.)


izvršite povezivanje za štampač.)


8. Spojite vaš kamkorder na pisač pomoću USB

8.

Povežite videokameru za štampač koristeći USB


kabela u privitku.


kabl, koji je uključen u isporuku.


9.

Uključite vaš pisač.


9.

Uključite električnu energiju za štampač.


Nakon kratkog vremena automatski se


Zaslon PictBridge izbornika pojavljuje se


pojavljuje ekran sa menijem PictBridge.


automatski nakon kratkog vremena.


Pokazivač naglašava "Print".


Kursor označava "Print".


90_ Serbian


Croatian _90

Page 94
Image 94
Samsung VP-D391/EDC manual PictbridgeTM Samo VP-D395i VP-D395i samo, Povezivanje za štampač, Spajanje na pisač

VP-D391/EDC specifications

The Samsung VP-D391 is a versatile digital camcorder designed for users seeking a combination of quality performance and user-friendly features. Released in various models including the VP-D391/EDC and VP-D391/XEF, this camcorder stands out due to its compact design and practical functionality, making it an excellent choice for both amateur filmmakers and everyday users.

One of the key features of the VP-D391 is its Digital Image Stabilization technology. This innovative feature helps to reduce camera shake, ensuring smoother footage even when filming while in motion. This is particularly beneficial for capturing dynamic scenes or home videos during family gatherings or outdoor activities where stability could be an issue.

The camcorder boasts a 34x optical zoom lens, allowing users to get closer to their subjects without sacrificing image quality. This is complemented by a 1200x digital zoom, providing even more versatility for capturing distant details. The lens is also equipped with a built-in autofocus system, ensuring sharp focus on moving subjects, an important feature for many users.

In terms of video quality, the VP-D391 captures video in various formats, making it easy for users to share their content across different platforms. The camcorder supports both MPEG and AVI formats, catering to varying preferences when it comes to editing and sharing videos. The 680,000 pixel CCD sensor contributes to the camcorder’s impressive video quality, delivering vibrant colors and rich details for memorable recordings.

Another notable characteristic is the convenience factor, as the device comes with a 2.7-inch color LCD screen. This screen allows for easy framing of shots and accessing the menu options without straining the eyes. Additionally, the shot transition features such as self-timer and various digital effects add a creative touch to the recordings.

Users will also appreciate the extended battery life provided by the VP-D391, ensuring that they can capture hours of footage without the need for frequent recharging. This is especially useful for events such as weddings or birthday parties, where uninterrupted video capturing is essential.

Overall, the Samsung VP-D391 camcorder models like the VP-D391/EDC and VP-D391/XEF exemplify a balanced combination of advanced technology and practical design. Suitable for a wide range of filming needs, it is a reliable device for anyone looking to create high-quality video content easily.