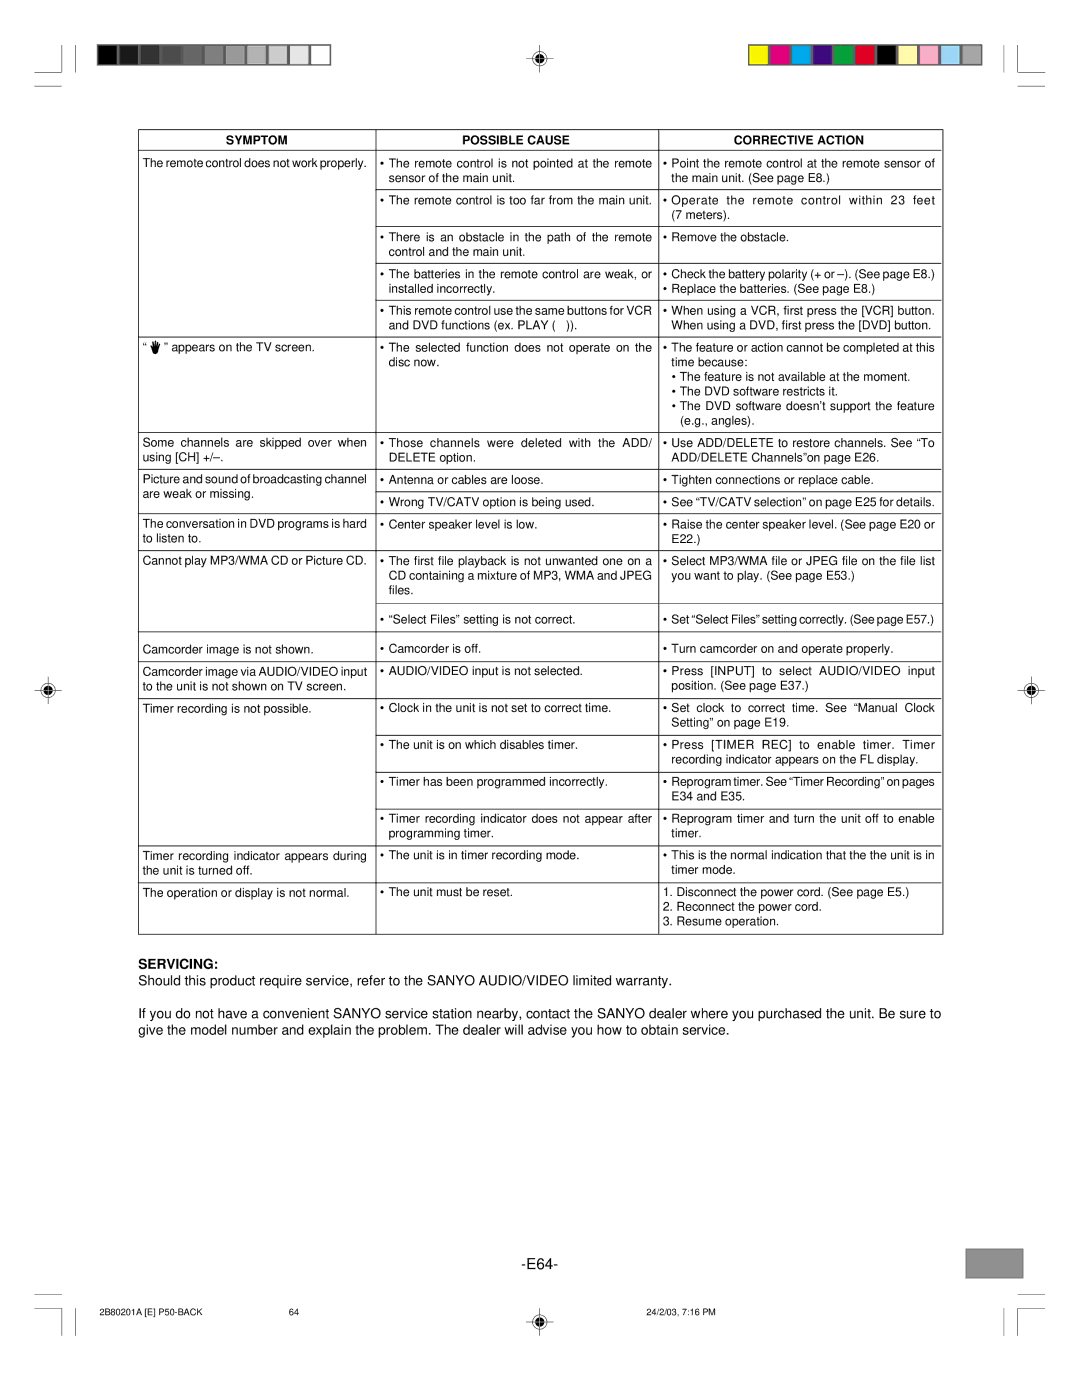
SYMPTOM | POSSIBLE CAUSE | CORRECTIVE ACTION | |
|
|
| |
The remote control does not work properly. | • The remote control is not pointed at the remote | • Point the remote control at the remote sensor of | |
| sensor of the main unit. | the main unit. (See page E8.) | |
|
|
| |
| • The remote control is too far from the main unit. | • Operate the remote control within 23 feet | |
|
| (7 meters). | |
|
|
| |
| • There is an obstacle in the path of the remote | • Remove the obstacle. | |
| control and the main unit. |
| |
|
|
| |
| • The batteries in the remote control are weak, or | • Check the battery polarity (+ or | |
| installed incorrectly. | • Replace the batteries. (See page E8.) | |
|
|
| |
| • This remote control use the same buttons for VCR | • When using a VCR, first press the [VCR] button. | |
| and DVD functions (ex. PLAY (a)). | When using a DVD, first press the [DVD] button. | |
|
|
| |
“ ” appears on the TV screen. | • The selected function does not operate on the | • The feature or action cannot be completed at this | |
| disc now. | time because: | |
|
| • The feature is not available at the moment. | |
|
| • The DVD software restricts it. | |
|
| • The DVD software doesn’t support the feature | |
|
| (e.g., angles). | |
|
|
| |
Some channels are skipped over when | • Those channels were deleted with the ADD/ | • Use ADD/DELETE to restore channels. See “To | |
using [CH] | DELETE option. | ADD/DELETE Channels”on page E26. | |
|
|
| |
Picture and sound of broadcasting channel | • Antenna or cables are loose. | • Tighten connections or replace cable. | |
are weak or missing. |
|
| |
• Wrong TV/CATV option is being used. | • See “TV/CATV selection” on page E25 for details. | ||
| |||
|
|
| |
The conversation in DVD programs is hard | • Center speaker level is low. | • Raise the center speaker level. (See page E20 or | |
to listen to. |
| E22.) | |
|
|
| |
Cannot play MP3/WMA CD or Picture CD. | • The first file playback is not unwanted one on a | • Select MP3/WMA file or JPEG file on the file list | |
| CD containing a mixture of MP3, WMA and JPEG | you want to play. (See page E53.) | |
| files. |
| |
|
|
| |
| • “Select Files” setting is not correct. | • Set “Select Files” setting correctly. (See page E57.) | |
|
|
| |
Camcorder image is not shown. | • Camcorder is off. | • Turn camcorder on and operate properly. | |
|
|
| |
Camcorder image via AUDIO/VIDEO input | • AUDIO/VIDEO input is not selected. | • Press [INPUT] to select AUDIO/VIDEO input | |
to the unit is not shown on TV screen. |
| position. (See page E37.) | |
|
|
| |
Timer recording is not possible. | • Clock in the unit is not set to correct time. | • Set clock to correct time. See “Manual Clock | |
|
| Setting” on page E19. | |
|
|
| |
| • The unit is on which disables timer. | • Press [TIMER REC] to enable timer. Timer | |
|
| recording indicator appears on the FL display. | |
|
|
| |
| • Timer has been programmed incorrectly. | • Reprogram timer. See “Timer Recording” on pages | |
|
| E34 and E35. | |
|
|
| |
| • Timer recording indicator does not appear after | • Reprogram timer and turn the unit off to enable | |
| programming timer. | timer. | |
|
|
| |
Timer recording indicator appears during | • The unit is in timer recording mode. | • This is the normal indication that the the unit is in | |
the unit is turned off. |
| timer mode. | |
|
|
| |
The operation or display is not normal. | • The unit must be reset. | 1. Disconnect the power cord. (See page E5.) | |
|
| 2. Reconnect the power cord. | |
|
| 3. Resume operation. | |
|
|
|
SERVICING:
Should this product require service, refer to the SANYO AUDIO/VIDEO limited warranty.
If you do not have a convenient SANYO service station nearby, contact the SANYO dealer where you purchased the unit. Be sure to give the model number and explain the problem. The dealer will advise you how to obtain service.
2B80201A [E] | 64 | 24/2/03, 7:16 PM |
