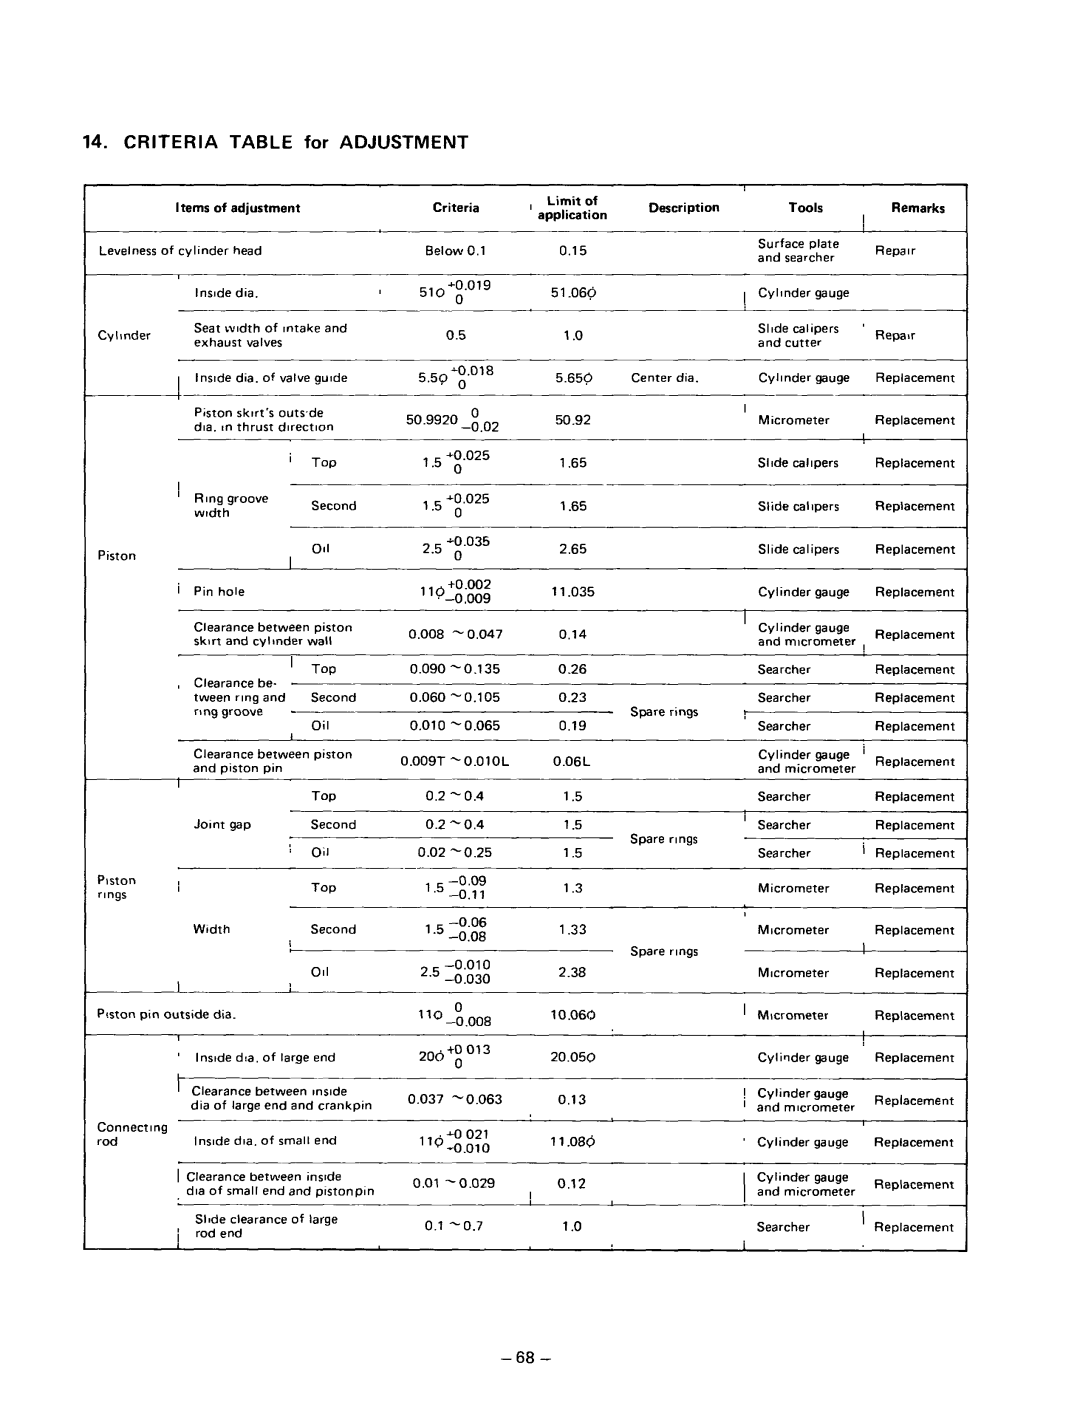
14. CRITERIA TABLE for ADJUSTMENT
I terns | of | adjustment |
| |||
Levelness of cylinder | head |
|
| |||
| lnslde | dia. |
|
| ||
Cylinder | Seat width of Intake and | |||||
exhaust | valves |
|
| |||
|
|
| ||||
1 lnstde dia. of valve guide | ||||||
| Piston | skirt’s | outs,de | |||
| dia. | I” thrust | dIrectIon | |||
|
|
|
|
| ’ | TOP |
I |
|
|
|
|
|
|
’ | Ring | groove |
| Second | ||
| width |
|
|
| ||
|
|
|
|
| ||
Piston |
|
|
|
|
| 011 |
|
|
|
|
|
| |
i | Pin | hole |
|
|
| |
| Clearance | between | piston | |||
| skirt |
| and | cylmder | wall | |
’ Top
,Clearance be-
tween ring and Second
ring groove -
Oil
Clearance between piston and piston pin
I
Criteria
Below 0.1
510+o.o19
0
0.5
5,50A0.018
. 0
0
50.9920
,,5 +0.025 0
,,5 ~0.025 0
2.5ao.035
0
,,O +0.002
0.008 - 0.047
0.090
0.060
0.010
0.009T - O.OlOL
,Limit of application
0.15
51 .cl6Q
1a
5.656
50.92
1.65
1.65
2.65
11 .O35
0.14
0.26
0.23
0.19
0.06L
Description
Center dia.
Spare rings
|
| Tools |
| Remarks | |
| Surface | plate |
| Repalr | |
| and | searcher |
| ||
|
|
| |||
1 | Cylinder | gauge |
|
| |
| Slide | calipers | ’ | Repair | |
| and | cutter |
|
| |
| Cylinder | gauge |
| Replacement | |
I | Micrometer |
| Replacement | ||
| I | ||||
|
|
|
|
| |
| Slide | calipers |
| Replacement | |
| Slide | calipers |
| Replacement | |
| Slide | calipers |
| Replacement | |
| Cylinder | gauge |
| Replacement | |
’ | Cylinder | gauge |
| Replacement | |
| and | mxrometer | , | ||
| Searcher |
|
| Replacement | |
v | Searcher |
|
| Replacement | |
|
|
|
|
| |
’ | Searcher |
|
| Replacement | |
| Winder | Saw | ’ | Replacement | |
| and | micrometer |
|
| |
I
|
|
|
|
|
|
| Top | 0.2 | - | 0.4 |
|
| Joint | gap |
|
| Second | 0.2 | |||
|
|
|
|
|
| I | Oil | 0.02 | ||
Piston | I |
|
|
|
|
| Top | 1.5 | ||
rings |
|
|
|
|
| |||||
|
| Width |
|
|
| Second | ’ .5 | |||
|
|
|
|
|
|
|
|
| ||
A- |
|
|
|
|
|
| 011 | 2,5 | ||
|
|
|
|
|
|
|
| |||
P!ston pin | outside | dia. |
|
|
| “* |
| 0 | ||
|
|
|
|
|
|
|
|
| ||
| ’ | lnstde | d:a. | of | large | end | 20d+0 | 013 | ||
|
|
| 0 | |||||||
|
|
|
|
|
|
|
|
|
| |
| I | Clearance | between | mslde | 0.037 | |||||
|
| dia of large end and crankpin | ||||||||
|
|
|
|
| ||||||
Connecting |
| lnslde | dia. | of | small | end |
| |||
rod |
|
| ||||||||
| ||||||||||
|
|
|
|
|
|
|
| |||
| 1 Clearance between | instde | 0.01 | - | 0.029 | |||||
|
| dla of small end and ptstonpln | ||||||||
|
|
|
|
| ||||||
|
| Slide | clearance | of | large | 0.1 | ||||
| i | rod | end |
|
|
| ||||
|
|
|
|
|
|
| ||||
| 1 |
|
|
|
|
|
|
|
|
|
1.5
1.5
1 .5
1.3
1.33
2.38
10.060
20.050
0.13
11.080
0.12
I
1 .o
Spare rings
Spare rings
Searcher | Replacement |
| Micrometer |
| Replacement | |
| MIcrometer |
| Replacement | |
|
|
| ! |
|
| MIcrometer |
| Replacement | |
’ | MIcrometer |
| Replacement | |
| Cylinder | gauge | Replacement | |
1 | Cylinder | gauge | Replacement | |
| and | mlcrometer | ||
|
| |||
’ | Cylinder | gauge | Replacement | |
| Cylinder | gauge | Replacement | |
| and | micrometer | ||
|
| |||
| Searcher | ’ | Replacement | |
I |
|
|
|
|
I
