Operator’s Manual for FAX Unit
Page
Preface
Preface
Toshiba America Business Solutions, Inc
For Canada only
Toshiba of Canada Limited
Toshiba Australia PTY Limited
Model and series names in this manual
How to read this manual Symbols in this manual
Before Reading This Manual
Explanation for control panel and touch panel
Trademarks
Accessories
Description of original/paper direction
General Precautions
Disclaimer notice
Page
Contents
Troubleshooting 112
User Settings
Administrator Settings
Specifications of GD-1320/GD-1260 114
Connecting Cables
Description of Each Component
Memory RX
Description of Each Component
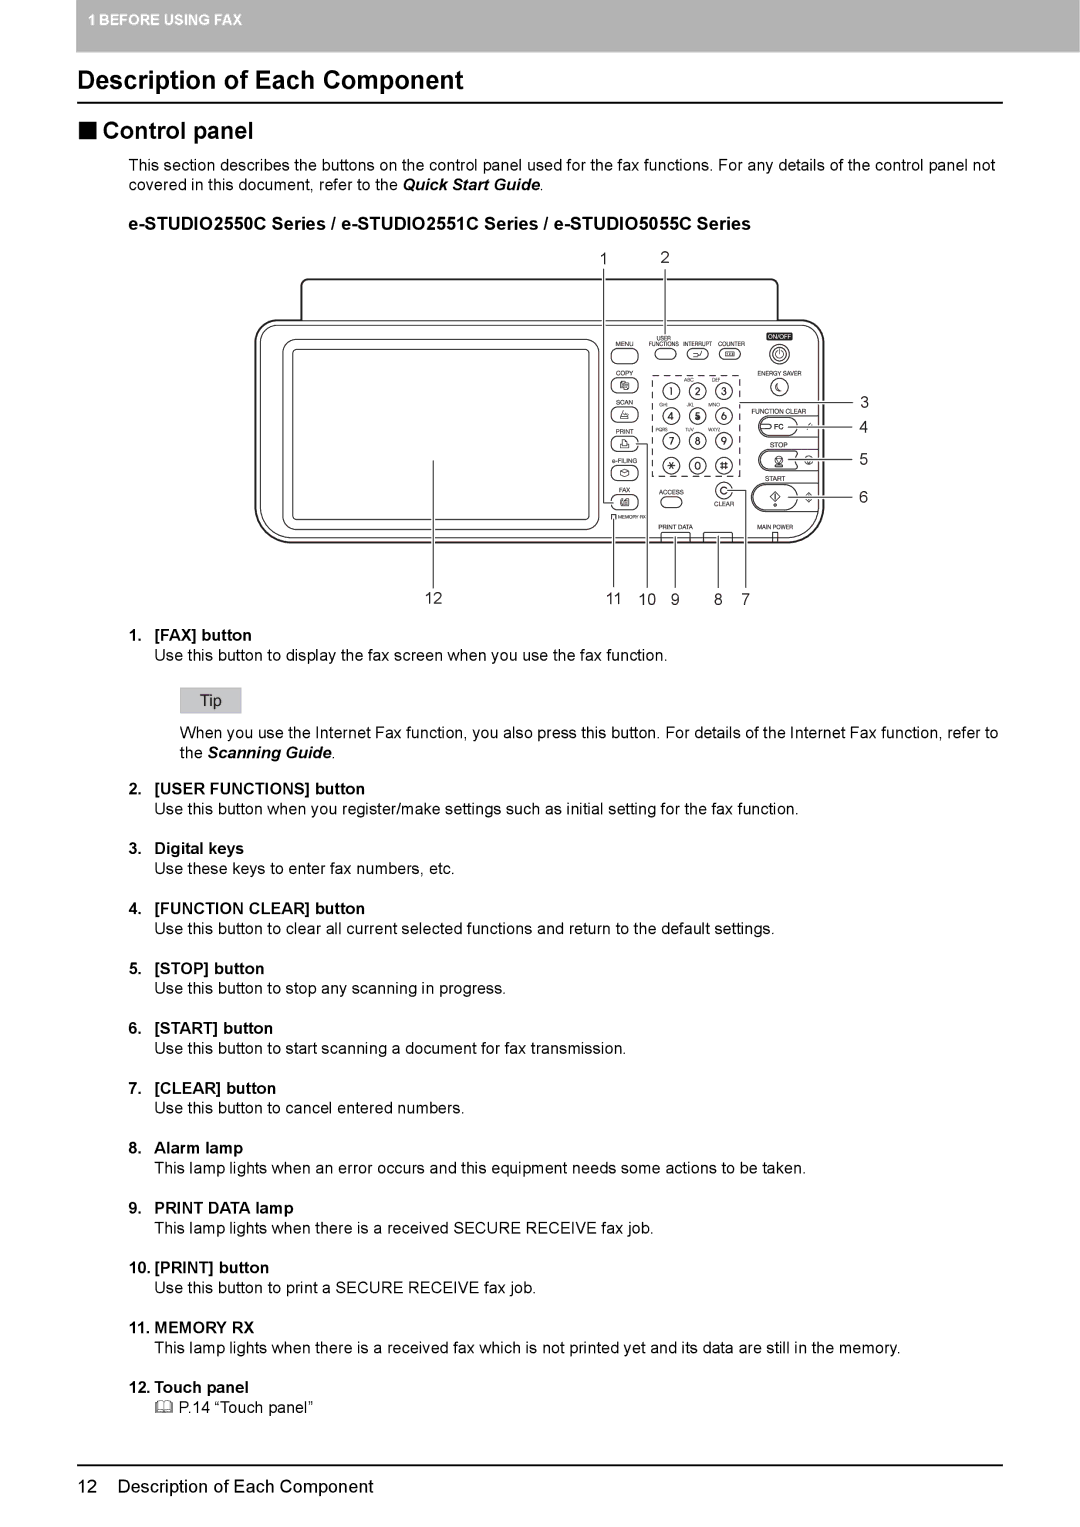
Control panel
Description of Each Component
Touch panel
Header area
Options
Connecting Cables
Line
Sending a Fax
Receiving a Fax
Place the originals
Basic procedures
Sending a Fax
Press the FAX button on the control panel
Press Send
Specify the recipient
To display the preview screen, press Preview
Sending the next original
Redial function
Batch transmission function
Handling an original Originals that can be sent
Original scanning range
Placing the originals on the original glass
Lower the Original Cover or Radf slowly
Placing the originals on the Radf
Precautions for using the Radf
Sending different width originals
Setting the transmission conditions
Making settings
Resolution
ECM
Changing the settings for each
Specifying the recipient
Direct entry with digital keys
Specifying the recipient in the address book
Confirm the fax number displayed on the fax screen
Press Known ID
Group entry
Searching by ID number
Then press OK
Searching for the recipients fax number
Press Search
Selecting the Ldap server
Confirming the recipients
Other transmissions On-hook transmission
Press Monitor
Replace the handset of the external telephone
Off-hook transmission
Displaying the preview
Press Preview on the fax menu
Sending a Fax
Auto reception
Reception mode
Receiving a Fax
Manual reception
Memory reception
Default setting for RX printing
Originals and paper Acceptable size of paper
Paper priority when there is no same size paper
North American format
Format
Page
Canceling the Transmission
Checking Communications
Press JOB Status Select FAX
Checking Communications
Checking reserved transmissions
Checking communication status log
List of the communication status is displayed
Registering recipients’ fax numbers to the address book
When using the original glass
Canceling the Transmission
Canceling the memory transmission
Press JOB Cancel
When using the Radf Reversing Automatic Document Feeder
Canceling direct transmissions
Canceling reserved transmissions
Press JOB STATUS, and then select the FAX tab
Advanced Functions
Mailbox Transmission
Transmitting 2-Sided Originals
Specify the recipient’s fax number
Priority Transmission
Polling Communication
Polling transmission
Press the Advanced tab, and then press Polling
Polling reception
Press the Start button on the control panel
Bulletin board mailbox
Mailbox Transmission
Confidential mailbox
Relay station mailbox
Registering/printing/deleting an original
Registering an original
Press the Start button on the control panel
Printing an original
Press the Advanced tab, and then press ITU Mailbox
Deleting an original
Sending/retrieving an original
Sending an original
Retrieving an original
Specify the recipients fax number
Creating/modifying/deleting a mailbox
Creating the confidential or bulletin board mailbox
Creating/modifying a relay station mailbox
MODIFY, and then OK
Mailbox Transmission
Deleting a mailbox
Confirmation screen for the deletion is displayed. Press YES
Chain Dial Communication
Press the Advanced tab, and then press Chain Dial Comm
Delayed Transmission Reservation
Canceling delayed transmission reservation
Recovery Transmission
Onramp Gateway
Studio
Specifying an E-mail address
Setting up the Smtp server
Offramp Gateway
Save as File
Select the file format in the File Format box
Printing Secure Receive fax jobs
Press the Print button on the control panel
Use the password set by your administrator for each line
Printing Lists & Reports Manually
Printing Lists & Reports Automatically Lists/Reports Samples
Printing Lists & Reports Manually
Journal transmission journal/reception journal
Reservation list
Press Journal
Mailbox/relay box report
Press the Advanced tab, and then press ITU Mailbox List
Printing Lists & Reports Automatically
Transmission Journal
Lists/Reports Samples
Transmission journal
Reception journal
Relay
Memory transmission report
Transmission report
Multi transmission report
Multi polling report
Relay TX orig. terminal report
Relay TX relay station report
Relay TX end terminal report
Relay station report
Mailbox reception report
Page
User Settings
Administrator Settings
User Settings
Fax settings
Original Mode
Set each setting item, and then press OK
Resolution
TX Type
Exposure
Preview Setting
Secure Receive Forced Setting
TTI
Administrator Settings
FAX menu is displayed Following section describes each menu
Press Terminal ID Set each setting option, and then press OK
Registering the terminal ID
Example of how sender information is printed on paper
Setting the initial setup
Press Initial Setup
Set each option, and then press OK
RX Mode
Monitor Volume / Completion Tone Volume
Dial Type / Dial Type LINE2
Discard
Setting RX printing
Press RX Print Set each option, and then press OK
Rotate Sort
Duplex Print
Reduction
Setting recovery transmission
TX / RX
Setting 2nd Line for FAX Unit
RX only Timer
RX only 24HR
Setting Secure Receive
Enable
Select Line 1 or Line
Setting a password for printing
Press NEW Password
Weekly Schedule
It can be set also on the TopAccess menu
Troubleshooting 112
Specifications of GD-1320/GD-1260 114
Error messages
Troubleshooting
Error codes
Reception troubles
Transmission/reception trouble
Transmission troubles
Specifications of GD-1320/GD-1260
LD, LG, LT, LT-R, ST, ST-R, Comp
Index
Numerics
114
Page
GD-1320/GD-1260