APPENDIX | 2 TROUBLESHOOTING | ||
|
|
| |
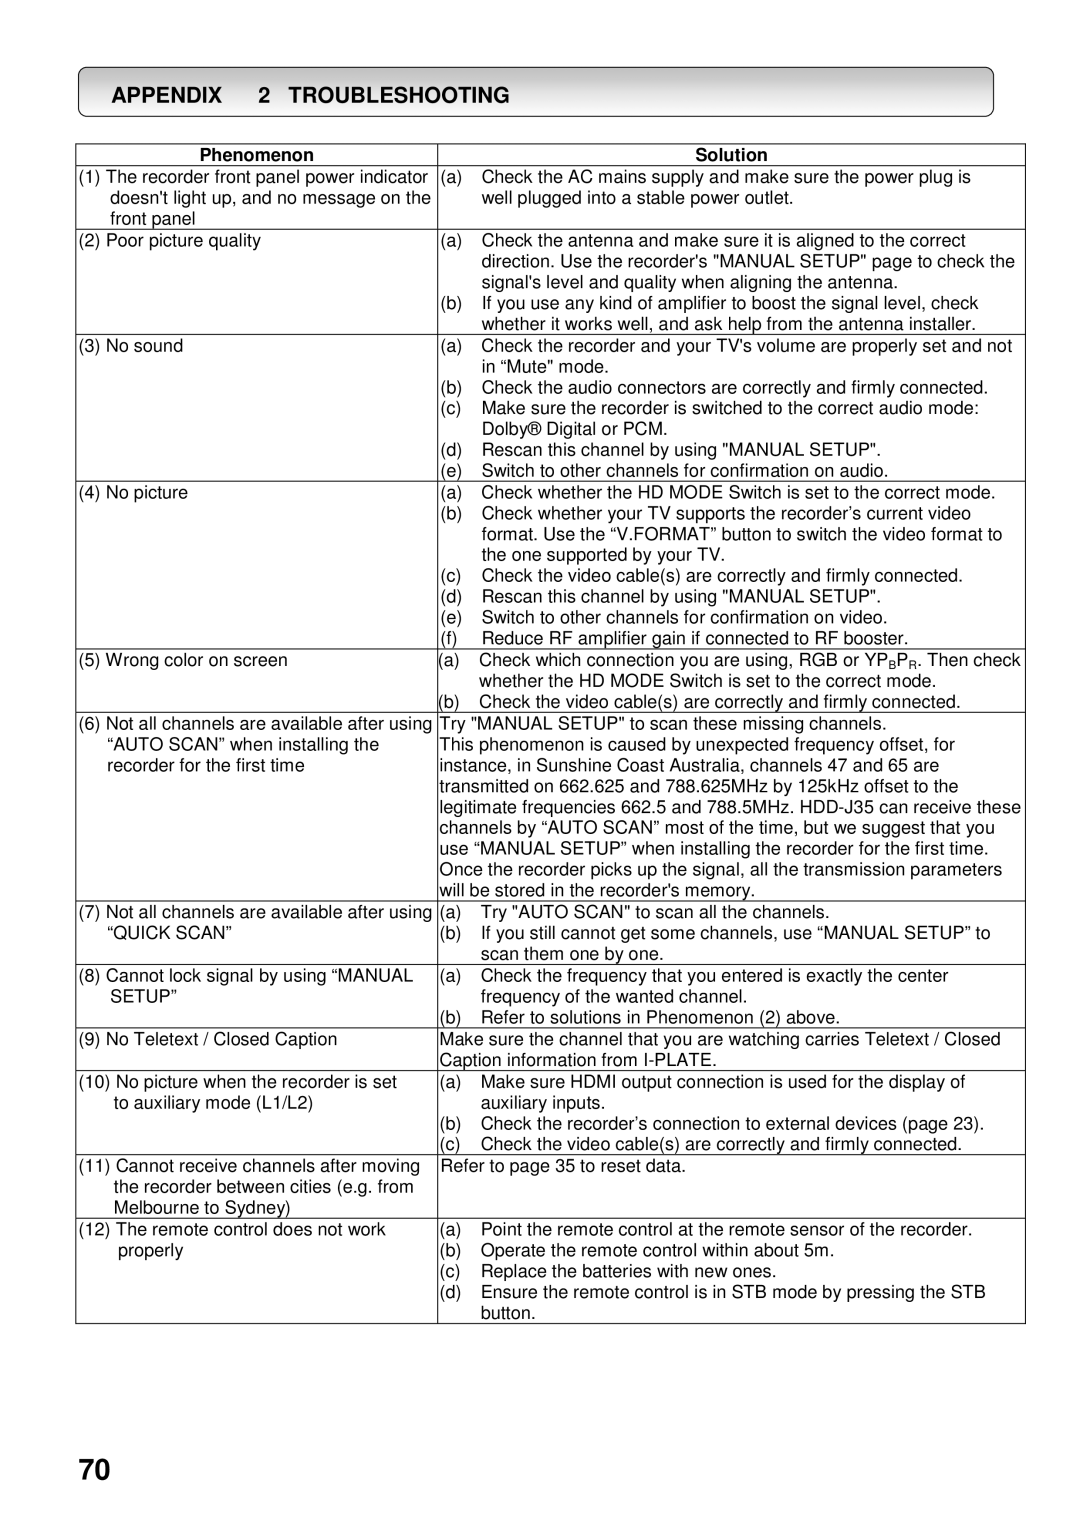
Phenomenon |
| Solution | |
(1) The recorder front panel power indicator | (a) | Check the AC mains supply and make sure the power plug is | |
doesn't light up, and no message on the |
| well plugged into a stable power outlet. | |
front panel |
|
|
|
(2) Poor picture quality | (a) | Check the antenna and make sure it is aligned to the correct | |
|
|
| direction. Use the recorder's "MANUAL SETUP" page to check the |
|
|
| signal's level and quality when aligning the antenna. |
|
| (b) | If you use any kind of amplifier to boost the signal level, check |
|
|
| whether it works well, and ask help from the antenna installer. |
(3) No sound |
| (a) | Check the recorder and your TV's volume are properly set and not |
|
|
| in “Mute" mode. |
|
| (b) | Check the audio connectors are correctly and firmly connected. |
|
| (c) | Make sure the recorder is switched to the correct audio mode: |
|
|
| Dolby® Digital or PCM. |
|
| (d) | Rescan this channel by using "MANUAL SETUP". |
|
| (e) | Switch to other channels for confirmation on audio. |
(4) No picture |
| (a) | Check whether the HD MODE Switch is set to the correct mode. |
|
| (b) | Check whether your TV supports the recorder’s current video |
|
|
| format. Use the “V.FORMAT” button to switch the video format to |
|
|
| the one supported by your TV. |
|
| (c) | Check the video cable(s) are correctly and firmly connected. |
|
| (d) | Rescan this channel by using "MANUAL SETUP". |
|
| (e) | Switch to other channels for confirmation on video. |
|
| (f) | Reduce RF amplifier gain if connected to RF booster. |
(5) Wrong color on screen | (a) | Check which connection you are using, RGB or YPBPR. Then check | |
|
|
| whether the HD MODE Switch is set to the correct mode. |
|
| (b) Check the video cable(s) are correctly and firmly connected. | |
(6) Not all channels are available after using | Try "MANUAL SETUP" to scan these missing channels. | ||
“AUTO SCAN” when installing the | This phenomenon is caused by unexpected frequency offset, for | ||
recorder for the first time | instance, in Sunshine Coast Australia, channels 47 and 65 are | ||
|
| transmitted on 662.625 and 788.625MHz by 125kHz offset to the | |
|
| legitimate frequencies 662.5 and 788.5MHz. | |
|
| channels by “AUTO SCAN” most of the time, but we suggest that you | |
|
| use “MANUAL SETUP” when installing the recorder for the first time. | |
|
| Once the recorder picks up the signal, all the transmission parameters | |
|
| will be stored in the recorder's memory. | |
(7) Not all channels are available after using | (a) | Try "AUTO SCAN" to scan all the channels. | |
“QUICK SCAN” |
| (b) | If you still cannot get some channels, use “MANUAL SETUP” to |
|
|
| scan them one by one. |
(8) Cannot lock signal by using “MANUAL | (a) | Check the frequency that you entered is exactly the center | |
SETUP” |
|
| frequency of the wanted channel. |
|
| (b) Refer to solutions in Phenomenon (2) above. | |
(9) No Teletext / Closed Caption | Make sure the channel that you are watching carries Teletext / Closed | ||
|
| Caption information from | |
(10) No picture when the recorder is set | (a) | Make sure HDMI output connection is used for the display of | |
to auxiliary mode (L1/L2) |
| auxiliary inputs. | |
|
| (b) Check the recorder’s connection to external devices (page 23). | |
|
| (c) Check the video cable(s) are correctly and firmly connected. | |
(11) Cannot receive channels after moving | Refer to page 35 to reset data. | ||
the recorder between cities (e.g. from |
|
| |
Melbourne to Sydney) |
|
| |
(12) The remote control does not work | (a) | Point the remote control at the remote sensor of the recorder. | |
properly |
| (b) | Operate the remote control within about 5m. |
|
| (c) Replace the batteries with new ones. | |
|
| (d) Ensure the remote control is in STB mode by pressing the STB | |
|
|
| button. |
70