QUICK MENU adjustments and settings (continued)
CONTENTS | 51 |
When selecting “Input source setting” in step 2. (Set the input source that can be selected by the INPUT button.)
Remote control |
| Control panel | |||
| (Main unit side) | ||||
|
|
|
| ||
|
|
|
| AUTO | AUTO |
INPUT |
| ON/STANDBY |
| KEYSTONE | SET |
| LASER |
|
|
|
|
KEYSTONE | AUTO | SET |
| VOL/ADJ. | |
|
| ||||
|
|
|
|
| |
|
| ||||
VOLUME/ADJUST | ENTER | EXIT | |||
|
|
|
| ||
|
|
|
| ||
|
|
| MENU | INPUT | |
MENU | ENTER EXIT |
| ON/STANDBY | ||
PIP | FREEZE |
|
|
| |
CALL | MUTE | RESIZE |
| TEMP LAMP ON | |
|
| ||||
|
|
|
| ||
BUSY FAN
ENTER
ENTER
ENTER
EXIT
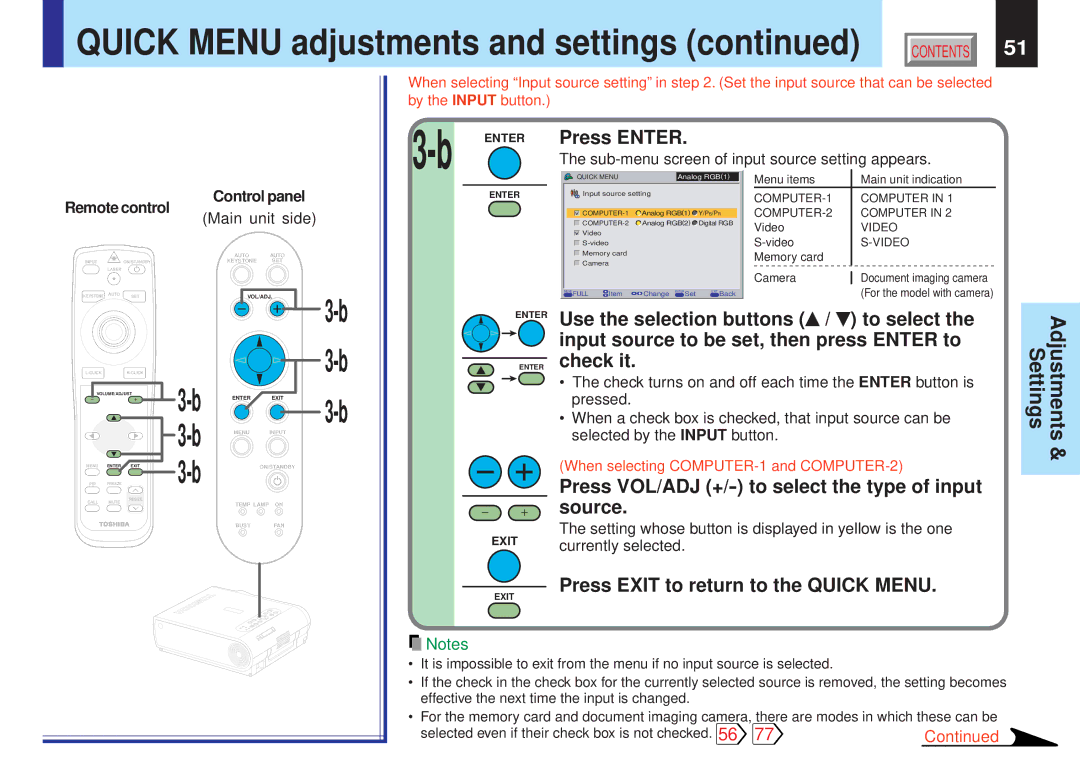
Press ENTER.
The sub-menu screen of input source setting appears.
| QUICK MENU |
| Analog RGB(1) | Menu items |
| Main unit indication | |
| Input source setting |
|
|
|
| ||
|
| COMPUTER IN 1 | |||||
|
|
|
|
| |||
| Analog RGB(1) Y/PB/PR |
| COMPUTER IN 2 | ||||
| Analog RGB(2) Digital RGB | Video |
| VIDEO | |||
| Video |
|
|
| |||
|
|
|
| ||||
|
|
|
| ||||
| Memory card |
|
| Memory card |
|
| |
| Camera |
|
|
|
| ||
|
|
|
| Camera |
| Document imaging camera | |
|
|
|
|
| |||
| MENU FULL Item | Change ENTER Set EXIT Back |
|
|
| (For the model with camera) | |
Use the selection buttons ( / | ) to select the | ||||||
input source to be set, then press ENTER to check it.
•The check turns on and off each time the ENTER button is pressed.
•When a check box is checked, that input source can be selected by the INPUT button.
(When selecting
Press VOL/ADJ (+/-) to select the type of input source.
The setting whose button is displayed in yellow is the one currently selected.
Settings | Adjustments |
| & |
|
|
Press EXIT to return to the QUICK MENU.
EXIT
![]() Notes
Notes
•It is impossible to exit from the menu if no input source is selected.
•If the check in the check box for the currently selected source is removed, the setting becomes effective the next time the input is changed.
•For the memory card and document imaging camera, there are modes in which these can be
selected even if their check box is not checked. 56 77 | Continued |