Adjusting The Media Support Disks
P4T/RP4T User Guide
Manual Introduction | RP4T Printers 35 | |
pg. | pg. | |
4 |
|
|
P4T Overview- pg. 5 | Maintenance pg. 36 | |
Printer Preparation pg. 7 | 38 | Troubleshooting pg. |
Connecting the Printer pg. 27 | 43 | Speci†cations pg. |
Radio Regulatory Information pg. 31 | Appendices pg. 46 | |
| Index pg. 52 | |
Media Core Size
Media supplied for the P4T Se- ries printers will have two pos- sible core sizes, depending on the media type. Journal media and most label media is supplied with a 0.75” [19.1 mm] diameter core to maximize the amount of media contained on a roll.
P4T printer media supports are set at the factory for 0.75” diam- eter media cores.
RP4T printers (equipped with the RFID encoder) are configured for media with 1.38” [35.05 mm] diameter cores since RFID me- dia cannot be wound around a small diameter core without both degrading its ability to feed properly past the printhead and causing possible damage to the embedded RFID circuitry.
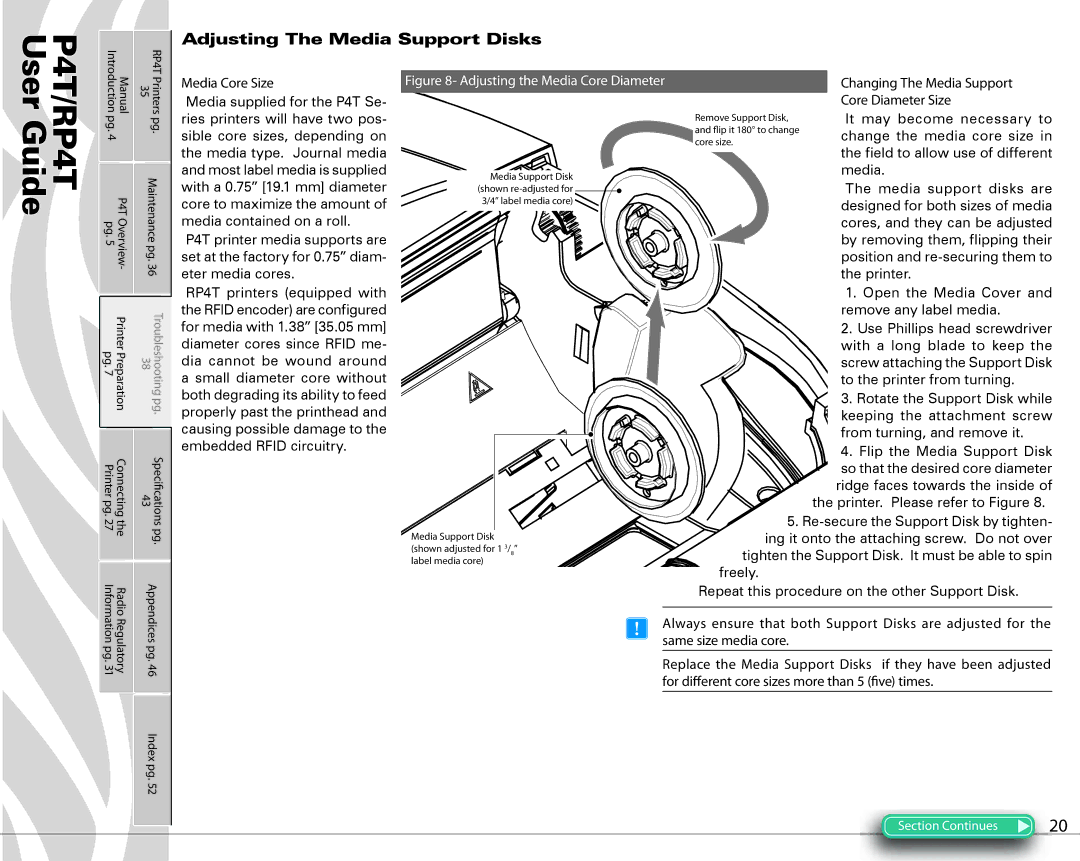
Figure 8- Adjusting the Media Core Diameter | Changing The Media Support | |
| Core Diameter Size | |
Remove Support Disk, | It may become necessary to | |
and «ip it 180° to change | change the media core size in | |
core size. | ||
the field to allow use of different | ||
| ||
Media Support Disk | media. | |
The media support disks are | ||
(shown | ||
3/4” label media core) | designed for both sizes of media | |
| ||
| cores, and they can be adjusted | |
| by removing them, flipping their | |
| position and | |
| the printer. | |
| 1. Open the Media Cover and | |
| remove any label media. | |
| 2. Use Phillips head screwdriver | |
| with a long blade to keep the | |
| screw attaching the Support Disk | |
| to the printer from turning. | |
| 3. Rotate the Support Disk while | |
| keeping the attachment screw | |
| from turning, and remove it. |
4. Flip the Media Support Disk ![]()
![]() so that the desired core diameter ridge faces towards the inside of the printer. Please refer to Figure 8.
so that the desired core diameter ridge faces towards the inside of the printer. Please refer to Figure 8.
|
| 5. |
Media Support Disk | 3/ ” | ing it onto the attaching screw. Do not over |
(shown adjusted for 1 | tighten the Support Disk. It must be able to spin | |
label media core) | 8 | |
|
| |
|
| freely. |
|
| Repeat this procedure on the other Support Disk. |
|
| Always ensure that both Support Disks are adjusted for the |
|
| same size media core. |
|
| Replace the Media Support Disks if they have been adjusted |
|
| for di¨erent core sizes more than 5 (†ve) times. |
Section Continues | 0 |