Prestige
Trademarks
Copyright
Disclaimer
Federal Communications Commission FCC Interference Statement
Information for Canadian Users
Declaration of Conformity
Version
P312 Broadband Security Gateway CE Doc
ZyXEL Limited Warranty
Customer Support
Information in Menu 24.2.1 -System Information
Table of Contents
LAN Port Filter Setup Chapter
Advanced Management
12-1
Firewall and Content Filters
13-1
17-1
21-1
Pptp
List of Figures
Menu 11.1 Remote Node Profile for Ethernet Encapsulation
List Of Figures Xvii
Xviii
List Of Figures Xix
Menu 21 Filter and Firewall Setup 14-1
List Of Figures Xxi
Page
List Of Tables
Xxiv
List of Tables Xxv
Page
Structure of this Manual
Preface
About Your Router
Related Documentation
Syntax Conventions
Part
Page
Prestige 312 Broadband Security Gateway
Features of The Prestige
Getting to Know Your Prestige
Dynamic DNS Support
Dhcp Dynamic Host Configuration Protocol
Time and Date Setting
IP Multicast
Applications for Prestige
Broadband Internet Access via Cable or xDSL Modem
Upgrade Prestige Firmware via LAN
Logging and Tracing
Secure Internet Access via DSL
Front Panel LEDs
Hardware Installation & Initial Setup
Front Panel LEDs and Back Panel Ports
LED functions
Prestige 312 Rear Panel and Connections
WAN
Additional Installation Requirements
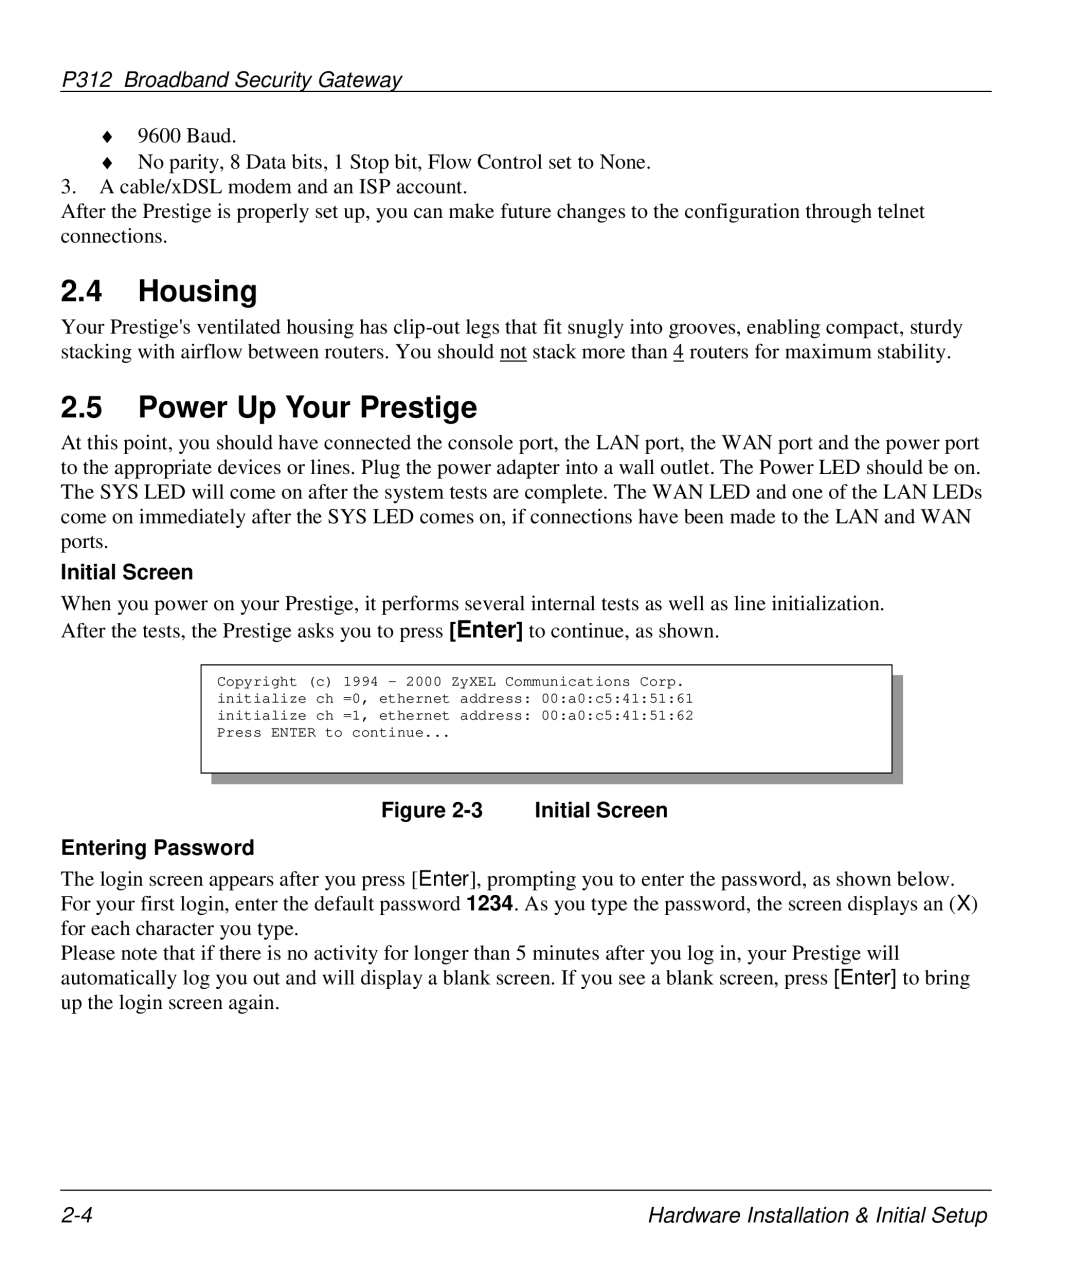
Entering Password
Housing
Power Up Your Prestige
Initial Screen
Operation Keystrokes Description
Main Menu Commands
Navigating the SMT Interface
Enter
Prestige 312 Main Menu
Main Menu
System Management Terminal Interface Summary
Main Menu Summary
Changing the System Password
Resetting the Prestige
Dyndns Wildcard
General Setup
Dynamic DNS
Configure Menu 1.1 Configure Dynamic DNS discussed next
Configuring Dynamic DNS
General Setup Menu Field
Field Description Example
Yes
WAN Setup
Configure Dynamic DNS Menu Fields
Me.ddns.org
LAN Setup
WAN Setup Menu Fields
LAN Port Filter Setup
10 Menu 3 LAN Setup
TCP/IP and Dhcp for LAN
Internet Access
Factory LAN Defaults
IP Address and Subnet Mask
RIP Setup
Private IP Addresses
IP Multicast
Dhcp Configuration
IP Pool Setup
DNS Server Address
Physical Network Partitioned Logical Networks
TCP/IP and Dhcp Ethernet Setup
IP Alias
Menu 3 LAN Setup 10/100 Mbps Ethernet
LAN Dhcp Setup Menu Fields
LAN TCP/IP Setup Menu Fields
IP Alias Setup Menu Fields
IP Alias Setup
Menu 3.2.1 IP Alias Setup
Only/Out Only
Internet Access Setup
Ethernet Encapsulation
RIP-1
Internet Access Setup Menu Fields
Pptp Encapsulation
New Fields in Menu 4 Pptp screen
Configuring the Pptp Client
PPPoE Encapsulation
Prestige automatically disconnects from the Pptp server
Internet Access Setup PPPoE
Basic Setup Complete
New Fields in Menu 4 PPPoE screen
Advanced Applications
Remote Node Setup
Remote Node Profile
Fields in Menu
Nailed-Up Connection
Fields in Menu 11.1 PPPoE Encapsulation Specific
Fields in Menu 11.1 Pptp Encapsulation
Editing TCP/IP Options with Ethernet Encapsulation
Remote Node Network Layer Options Menu Fields
Version
Editing TCP/IP Options with Pptp Encapsulation
Private
2B/RIP-2M and None Multicast
Remote Node Network Layer Options
Yes/No
Remote Node Filter
Editing TCP/IP Options with PPPoE Encapsulation
None/In Only/Out Only and None
Remote Node Filter Ethernet Encapsulation
IP Static Route Setup
Example of Static Routing Topology
IP Static Route Setup
Menu 12 IP Static Route Setup
IP Static Route Menu Fields
Field Description
Page
NAT Definitions
Network Address Translation NAT
Introduction
What NAT Does
How NAT works
NAT Mapping Types
Type IP Mapping SMT abbreviation
SUA Single User Account Versus NAT
NAT Mapping Types
Applying NAT in the SMT Menus
SMT Menus
NAT Application
Applying NAT for Internet Access
Address Mapping Sets and NAT Server Sets
Configuring NAT
Field Options Description Network Full Feature
Applying NAT in Menus 4
Menu 15.1 Address Mapping Sets
Field Description Options/Example
Server
Ordering Your Rules
Menu
Menu 15.1.1.1 configuring an individual rule
Editing an Individual Rule in a Set
NAT Server Sets
Multiple Servers behind NAT
Configuring a Server behind NAT
10 Multiple Servers Behind NAT
Examples
Internet Access Only
Services Port Number
13 Internet Access & NAT Example
NAT Example
Example 2 Internet Access with an Inside Server
Example 3 General Case
16 NAT Example
17 Example 3 Menu
19 Example 3 Final Menu
Example 4 -NAT Unfriendly Application Programs
21 NAT Example
22 Example 4- Menu 15.1.1.1 Address Mapping Rule
Advanced Management
Page
Filter Configuration
About Filtering
Filter Structure of the Prestige
Filter Rule Process
Rule Forward Drop
Configuring a Filter Set
Menu 21 Filter and Firewall Setup
NetBIOSWAN Filter Rules Summary
Abbreviations Description Display
Filter Rules Summary Menu
Abbreviations Used in the Filter Rules Summary Menu
Action Not Matched will be N/A Refers to Action Matched
Abbreviations Used If Filter Type Is IP
Configuring a Filter Rule
3 TCP/IP Filter Rule
Abbreviations Used If Filter Type Is GEN
Menu 21.1.1.1 TCP/IP Filter Rule
TCP/IP Filter Rule Menu Fields
Yes / No
None/Less/Greater
Equal/Not Equal
Action Matched
Following diagram illustrates the logic flow of an IP filter
10 Executing an IP Filter
Generic Filter Rule
11 Menu 21.4.1.1 Generic Filter Rule
Generic Filter Rule Menu Fields
Example Filter
12 Telnet Filter Example
13 Example Filter Menu
Filter Types and NAT
14 Example Filter Rules Summary Menu
LAN traffic
Applying a Filter and Factory Defaults
Firewall
Remote Node Filters
16 Filtering LAN Traffic
About Snmp
Snmp Configuration
Configuring Snmp
Snmp Configuration Menu Fields
Field Description Default
Menu 24 System Maintenance
System Information & Diagnosis
Menu 24.1 System Maintenance Status
System Status
LAN
System Maintenance Status Menu Fields
PPPoE Encapsulation
Dhcp
System Information and Console Port Speed
System Information
Console Port Speed
Fields in System Maintenance
Log and Trace
Viewing Error Log
Unix Syslog
CDR
System Maintenance Menu Syslog Parameters
Parameter Description
CDR
PPP log
Diagnostic
Call-Triggering Packet
10 Menu 24.4 System Maintenance Diagnostic
WAN Dhcp
Number Field Description
System Maintenance Menu Diagnostic
Internet Setup in Menu 4 Internet Access
Transferring Files
Filename conventions
Firmware Development
Backup Configuration
Command
Filename Conventions
Uploading the Router Firmware
Restore Configuration
Upload Firmware
Uploading Router Configuration File
Menu 24.7.1 System Maintenance Upload Router Firmware
Tftp File Transfer
Example Tftp Command
Third Party Tftp Clients -General fields
FTP File Transfer
Telnet into Menu
Using the FTP command from the DOS Prompt
Telnet into Menu 24.7.2 System Maintenance
Third Party FTP Clients -General fields
Page
Valid Commands
System Maintenance & Information
Command Interpreter Mode
Call Control
Call Control Support
Budget Management
Call History
Call History
Call History Fields
Time and Date Setting
How often does the Prestige update the time?
System Maintenance & Information 11-5
Remote Management Setup
Menu 24.11 Remote Management Control
Boot Commands
Option to Enter Debug Mode
Boot Module Commands
Single Administrator
Telnet Configuration and Capabilities
About Telnet Configuration
Telnet Under NAT
System Timeout
Telnet Under the Firewall
Firewall and Content Filters
Packet Filtering Firewalls
What is a Firewall
Types of Firewalls
Application-level Firewalls
Introduction to ZyXEL’s Firewall
Stateful Inspection firewalls
Denial of Service
Basics
Types of DoS attacks
Common IP Ports
SYN Flood
Stateful Inspection
Smurf Attack
Stateful Inspection Process
Stateful Inspection
Stateful Inspection & the Prestige
TCP Security
Upper Layer Protocols
Guidelines For Enhancing Security With Your Firewall
13.4.4 UDP/ICMP Security
Security In General
What Is a Firewall? 13-11
Page
Introducing the Prestige Firewall
SMT Main Menu
Land
View Firewall Log
Attack Types
IP Spoofing
Legal NetBIOS Commands
Icmp Commands That Trigger Alerts
Illegal Commands NetBIOS and Smtp
Legal Smtp Commands
Traceroute
Teardrop
Big Picture Filtering, Firewall and NAT
Packet Filtering Vs Firewall
Packet Filtering
Firewall
When To Use Filtering
When To Use The Firewall
Page
Introducing the Prestige Web Configurator
Web Configurator Login and Welcome Screens
Prestige Web Configurator Welcome Screen
Enabling the Firewall
Mail
What are Alerts?
What are Logs?
Mail Screen
Mail
Example E-Mail Log
Smtp Error Messages
Smtp Error Messages
Attack Alert
Mail Log
TCP Maximum Incomplete And Blocking Time
Threshold Values
Half-Open Sessions
Attack Alert
Field Description Default Values
Existing half-open sessions
When TCP Maximum Incomplete is
Do not set Maximum Incomplete High to
Page
Rules Overview
Rule Checklist
Creating Custom Rules
Rule Logic Overview
Key Fields For Configuring Rules
Security Ramifications
WAN to LAN Rules
Connection Direction
LAN to WAN Rules
Services Supported
WAN to LAN Traffic
Services Supported
Service Description
Rule Summary
Firewall Rules Summary First Screen
Block
Match
Creating/Editing Firewall Rules
Field Description Option
Creating/Editing a Firewall Rule
Source & Destination Addresses
Range Address
Adding/Editing Source & Destination Addresses
Single Address
Subnet Address
Timeout
Factors Influencing Choices for Timeout Values
Timeout Screen
Hour
Timeout Menu
Field Description Default Value
Custom Ports
Custom Ports
Creating/Editing a Custom Port
Creating/Editing a Custom Port
Single
Range
Log Screen
Logs
Log Screen
Jan 1
Vulnerability, NetBIOS, smtp illegal
Command, traceroute, teardrop, or syn
Src IP, dest port, src port and protocol
Logs 18-3
Page
Example Firewall Rules
Activate The Firewall
Example 1 E-Mail Screen
Example 1 Configuring a Rule
Example Firewall Rules 19-5
Example 2 Small Office With Mail, FTP and Web Servers
Example 1 Rule Summary Screen
Send Alerts When Attacked
Configuring a POP Custom Port
Example 2 Local Network Rule 1 Configuration
Example 2 Local Network Rule Summary
10 Example 2 Internet to Local Network Rule Summary
11 Custom Port for Syslog
12 Syslog Rule Configuration
13 Example 3 Rule Summary
ActiveX
Content Filtering
Restrict Web Features
Java
Cookies
Content Filtering Using the Web Configurator
Blocking URLs
Web Proxy
Block Web URLs
Content Filtering Fields
Field Description Restrict Web Features
Troubleshooting, Appendices, Glossary and Index
Page
Troubleshooting the Start-Up of your Prestige
Troubleshooting
Problems Starting Up the Prestige
Problem Corrective Action
Troubleshooting the LAN Interface
Problems with the LAN Interface
Problems with the WAN interface
Troubleshooting the WAN interface
Troubleshooting Internet Access
Problems with Internet Access
Problems with the Firewall
Page
PPPoE in Action
Diagram 1 Single-PC per Modem Hardware Configuration
Appendix a PPPoE
Benefits of PPPoE
Prestige as a PPPoE Client
Diagram 2 Prestige as a PPPoE Client
How PPPoE Works
Pptp and the Prestige
What is PPTP?
Appendix B
Pptp Protocol Overview
Control & PPP connections
IRD + OTD +
Appendix C Hardware Specifications
Mtbf
Appendix D Important Safety Instructions
Appendix E Firewall CLI Commands
Function CLI Syntax
Sets
Function CLI Syntax Description
P312 Broadband Security Gateway
Delete
Appendix F Power Adapter Specs
AC Power Adapter Specifications
P312 Broadband Security Gateway
CDR Chap
Glossary of Terms
ARP
CSU/DSU DCE
DTE
Dram DSL
Dslam
EMI
FTP
FAQ
FCC
Hdlc
MAC
Ipcp PPP IPX
IRC ISP
NIC
NAT
Ndis
PAP
Pstn
POP
Pots PPP
RIP
PVC
RFC
SAP
SUA TCP
Spam
STP
Tftp
VPN
Page
Index
Ddns
Encapsulation
2-11, 2-12, 3-4
13-6
15-1 ZyNOS