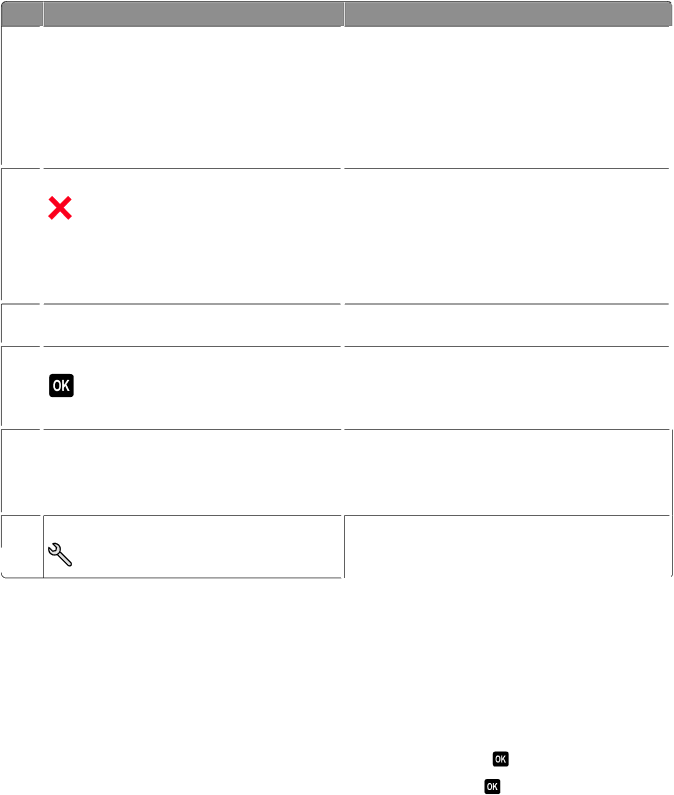
Dell P513w manual Changing the Power Saver timeout, Sided/Eco-Mode

Page 14

8

9

10

11

12

13

Use

2-Sided/Eco-Mode

Cancel

Arrow buttons

Select

Display

Note: The display is turned off in Power Saver mode.

Setup

To

Activate 2-Sided to:

Print on both sides of the paper (duplex). Activate Eco-Mode to:

Print on both sides of the paper (duplex).

Change to Power Saver mode after the printer is left idle for 10 minutes.

Set screen brightness to low.

Cancel a print, copy, or scan job in progress.

Exit from a menu level of the Copy, Scan, Photo, or File Print menu to the top level of a menu.

Exit from a menu level of the Setup menu to the top level of the previous mode.

Clear current settings or error messages, and return to default settings.

Choose a menu or submenu item that appears on the display.

Select menu options.

Save settings.

Feed or eject paper. Press and hold for 3 seconds to feed or eject paper from the printer.

View:

Printer status

Messages

Menus

Access the setup menu and change printer settings.

Note:The Copy, Scan, and Photo button lights are off when this button is selected.

Changing the Power Saver timeout

The Power Saver timeout is the time it takes for the printer to switch to Power Saver mode when the printer is left idle. The Power Saver feature optimizes energy efficiency by reducing the printer power consumption (as much as 28 percent on some printer models) compared to the default printer settings. To save the most energy, select the lowest Power Saver timeout.

1From the printer control panel, press .

2

Press the up or down arrow button to scroll to Device Setup, and then press .

3

Press the up or down arrow button to scroll to Power Saver, and then press .

4Press the up or down arrow button to select a Power Saver timeout, and then press .

Using the printer control panel buttons and menus

14

Image 14
Contents Dell P513w Users Guide MayContents Copying ScanningTroubleshooting 104Safety information Minimizing your printers environmental impact About your printerThank you for choosing this printer Conserving energyRecycling Finding information about the printerConserving ink Product Information Guide Understanding the parts of the printer UseAbout your printer Replacing ink cartridges Ordering and replacing suppliesOrdering ink cartridges Recycling Dell products Select Printer HomeUsing the printer control panel buttons and menus Using the printer control panelChanging the Power Saver timeout Sided/Eco-ModeChanging temporary settings into new default settings Saving paper and energy with Eco-ModeTo disable the settings timeout feature Resetting to factory settingsTo change the temporary settings into new default settings Using the printer control panel menusInitial Setup Complete appears on the display Software installed during printer installation Using the printer softwareUsing the Windows printer software Minimum system requirementsUsing the printer software Uninstalling the printer software Reinstalling the printer softwareChecking for software updates Installing the printer softwareLoading paper and original documents Loading paperSheets of heavyweight matte paper Saving paper default settings Loading original documents on the scanner glass Printing basic documents PrintingTips for printing Printing a documentPrinting pages in reverse order Printing multiple pages on one sheetPrinting envelopes If the printer is using a USB connectionPrinting specialty documents Tips on loading label sheets Printing labelsPrinting on custom-size paper Using a memory card or flash drive with the printer Working with photosPrinting photos using the printer control panel Supported memory cards and file typesEditing photos using the printer control panel You canPrinting photos from a PictBridge-enabled digital camera Printing photos from a memory device using the proof sheet Printing photos from a digital camera using Dpof Bluetooth Dongle Connected appears on the display Setting the Bluetooth security level Printing from a Bluetooth-enabled devicePrinting on both sides of the paper duplexing Printing on both sides of the paper duplexing automaticallyPrinting on both sides of the paper duplexing manually Pausing print jobs Setting your printer as the default printerChanging the printing mode Changing the printing mode for a single print jobCanceling print jobs Resuming print jobsMaking copies CopyingTips for copying Copying a two-sided document Copying photosCopying an ID card Making a copy lighter or darker Adjusting copy qualityEnlarging or reducing images Collating copies using the printer control panel Repeating an image on oneMaking a duplex copy automatically Copying multiple pages on one sheetMaking a duplex copy Making a duplex copy manuallyCanceling copy jobs Scanning to a local or network computer ScanningTips for scanning Scanning photos into an editing application Using the printer control panelScanning to a flash drive or memory card Using the printer software Scanning documents into an editing applicationHow can I improve the quality of a scan? Scanning directly to e-mail using the printer softwareScanning FAQ What is an application list, and how do I update it? Canceling scan jobsWhy am I being asked for a PIN? How do I scan in black and white?Networking Installing the printer on a wireless networkWireless network compatibility Supported network security optionsPrinting a network setup Interpreting the colors of the Wi-Fi indicator light Installing the printer on a wireless networkInstalling the printer on other computers Assigning a static IP address Special wireless installation instructionsAdding the printer to your wireless network Before you beginCreating an ad hoc wireless network Advanced wireless setupChanging wireless settings after installation Windows VistaWindows XP Adding a printer to an existing ad hoc wireless network WindowsUsing the printer locally USB Switching between USB and wireless connections Windows onlyUsing the printer wirelessly Sharing a printer in a Windows environment Prepare the computers to share the printerWhere do I find my WEP key or WPA passphrase? Networking FAQWhat is Wi-Fi Protected Setup? What is an SSID?Wireless network examples What is a network?How are home networks configured? Scenario 2 Wireless network with Internet access Why do I need an installation cable? How do I attach the installation cable?Characteristics How are infrastructure and ad hoc networks different?Remove Obstacles Between the Access Point and the Printer Finding the signal strengthHow can I improve wireless signal strength? Arrange the Network to Reduce Signal Absorption Remove Sources of InterferenceWhat is a MAC address? How do I find the MAC address?How to locate a printer IP address What is an IP address?What is TCP/IP? How do I locate IP addresses?What is a key index? How are IP addresses assigned?Checking ink levels Maintaining the printerMaintaining ink cartridges Aligning the printheadCleaning the exterior of the printer Cleaning the printhead nozzlesCleaning the scanner glass If Troubleshooting does not solve your problem TroubleshootingUsing the Service Center to solve printer problems Setup troubleshootingIncorrect language appears on the display Printhead errorsChange the Language Using the Printer Menus Remove and Reinsert the Printhead Software did not install Reconnect the Printer Power SupplyMake Sure the INK Cartridges are Inserted Correctly Remove and Reinstall the Printer SoftwarePrint job does not print or is missing pages Printer is busy or does not respond Make Sure the Printer is not in Power Saver ModePrinter is printing blank pages Cannot delete documents from the print queueCannot print through USB Jams and misfeeds troubleshootingMake Sure the USB Port is Enabled in Windows Paper jam in the printerPaper jam in the paper support Paper jam in the duplex unitCheck Paper Loading Paper or specialty media misfeedsCheck Paper Condition Streaks or lines on printed image Print troubleshootingPoor quality at the edges Print speed is slow Copy and scan troubleshootingComputer slows down when printing Maximize Computer Processing SpeedPoor copy or scanned image quality Copier or scanner does not respondScanner unit does not close Partial copies or scans of documents or photosScan was not successful Memory card troubleshootingMemory card troubleshooting checklist Scanning takes too long or freezes the computerReinsert the Memory Card Nothing happens when a memory card is insertedCannot print documents from a memory card or flash drive Check the Network ConnectionWireless troubleshooting Wireless troubleshooting checklistTurn the Wireless Access Point OFF and then Back on Resetting the wireless settings to factory defaultsCannot print over wireless network Disconnect from VPN SessionCheck the Wireless Signal Quality Make Sure Demo Mode is Turned OFFMove Your Access Point Away from Other Electronic Devices Check Your WEP KEY or WPA PassphraseCheck Your Advanced Security Settings Continue button is unavailable Cannot print and there is a firewall on the computer Wi-Fi indicator light is not litCheck Power Select the Wireless Printer Allow the Wireless Installation to CompleteEnable the Printer Select the Wireless PortCheck Security Keys Wi-Fi indicator light is still orangeCheck Network Name Check MAC Address Make Sure the Access Point is onMove Your Access Point to Minimize Interference Ping the Access Point to Make Sure the Network is Working Configure the Printer for Wireless Access Again Make Sure Your Computer can Communicate with the PrinterWireless print server not installed How to locate a printer IP addressMake Sure the Wireless Port is Selected 100Resolving intermittent wireless communications issues 101102 Change the Channel the Wireless Router UsesConfigure the Wireless Router with a Unique Ssid Eliminate Sources of Interference103 Check for Known Issues with the Wireless RouterCheck for Wireless Adapter Updates Change ALL Network Devices to the Same TypeIndex 104105 106 Dpof107 Ssid108 VPN