Ricoh FAX1700L manual Replacing the Photoconductor

Page 60

Replacing the Photoconductor

MAINTAINING YOUR MACHINE

Replacing the Photoconductor

The photoconductor receives the print image before it is transferred to paper. To ensure optimal quality, replace it every 20,000 copies.

If the following display appears, it is time to replaceSRPLACEEtheTDOCphotoconductor.OPCORDIALNOm. .

To check how many sheets you’ve printed, please refer the section titled "Counters" (See page 37.)

Caution: Do not expose the photoconductor drum to light for an extended period.

Caution: Do not open the cover or touch the PC drum : it cannot be re- paired. Any scratch on the drum would be reproduced on prints.

Caution: Do not touch any parts other than those specified in the proce- dure.

Caution: Though organic photoconductor drums are safe for the environ- ment, dispose of used drums according to local regulations.

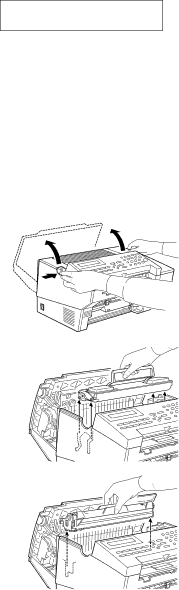
1Squeeze in the release button on the left of the machine and open

the cover fully back.

2 Lift out the toner cassette.

3Remove the old photoconductor.

51

Image 60
Contents Ricoh Paper Feed Unit Type Operator Safety Safety Important Safety InstructionsWhen to Call Your Service Representative SafetyPower and Grounding Cold Weather Power-upSymbols & Conventions Used In This Manual ThunderstormsOzone Machine Layout Operation panelPart Names TrayFaxing Recommended Types of Document Faxing Memory Transmission and Immediate Transmission Move the original Transmit Tip 5551234 Receiving Calls & Fax MessagesFaxes/Phone Calls Priorityfax Page SET-MessageDOC.appearsORDIALhere- no Faxing a Page With Very Fine Detail Optional Features for Transmission NDLATER?PAGES? YesTTIPRINT? Redialing RADY100%1000 Storing & Editing Fax Numbers Functions 31 Quick Dial Function 31 Yes Speed Dial Function 3 2 YesN01 NewyorkofficeStoring & Editing a Group of Fax Numbers Function Press Function, 3, 3, YesKPAD/N CLEA? Erasing GroupsProgramming the Group Key Press Function 3 1 and YesPress Function Transmit Programming the Dial Option KeyOn Hook Dial or Handset Mode Chain DialingFILENO.KPAD/jk Erasing a Stored Message Before It Is SentFunctions 21 Printing a Stored Message Function Press Function, 5, 1, and YesPollingrecvstart Polling Reception FunctionTalking Before Sending a FaxOn Hook Dial Sending a Fax using the Handset Other Features Verifying Communications, Errors, Counters, etcTransmission Result Report Switch 03, bit Result Column Printjournalstart Journal FunctionSelectlists GROUPLIST?Rejecting Messages From Certain Senders Counters FunctionEmpty/Not Not emptyExcept from ABC ABC Press Yes and FunctionON/OFF Saving Energy Which saving energy mode is best for you? Saving Energy with the Night TimerNghttimer TIMER#1TUEKPAD/YON/OFF NEXTkTonal Signals Printing the Sender’s IdentificationCopylt Copying Maintaining Your Machine Loading Paper in the Main Paper TrayReplacing Toner Cassette Maintaining Your Machine Replacing the Photoconductor PLACEOPC? STDOC.ORDIALNODaily Maintenance If an Indicator Lights Up on the Operation Panel Other Possible ProblemsYou want to remove the document in the feeder Clearing Document Jams Clearing Copy Jams Communication problems If Messages You Receive Don’t Fit on Your PaperPaper size in the cassette Maximum reducible length Problem Required Action Operational DifficultiesPBX Reception Telephoning Displayed Error Messages No File ExistsCalling the Service Station SYSTEMPARA.TXSTARTFunction 6 2 2 2 2 7 2 and Yes Start Access Code for Functions 61 to User Parameters functionExample Settings Technical ReferenceReportmemorytx SubstitutereceptionPrintdensity Changing your machine’s default settings Adjusting the Volume of Various Features Function TRACounters Function 94, see Selecting the Display’s LanguageEntering Characters Document & Paper Specifications Documents Using the Auto Document FeederPaper Requirements Capabilities Job currently in progressSpecifications Electrical Specifications Base machinePower consumption Fax SpecificationsGeneral Specifications Optional Lower Paper CassetteInstallation Machine EnvironmentInstallation Installing the Photoconductor and Toner Cassette Installing the Main Paper Tray Attaching the Document TrayInstalling the Auto Document Table Installing the Copy TrayInstalling the Optional Paper Feed Unit Papersize LEGAL8.5X14INCHSetting the Paper Installing the Optional Memory CardConnecting the Machine Connecting to the Phone LinesConnecting to the Phone Lines Connecting the Power Important Points about Power ConnectionInitial Settings & Adjustments NEXTk Format of the number is normally as followsSetcsi KPAD/NInitialmode FRI ONkOFF NEXTkPage Class 1 Laser Product Accordance with IEC Connection to the Pstn or a Pabx Extension Page Option key Faxing at a GlanceHints Declaration of Conformity Supplies