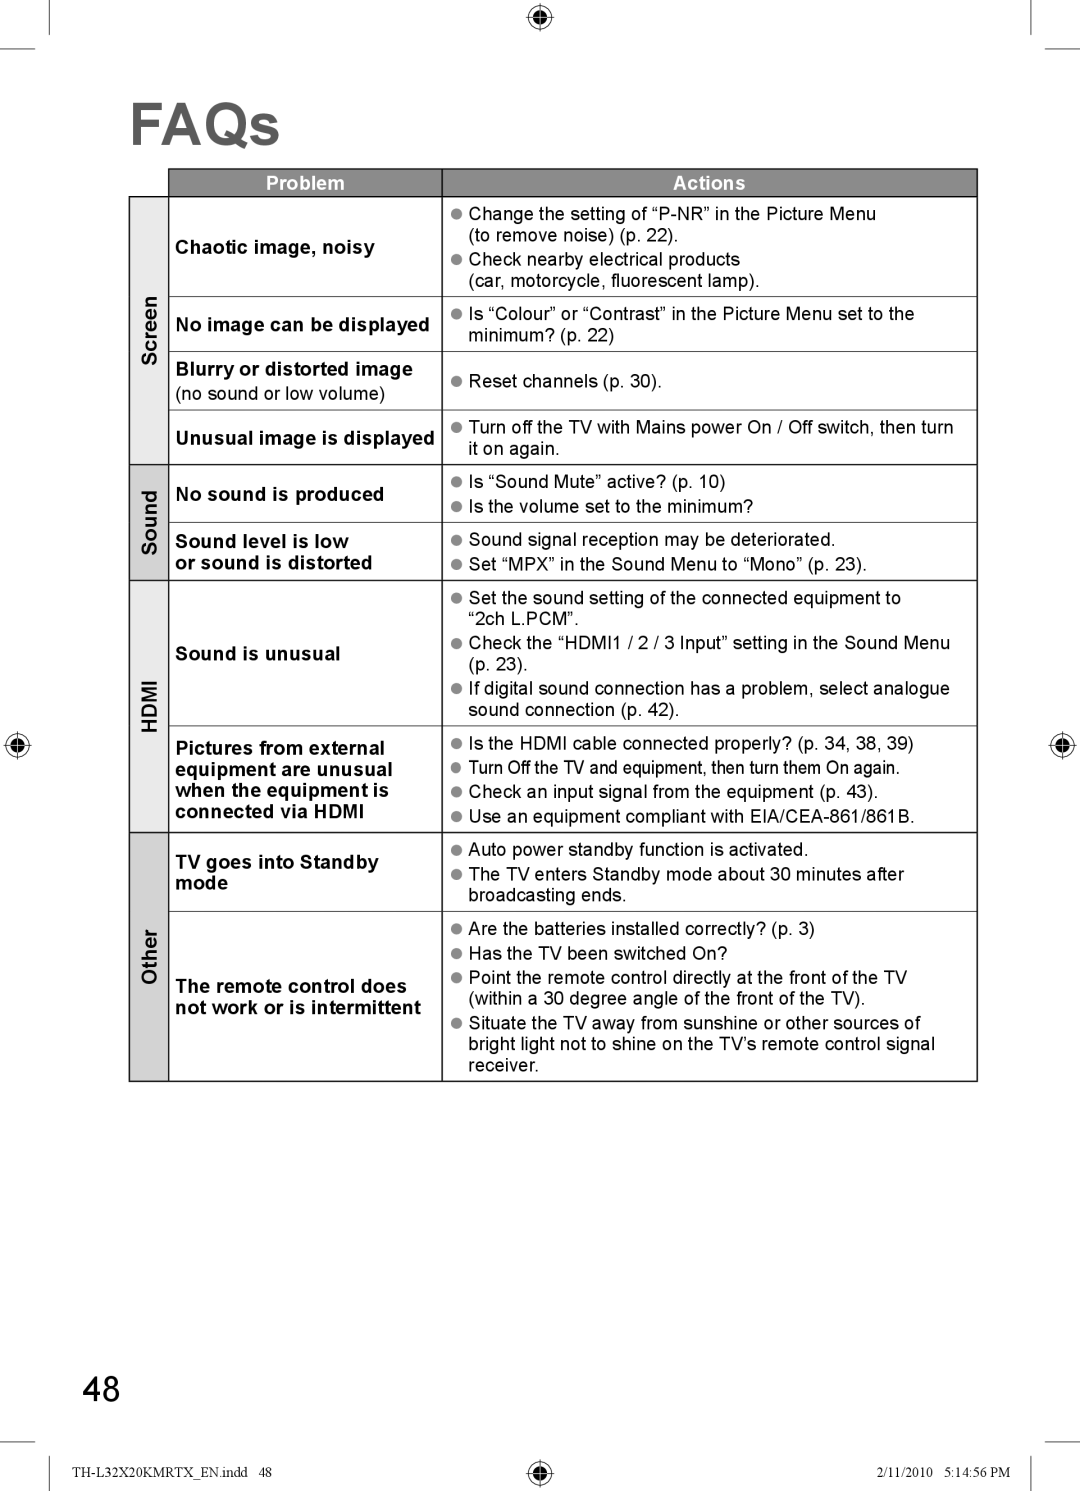
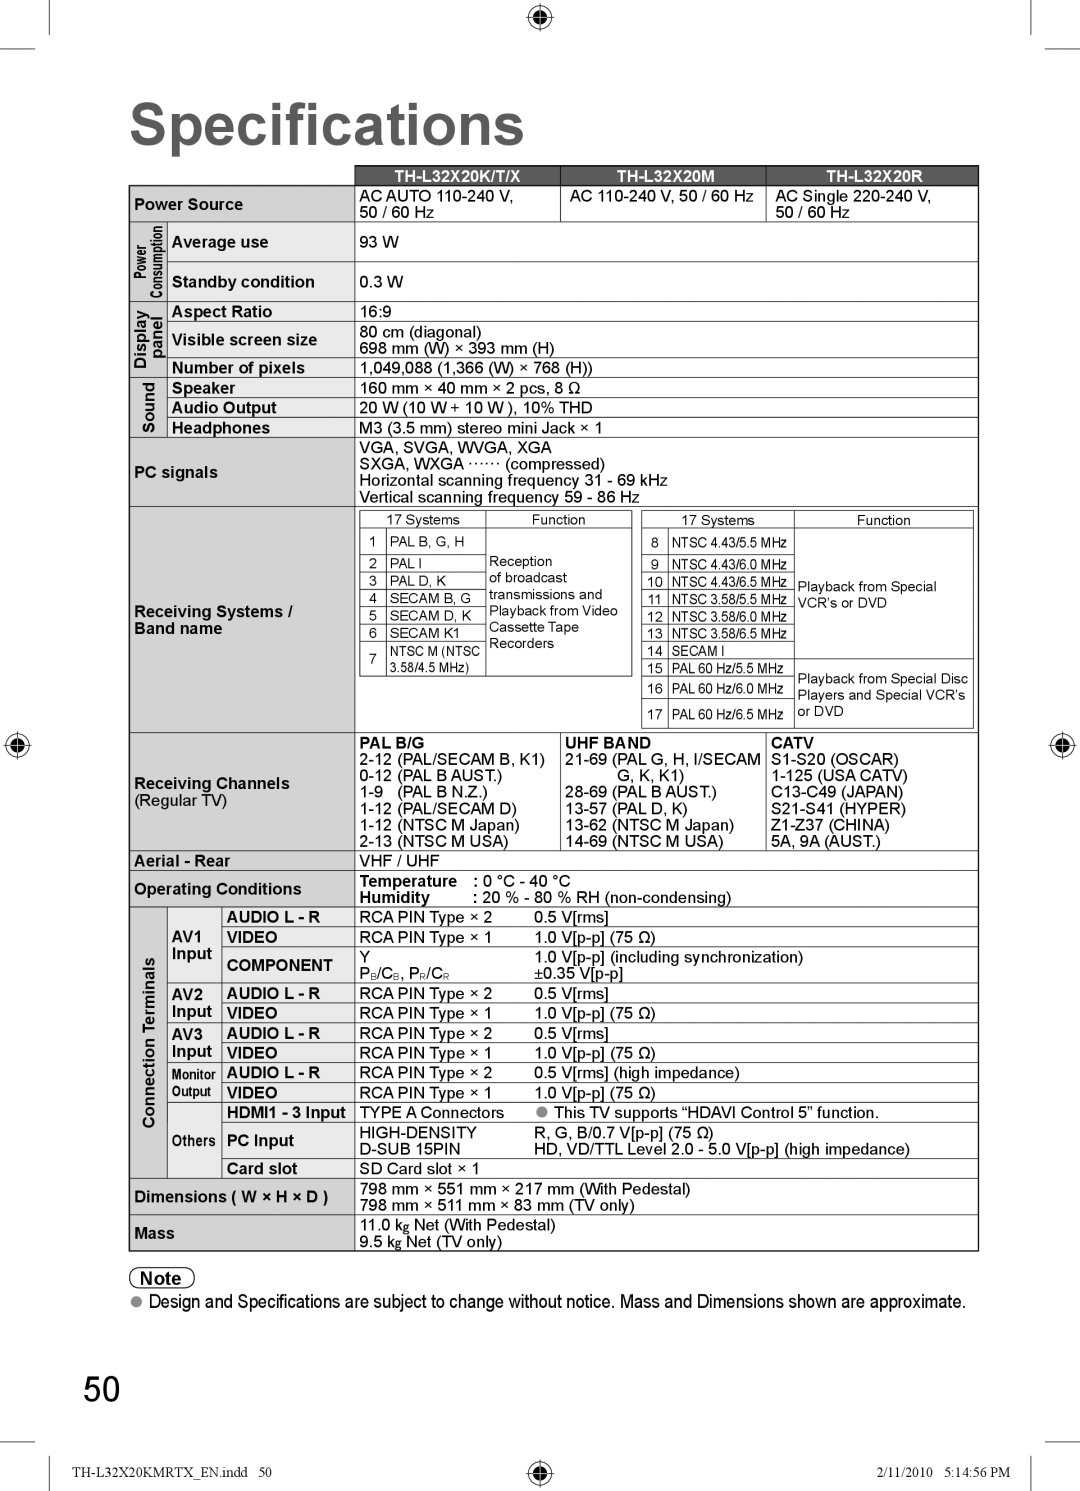
Panasonic TH-L32X20T Chaotic image, noisy, No image can be displayed, Blurry or distorted image

Page 48

FAQs

Screen

Sound

HDMI

Other

Problem

Actions


Change the setting of “P-NR” in the Picture Menu

Chaotic image, noisy

(to remove noise) (p. 22).

Check nearby electrical products


(car, motorcycle, fluorescent lamp).


No image can be displayed

Is “Colour” or “Contrast” in the Picture Menu set to the


minimum? (p. 22)

Blurry or distorted image

Reset channels (p. 30).

(no sound or low volume)


Unusual image is displayed

Turn off the TV with Mains power On / Off switch, then turn


it on again.

No sound is produced

Is “Sound Mute” active? (p. 10)

Is the volume set to the minimum?


Sound level is low

Sound signal reception may be deteriorated.

or sound is distorted

Set “MPX” in the Sound Menu to “Mono” (p. 23).


Set the sound setting of the connected equipment to


“2ch L.PCM”.

Sound is unusual

Check the “HDMI1 / 2 / 3 Input” setting in the Sound Menu

(p. 23).


If digital sound connection has a problem, select analogue


sound connection (p. 42).

Pictures from external

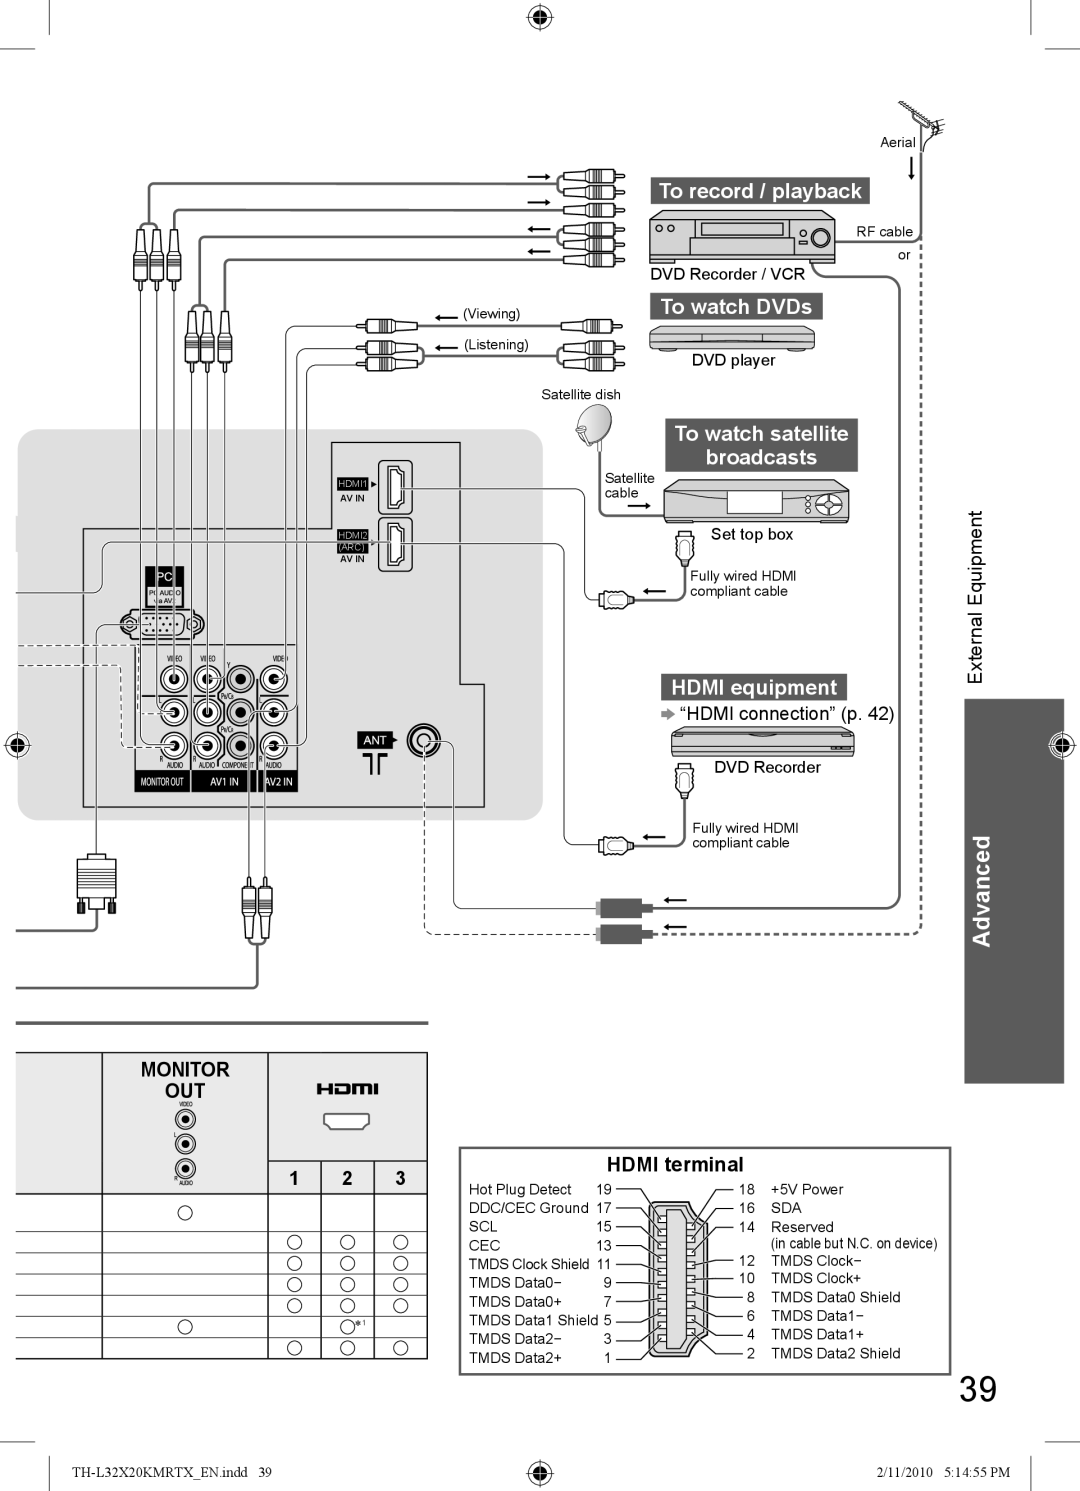
Is the HDMI cable connected properly? (p. 34, 38, 39)

equipment are unusual

Turn Off the TV and equipment, then turn them On again.

when the equipment is

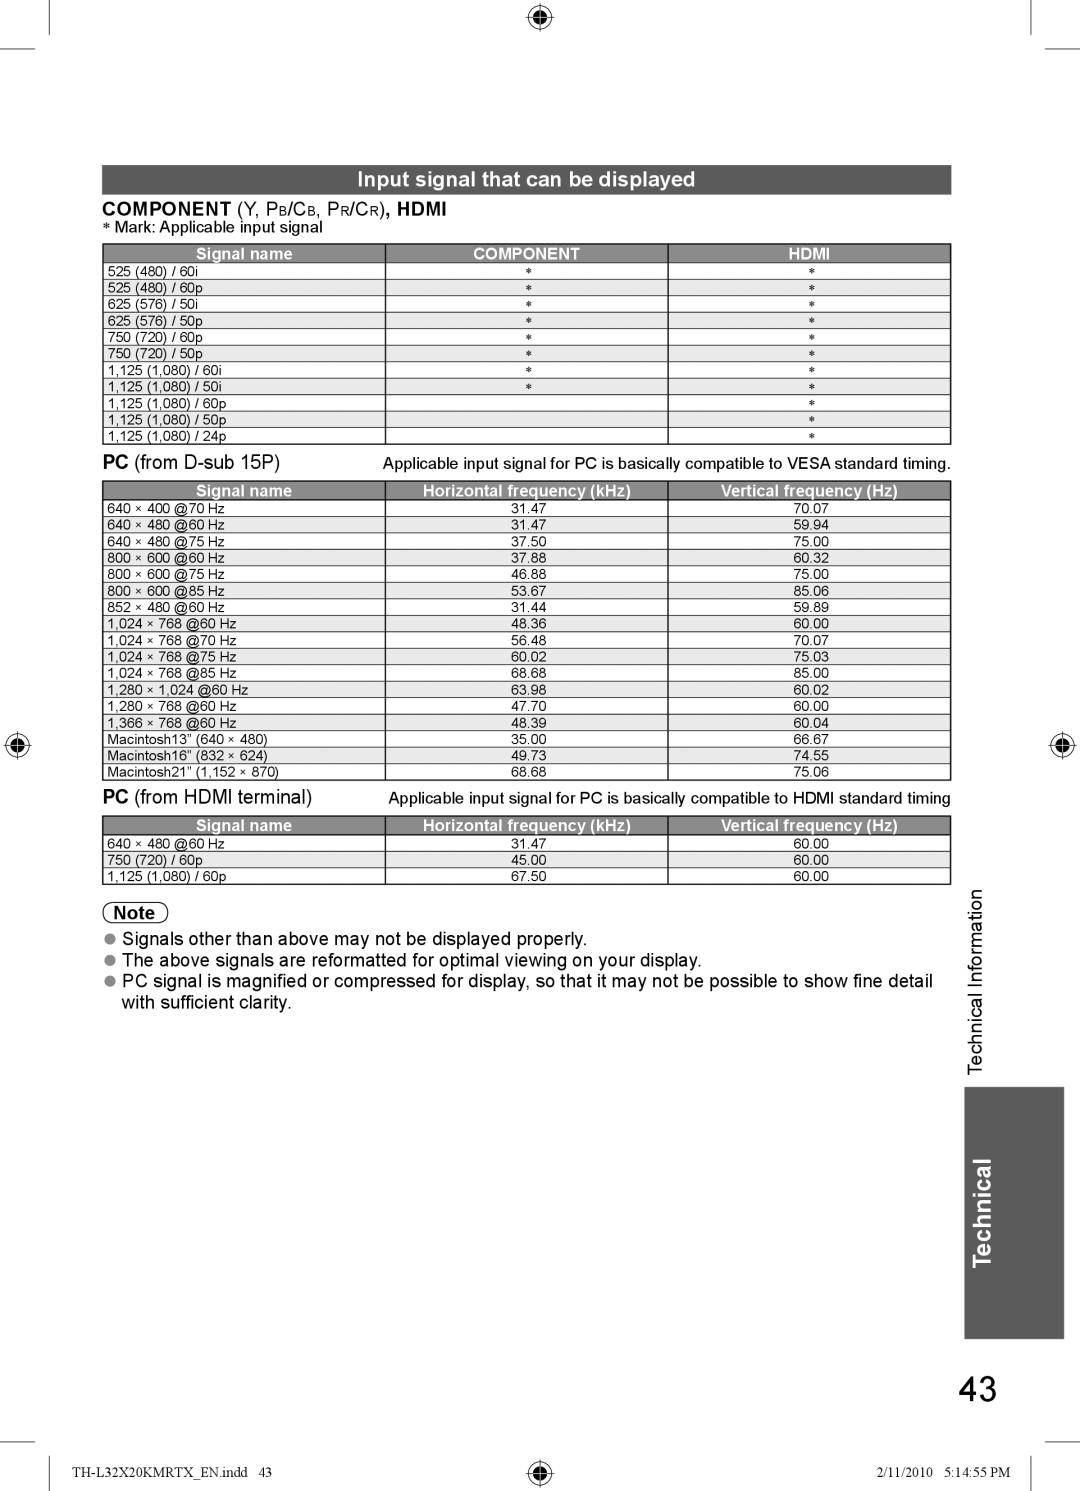
Check an input signal from the equipment (p. 43).

connected via HDMI

Use an equipment compliant with EIA/CEA-861/861B.

TV goes into Standby

Auto power standby function is activated.

The TV enters Standby mode about 30 minutes after

mode

broadcasting ends.


Are the batteries installed correctly? (p. 3)


Has the TV been switched On?

The remote control does

Point the remote control directly at the front of the TV

(within a 30 degree angle of the front of the TV).

not work or is intermittent

Situate the TV away from sunshine or other sources of


bright light not to shine on the TV’s remote control signal


receiver.


48

TH-L32X20KMRTX_EN.indd 48

2/11/2010 5:14:56 PM
Image 48
Contents Operating Instructions EnglishSD Card Amplifier with Personal Speaker System ComputerBlu-ray Disc player Contents Safety Precautions Adjust the LCD panel to your desired angle Accessories / Options Attaching the pedestalOptional accessories Rear of the TVConnecting aerial Basic ConnectionTV only Monitor OUT AV1 AV2 Remote control Identifying ControlsUsing the On Screen Displays Auto Tuning Plug the TV into mains socket and switch OnSelect your language Select HomeTurn power on Off TimerWatching TV Select a channelDisplay the selectable settings for the current programme Display information bannerChange OSD language To change the mode using the Aspect button only Change aspect ratioDisplay Aspect Selection list Switch to Teletext Viewing TeletextSelect the page up to Watch TV while waiting for update View in multi windowStore frequently viewed pages View subSelected mode is displayed on the screen Example AV2 Watching External inputsView To return to TVOperating the equipment with the TV remote control How to Use Menu Functions Adjust or selectDisplay the menu Select the menu Select the itemSetup How to Use Menu FunctionsOverview PictureAdjustments / Configurations alternatives Basic picture mode Dynamic / Normal / Cinema / GameViewing Mode Eco ModeSound Setup Shipping ConditionSystem Software LicenceTuning and Editing Channels Display the menu Select SetupSelect Tuning Menu Select a functionAuto Tuning Set all TV channels automatically Manual Tuning Set TV channel manuallyFine Tuning Manual TuningChild Lock Display the menuChild Lock Control channel audience Select Display Settings Input LabelsSelect Input Labels Select an input terminal and setShipping Condition Reset settings Start Shipping ConditionFollow the on screen instructions How to Use Viera Tools Display icons of the featureSelect a feature Follow the operation of each featureInsert the SD Card Enter SD mode Photo View Viewing from SD CardSelect a folder to display the thumbnail Select a photo to be viewedSlideshow Multi and CollageViera Link Functions Viera Link Hdavi ControlTMTo use Player theatre / Blu-ray Disc theatre To use AmplifierPower on link Power off linkEasy playback Viera Link FunctionsSelect the equipment you want to access Menu of the accessed equipmentIf you access non-VIERA Link equipment Viera Link Hdavi ControlSpeaker Selection Speaker control Set to Home Cinema or TVHome Cinema Headphones External EquipmentCamcorder Game Equipment To listen with speakersTo record / playback To watch DVDsTo watch satellite Broadcasts Hdmi equipmentTechnical Information Channel AllocationAudio Signal Stereo / Bilingual Sound SelectionPressing the Stereo / Bilingual Sound Selection button Regular + Nicam MonoApplicable Hdmi features Hdmi connectionDVI connection Input signal that can be displayed PC from D-sub 15PPC from Hdmi terminal Sub 15-pin connector signal PC connectionSD Card Data format for Card browsingMaintenance Display panel, Cabinet, PedestalMains plug FAQs An error message appearsWhite spots or shadow images noise Check the position, direction, and connection of the aerialWhen the equipment is Remote control doesChaotic image, noisy No image can be displayedLicence This product incorporates the following softwareSpecifications TH-L32X20K/T/X TH-L32X20M TH-L32X20RTechnical Specifications MemoCustomer’s Record