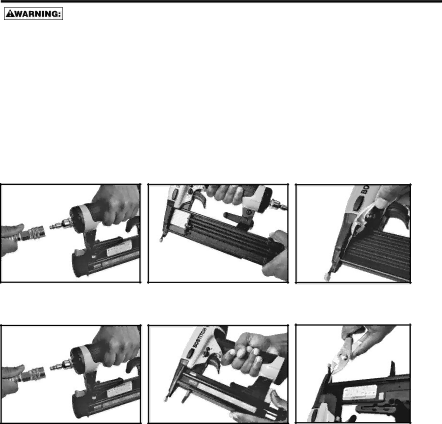
Bostitch BT1855K manual JAM Clearing Procedure, BT1855 JAM Clearing SX1838 JAM Clearing

Page 12

JAM CLEARING PROCEDURE

Disconnect tool from air supply before making adjustments or before attempting any part assembly or disassembly.

On occasion nails can jam in the nose of a pneumatic nailer. This can be caused by striking a metal plate in the wall, drywall screw, or some other hard object. The BT1855 and SX1838 feature open drive channel architecture for jam clearing. To clear a jam follow this procedure:

1.Disconnect the tool from the air supply.

2.Open the magazine by depressing the magazine release button and pulling open the magazine.

3.Remove the jam fastener. In certain circumstances, pliers may be required to remove the fastener.

4.Close the magazine.

BT1855 JAM CLEARING

SX1838 JAM CLEARING

-12-

Image 12
Contents BT1855 & SX1838 Introduction IndexSafety Instructions AIR Supply and ConnectionsLoadingtool OperationTool Components Tool Specifications Fastener SpecificationsAIR Supplyand Connections Loadingthe BT1855 & SX1838 Loading the SX1838Trip Operation Mode Selecting the Trip ModeTrigger Lockout Control ContacttripDIAL-A-DEPTH Fastener Control Adjustment BOSTITCH, INCInstalling the Belt Hook Usingthe Integrated Pencil SharpenerHEX Wrench Storage Tool Operation Before Handling or Operating this ToolContact Trip Operation Sequential Trip OperationJAM Clearing Procedure BT1855 JAM Clearing SX1838 JAM ClearingReplacement Parts Assembly Procedure for SealsAIR SUPPLY-PRESSURE and Volume Tool Operation CheckMaintenance Checklist Maintenance Benefit Procedure Service IntervalTroubleshooting ProblemCausecorrection Availableaccessories Bostitch Finish &TRIM Products Introducción ÍndiceNota Instrucciones DE Seguridad Suministro DE Airey ConexionesCarga DE LA Herramienta FuncionamientoComponentes DE LA Herramienta Especificaciones DE LA Herramienta Especificaciones DE FijacionesNota Conectores ManguerasFuente DE Suministro ReguladorCarga DE LA BT1885Y LA SC1838 Carga DE LA SX1838Control DE Bloqueo DEL Gatillo Modo DE Funcionamiento DEL DisparadorDisparo DE Contacto Disparo SecuencialAjuste DE Control DE Fijaciones DIAL-A-DEPTH Instalación DEL Gancho Para EL Cinturón USO DEL Sacapuntas IntegradoAlmacenamiento DE LA Llave Hexagonal Funcionamiento DE LA Herramienta Antes DE Manipular U Operar Esta HerramientaFuncionamiento DEL Disparo DE Contacto Funcionamiento DEL Disparo SecuencialProcedimiento Para Despejar Atascos Presión Y Volumen DEL Suministro DE Aire Revisión Funcional DE LA HerramientaMantenimiento DE LA Herramienta Neumática Piezas DE RepuestoLista DE Verificación DE Mantenimiento Mantenimiento Beneficio Procedimiento Intervalo De servicioSolución DE Problemas Problema Causa CorrecciónAccesorios Disponibles Productos Bostitch Para Rematey Detalle Remarque Garantie Limitée É.-U. et Canada seulementConsignes DE Sécurité Alimentation Dair ET ConnexionsChargement DE L’OUTIL FonctionnementComposants DE Loutil Spécifications DE L’OUTIL Caractéristiques DES AttachesRemarque Raccords TuyauxsouplesSource D’ALIMENTATION RégulateurChargement DE LA BT1855 ET DE LA SX1838 Chargement DE LA SX1838Commande DE Blocage DE Gâchette Mode DE DéclenchementSÉLECTION/CHANGEMENT DU Mode DE Déclenchement Déclenchement SUR ContactAjustement DE LA Commande D’ATTACHE DIAL-A-DEPTH Installation DU Crochet DE Ceinture Pour Utiliser LETAILLE-CRAYON IntégréRangement DE LA CLÉ HEX Fonctionnement EN Mode Déclenchement SUR Contact Fonctionnement EN Mode Déclenchement SéquentielFonctionnement DE L’OUTIL Procédure Pour LE Dégagement DES Blocages Alimentation DAIR-PRESSION ET Volume Vérification DU Fonctionnement DE L’OUTILEntretien DE L’OUTIL Pneumatique Pièces DE RechangeEntretien Bienfait Procédure Intervalle De service Liste DE Vérification Pour L’ENTRETIENCausesolution DépannageProblème Accessoires Disponibles Produits DE Finition ET D’HABILLAGE Bostitch