Manuals
/
Arturia
/
Musical Instruments & Equipment
/
Musical Instrument
Arturia
2
manual
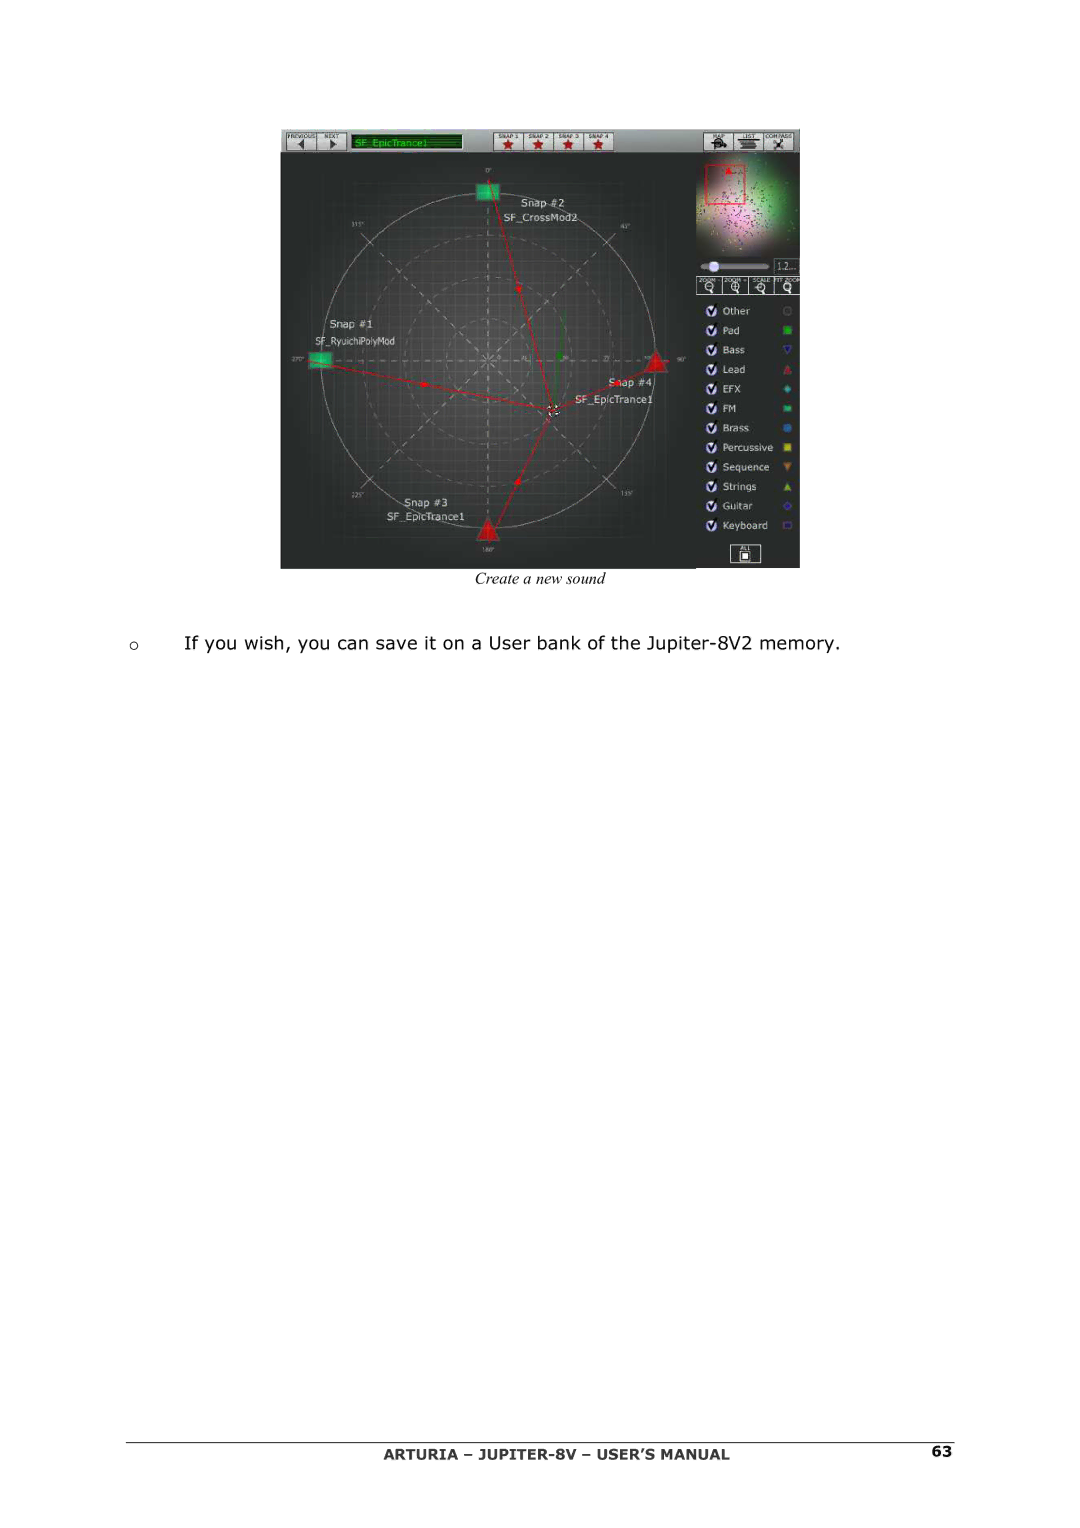
Create a new sound
Models:
2
1
63
125
125
Download
125 pages
55.28 Kb
60
61
62
63
64
65
66
67
Page 63
Image 63
Create a new sound
O
If you wish, you can save it on a User bank of the
Jupiter-8V2
memory.
ARTURIA –
JUPITER-8V
– USER’S MANUAL
63
Page 62
Page 64
Page 63
Image 63
Page 62
Page 64
Contents
USER’S Manual
Sound Design
Programming
Manual
Design
Thank you for purchasing the Arturia Jupiter-8V
New features in Jupiter-8V
Table of contents
Different Modules
Modes of Operation
ROLAND/JUPITER-8 Story
Introduction
Arturia JUPITER-8V USER’S Manual
Arturia JUPITER-8V USER’S Manual
Arturia JUPITER-8V USER’S Manual
Better reproduction of analog oscillator waveforms
Aliasing-free oscillators
Arturia JUPITER-8V USER’S Manual
Direct Filter Circuit Modeling
2WINDOWS Installation
Installation
Choose the installation folder
Select installation folder for plug-ins
Jupiter-8V2.pkg
MAC OS X Installation
Authorization
Arturia JUPITER-8V USER’S Manual
Arturia JUPITER-8V USER’S Manual
Arturia JUPITER-8V USER’S Manual
Enter the activation code
It’s now time to launch Jupiter-8V2
Structure of the JUPITER-8V
Quick Start
Selecting the presets
Using the Presets
Click on the presets tab
Editing the presets
4 Main Parts of the JUPITER-8V
Overview of the JUPITER-8VUSER Interface
Signal path of the Jupiter-8V
Advanced Modulations Section
Creating a melodic sequence with the Sequencer
Set the speed of the sequencer with the Rate knob
Create progressive modulations with the Galaxy unit
Click on the Galaxy tab
Control parameters with the Keyboard unit
Effects
Choose the effect of Distortion in the effects menu
Chorus
Patch Section of the Effects
Delay
Realtime Controllers and Midi Assign
Arturia JUPITER-8V USER’S Manual
Arturia JUPITER-8V
Roland JUPITER-8
Arturia JUPITER-8V USER’S Manual
Tool BAR
Interface
Selection of a preset Patch or Program
Types of presets
Select from the toolbar
Preset
Creating a new preset
Save a user preset
Save a user preset using the Save as option
Import / Export a preset bank
Delete a preset
Knobs
Using the Controllers
Switches
Buttons
Pitch Bend wheel
Modulation button
Virtual keyboard
LCD Screen
Preference screen
Midi Control
Sound MAP
MAP main interface
Sound Map overview
Instrument type filter window
Preset snapshot memories
List preset manager
Compass morphing interface
Create a new sound
Original JUPITER-8
Different Modules
1.1 VCO
Oscillators « VCO 1 and 2 »
Shape
Fine Tune
Filter VCF
Mixer VCO1 / VCO2
Non-resonant 6 dB/octave high-pass filter
Amplifier VCA
Adsr Envelopes
VCO modulator
LFO
Bend
ENV1
LFO MOD Rise
LFO MOD
Master Tune section
Pitch bend wheel and LFO MOD button
11The arpeggiator Arpeggio
Keyboard assign section Assign Mode
Play modes selection KEY Mode
Rate
Step Sequencer
Start
Stop
Steps
Length
Link
Outputs
Galaxy
Chorus /Flanger
Voice Effects
Distortion
Parametric EQ
Phaser
Ring Mod
Chorus/Flanger
Patch Effects
Stereo Analog Delay
Feedback 1/2
Sweep
Generator
Depth 1/2
Dual Phaser
Oscillator or VCO
Main Elements
Sawtooth waveform and its harmonic spectrum
Triangle waveform and its harmonic spectrum
Sinusoid waveform and its harmonic spectrum
Filter or VCF
Mixer
High-Pass Filter HP Filter
Resonance
Amplifier or VCA
Other Modules
Keyboard
Envelope generator or Adsr
Low frequency oscillator
LFO module of the Jupiter-8V
Modules of the JUPITER-8V
Some Elements of Sound Design
Polyphonic Violin Preset Made with the JUPITER- 8
Choose the modulated square waveform on VCO2
Increase the attack time
Arpeggiated Sounds
Increase the release time for the second Adsr envelope
Open the «Modulations»
Now you can save your preset to be able to use it later
Sequence with the JUPITER-8V
Choose the value 1/8
Interface of the Jupiter-8V sequencer
110
10.1.2Preference Configuration
STAND-ALONE
10.1.1Launching the Stand-alone application
Using a VST and Audio Unit Instrument in Ableton Live
10.3.1Utilization of the plug-in
Using Audio Unit and VST Instrument in Live
10.3.2Connection to a Midi channel
10.3.4Automation under Pro Tools
10.3.3Saving the presets
10.4.1Instrument use in VST mode
Cubase VST
10.4.2Rescan the plug-ins directory in Cubase
10.5.1Use in Logic Audio
10.4.4Saving of presets
10.4.3Connection to a Midi track
Logic & Audio Unit MAX OSX only
Jupiter-8 V opening in Logic
Sonar VST Windows only
10.6.1Opening the instrument Sonar
10.6.2Connection to a Midi track
10.6.3Save the presets
10.6.4Automation
USE in Digital Performer
Connection from a Midi track to Jupiter-8V
Arturia JUPITER-8V2 License Agreement
Support, Upgrades and Updates after Product Registration
No Unbundling
No other Warranties
Top
Page
Image
Contents