Aligning Rip Fence

To prevent personal injury, always disconnect ! WARNING plug from power source before making any

adjustments. The rip fence must be parallel with the SAWBLADE in order to prevent KICKBACK when ripping.

Your table saw is equipped with a Self-Aligning, Quick-Set rip fence. Once the adjustments below have been made, the rip fence will self align when the fence is locked into position.

NOTE: The blade must be parallel with the miter gauge slots (see page 36) and be perpendicular to table before proceeding with rip fence alignment.

!

WARNING

To prevent personal injury, always make sure

the rip fence is locked before making rip cuts.


1.Lift both guard barriers 2 to their up locked position.

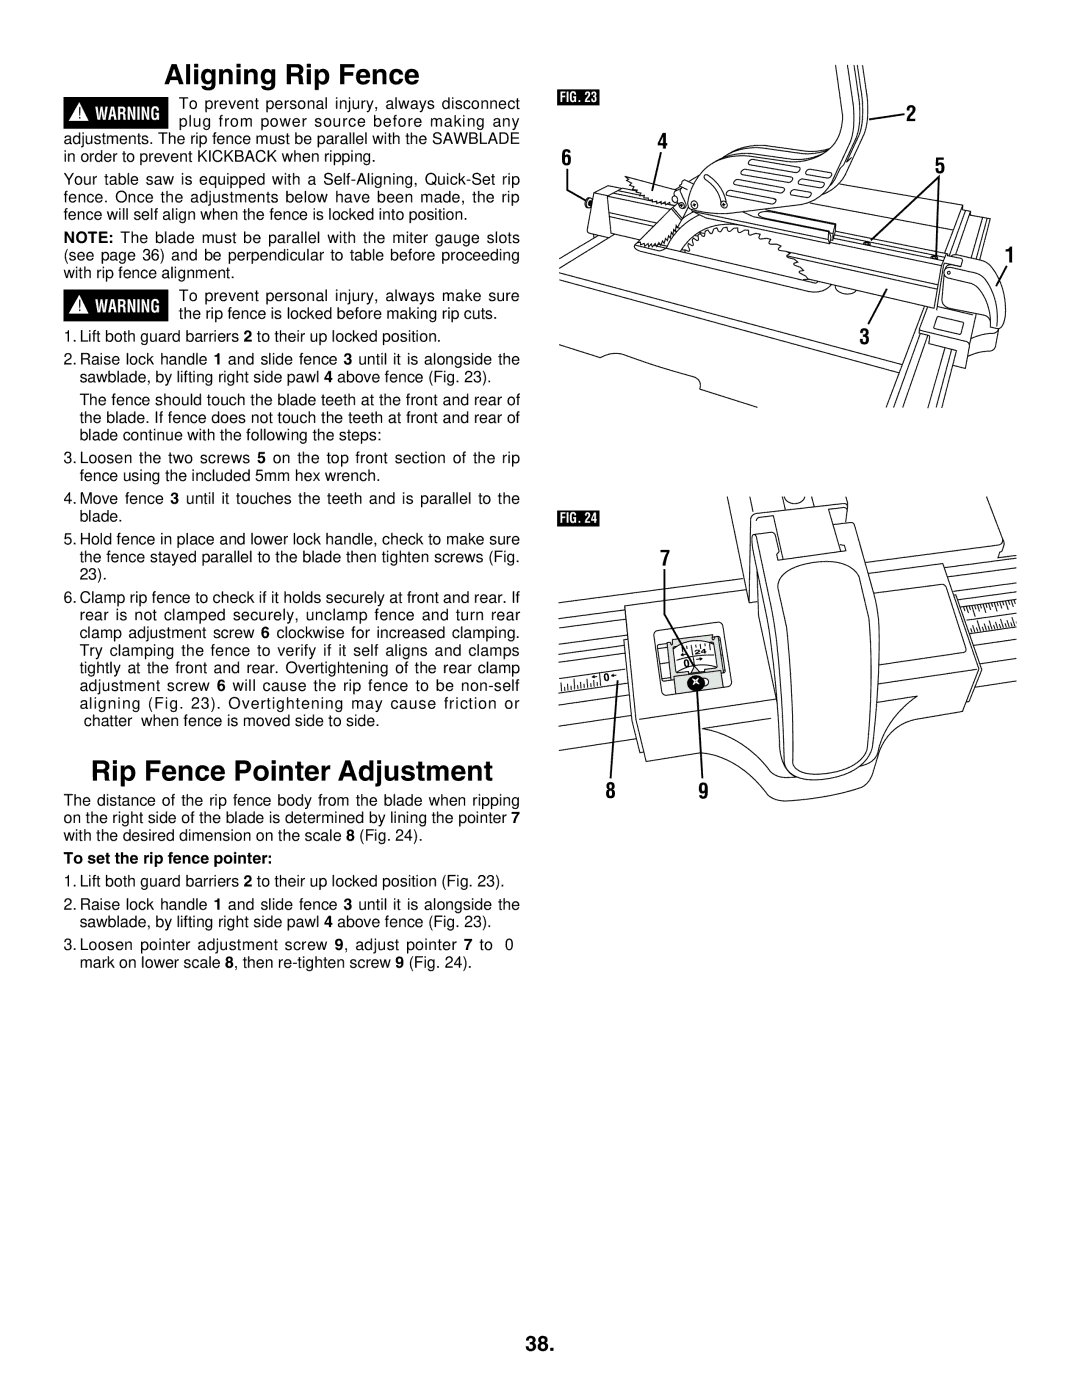
2.Raise lock handle 1 and slide fence 3 until it is alongside the sawblade, by lifting right side pawl 4 above fence (Fig. 23).

The fence should touch the blade teeth at the front and rear of the blade. If fence does not touch the teeth at front and rear of blade continue with the following the steps:

3.Loosen the two screws 5 on the top front section of the rip fence using the included 5mm hex wrench.

4.Move fence 3 until it touches the teeth and is parallel to the blade.

5.Hold fence in place and lower lock handle, check to make sure the fence stayed parallel to the blade then tighten screws (Fig. 23).

6.Clamp rip fence to check if it holds securely at front and rear. If rear is not clamped securely, unclamp fence and turn rear clamp adjustment screw 6 clockwise for increased clamping. Try clamping the fence to verify if it self aligns and clamps tightly at the front and rear. Overtightening of the rear clamp adjustment screw 6 will cause the rip fence to be non-self aligning (Fig. 23). Overtightening may cause friction or “chatter” when fence is moved side to side.

Rip Fence Pointer Adjustment

The distance of the rip fence body from the blade when ripping on the right side of the blade is determined by lining the pointer 7 with the desired dimension on the scale 8 (Fig. 24).

To set the rip fence pointer:

1.Lift both guard barriers 2 to their up locked position (Fig. 23).

2.Raise lock handle 1 and slide fence 3 until it is alongside the sawblade, by lifting right side pawl 4 above fence (Fig. 23).

3.Loosen pointer adjustment screw 9, adjust pointer 7 to “0” mark on lower scale 8, then re-tighten screw 9 (Fig. 24).

FIG. 23


2

6

4

5


1

3

FIG. 24

7

8 9

38.

Page 38
Image 38
Bosch Appliances 4100DG, 4100-09 manual Aligning Rip Fence, Rip Fence Pointer Adjustment, To set the rip fence pointer

4100DG, 4100-09, 4100 specifications

Bosch Appliances 4100, 4100-09, and 4100DG are a series of highly regarded kitchen appliances designed to enhance efficiency and performance in home cooking. Bosch has a long-standing reputation for crafting high-quality products, and this series is no exception. Each model combines cutting-edge technology with sleek design to meet the needs of modern households.

A standout feature of the Bosch 4100 series is its powerful performance. These appliances come equipped with high-performance motors and advanced cooking capabilities that ensure consistent results. Whether baking, broiling, or roasting, users can expect even heat distribution and precise temperature control, which are critical for achieving culinary perfection.

The 4100 appliances also emphasize intuitive usability, featuring easy-to-navigate controls and thoughtful design. The models include user-friendly digital displays and simple button interfaces, making it easy for anyone, regardless of cooking experience, to operate them seamlessly. Additionally, the Bosch 4100 series is designed with a focus on safety, incorporating advanced systems that prevent overheating and ensure secure operation.

In terms of design, the Bosch 4100 models boast a streamlined aesthetic that blends well with any kitchen décor. Constructed from high-quality materials, they offer durability while exuding a modern, sophisticated look. The stainless-steel finishes not only add elegance but are also easy to clean and maintain, making them practical for everyday use.

Another noteworthy characteristic of the Bosch 4100 series is the energy efficiency standards they meet. These appliances are designed to utilize less energy without compromising performance, helping homeowners save on utility bills while minimizing their environmental footprint.

The 4100DG model specifically stands out for its dual-fuel capabilities, allowing users to harness the benefits of both gas and electric cooking methods. This versatility provides chefs with greater flexibility and precision, accommodating a variety of cooking styles and preferences.

Overall, Bosch Appliances 4100, 4100-09, and 4100DG exemplify craftsmanship and innovation in the kitchen appliance sector. Their combination of advanced technology, user-friendly features, and stylish designs make them an excellent choice for anyone looking to elevate their cooking experience and enhance their kitchen functionality.