Getting To Know Your Table Saw
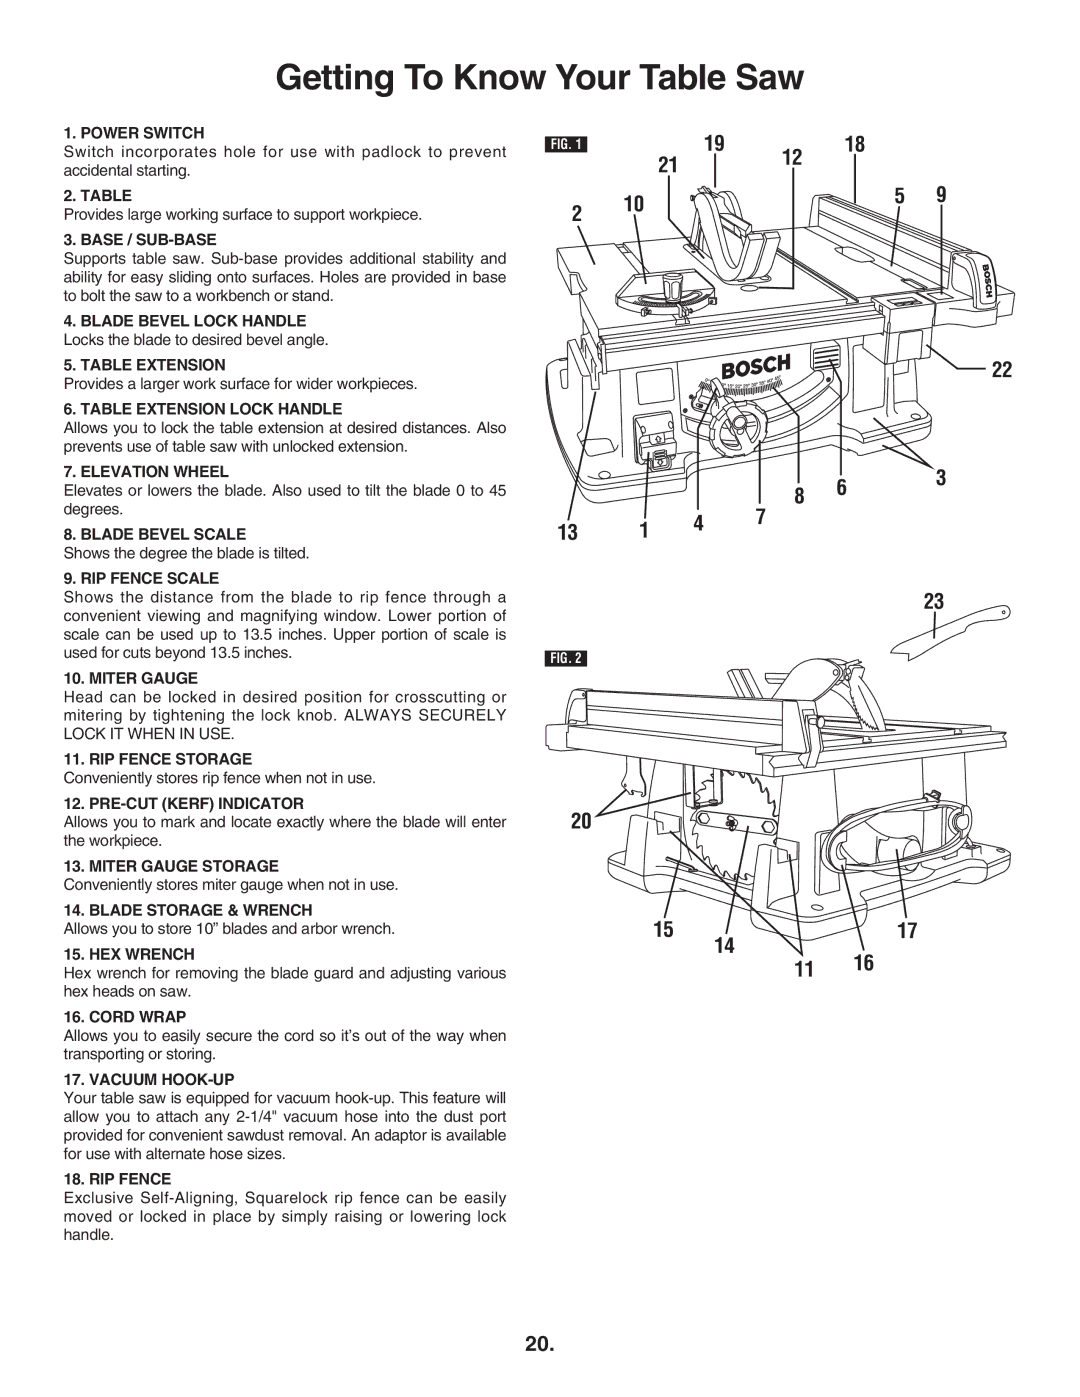
1. POWER SWITCH
Switch incorporates hole for use with padlock to prevent accidental starting.
2. TABLE
Provides large working surface to support workpiece.
3. BASE / SUB-BASE
Supports table saw.
4.BLADE BEVEL LOCK HANDLE Locks the blade to desired bevel angle.
5.TABLE EXTENSION
Provides a larger work surface for wider workpieces.
6. TABLE EXTENSION LOCK HANDLE
Allows you to lock the table extension at desired distances. Also prevents use of table saw with unlocked extension.
7. ELEVATION WHEEL
Elevates or lowers the blade. Also used to tilt the blade 0 to 45 degrees.
8. BLADE BEVEL SCALE
Shows the degree the blade is tilted.
9. RIP FENCE SCALE
Shows the distance from the blade to rip fence through a convenient viewing and magnifying window. Lower portion of scale can be used up to 13.5 inches. Upper portion of scale is used for cuts beyond 13.5 inches.
10. MITER GAUGE
Head can be locked in desired position for crosscutting or mitering by tightening the lock knob. ALWAYS SECURELY LOCK IT WHEN IN USE.
11. RIP FENCE STORAGE
Conveniently stores rip fence when not in use.
12.
Allows you to mark and locate exactly where the blade will enter the workpiece.
13. MITER GAUGE STORAGE
Conveniently stores miter gauge when not in use.
14. BLADE STORAGE & WRENCH
Allows you to store 10” blades and arbor wrench.
15. HEX WRENCH
Hex wrench for removing the blade guard and adjusting various hex heads on saw.
16. CORD WRAP
Allows you to easily secure the cord so it’s out of the way when transporting or storing.
17. VACUUM HOOK-UP
Your table saw is equipped for vacuum
18. RIP FENCE
Exclusive
FIG. 1 | 19 | 12 | 18 |
|
| 21 |
|
| |
|
|
|
| |
2 | 10 |
| 5 | 9 |
|
|
| ||
|
|
|
|
![]()
![]()
![]() 22
22
8 | 6 | 3 |
| ||
|
|
13 1 4 7
23
FIG. 2
20
15 | 17 |
| 14 |
11 16
20.
