English
Using System Menus
Video options
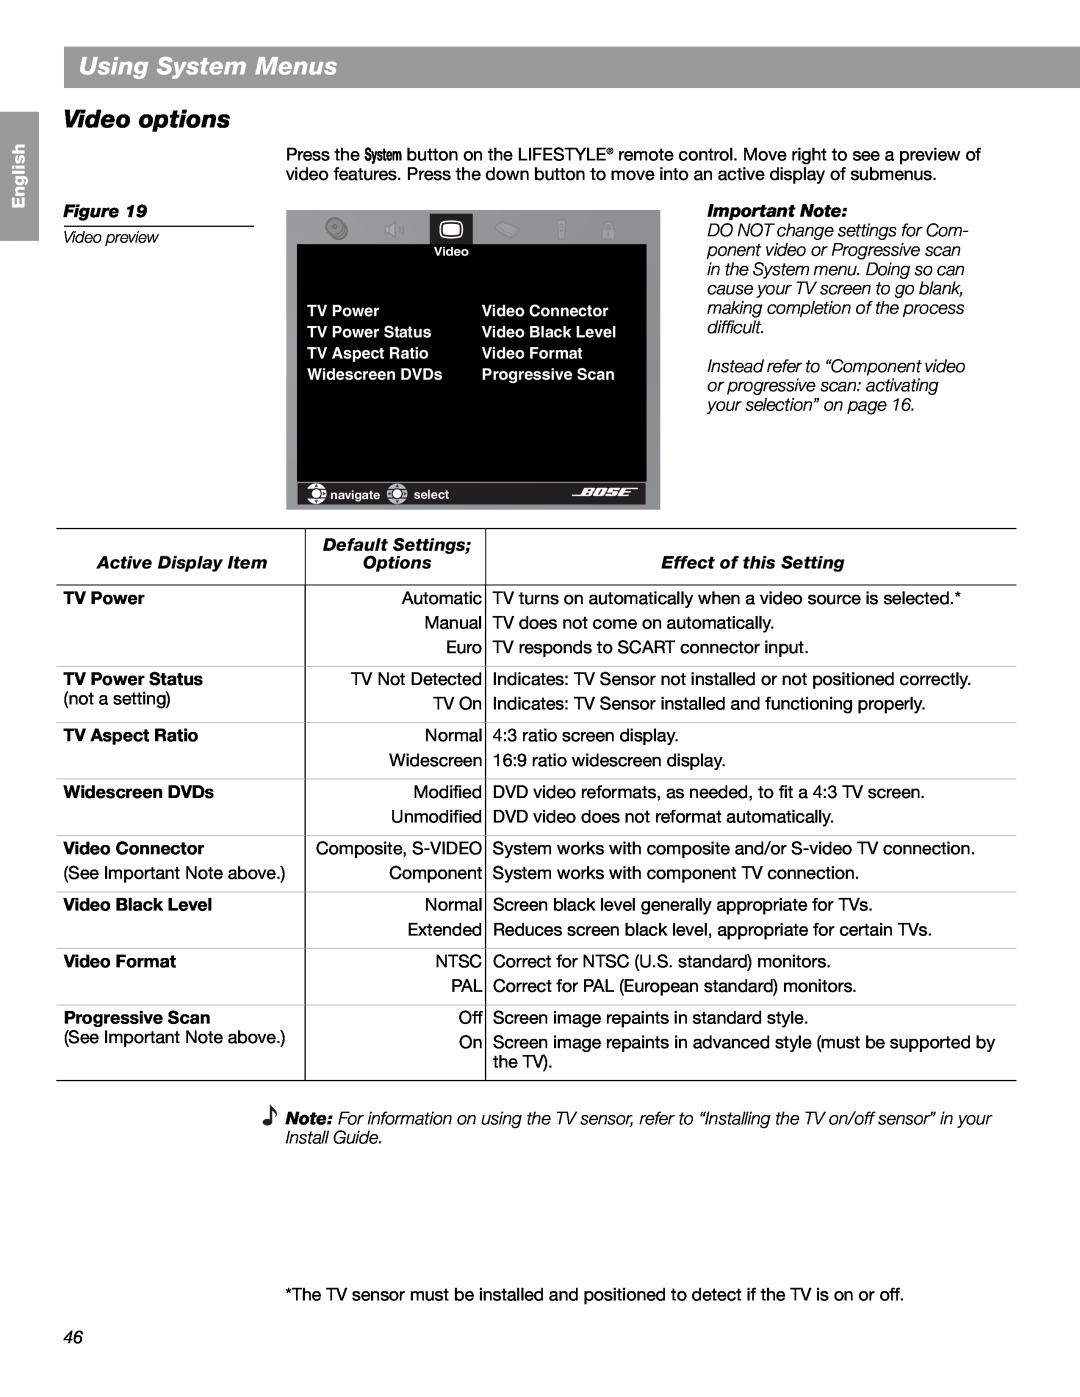
Press the System button on the LIFESTYLE® remote control. Move right to see a preview of video features. Press the down button to move into an active display of submenus.
Español
Figure 19
Video preview
Video
TV Power | Video Connector |
TV Power Status | Video Black Level |
TV Aspect Ratio | Video Format |
Widescreen DVDs | Progressive Scan |
Important Note:
DO NOT change settings for Com- ponent video or Progressive scan in the System menu. Doing so can cause your TV screen to go blank, making completion of the process difficult.
Instead refer to “Component video or progressive scan: activating your selection” on page 16.
Français
![]()
![]() navigate
navigate ![]()
![]() select
select
| Default Settings; |
|
Active Display Item | Options | Effect of this Setting |
|
|
|
TV Power | Automatic | TV turns on automatically when a video source is selected.* |
| Manual | TV does not come on automatically. |
| Euro | TV responds to SCART connector input. |
|
|
|
TV Power Status | TV Not Detected | Indicates: TV Sensor not installed or not positioned correctly. |
(not a setting) | TV On | Indicates: TV Sensor installed and functioning properly. |
| ||
|
|
|
TV Aspect Ratio | Normal | 4:3 ratio screen display. |
| Widescreen | 16:9 ratio widescreen display. |
|
|
|
Widescreen DVDs | Modified | DVD video reformats, as needed, to fit a 4:3 TV screen. |
| Unmodified | DVD video does not reformat automatically. |
|
|
|
Video Connector | Composite, | System works with composite and/or |
(See Important Note above.) | Component | System works with component TV connection. |
|
|
|
Video Black Level | Normal | Screen black level generally appropriate for TVs. |
| Extended | Reduces screen black level, appropriate for certain TVs. |
|
|
|
Video Format | NTSC | Correct for NTSC (U.S. standard) monitors. |
| PAL | Correct for PAL (European standard) monitors. |
|
|
|
Progressive Scan | Off | Screen image repaints in standard style. |
(See Important Note above.) | On | Screen image repaints in advanced style (must be supported by |
|
| the TV). |
|
|
|
Note: For information on using the TV sensor, refer to “Installing the TV on/off sensor” in your
Install Guide.
*The TV sensor must be installed and positioned to detect if the TV is on or off.
46
