Darning

Pattern

Foot

Other


6-10 (Straight Stitch)

None

Darning Plate

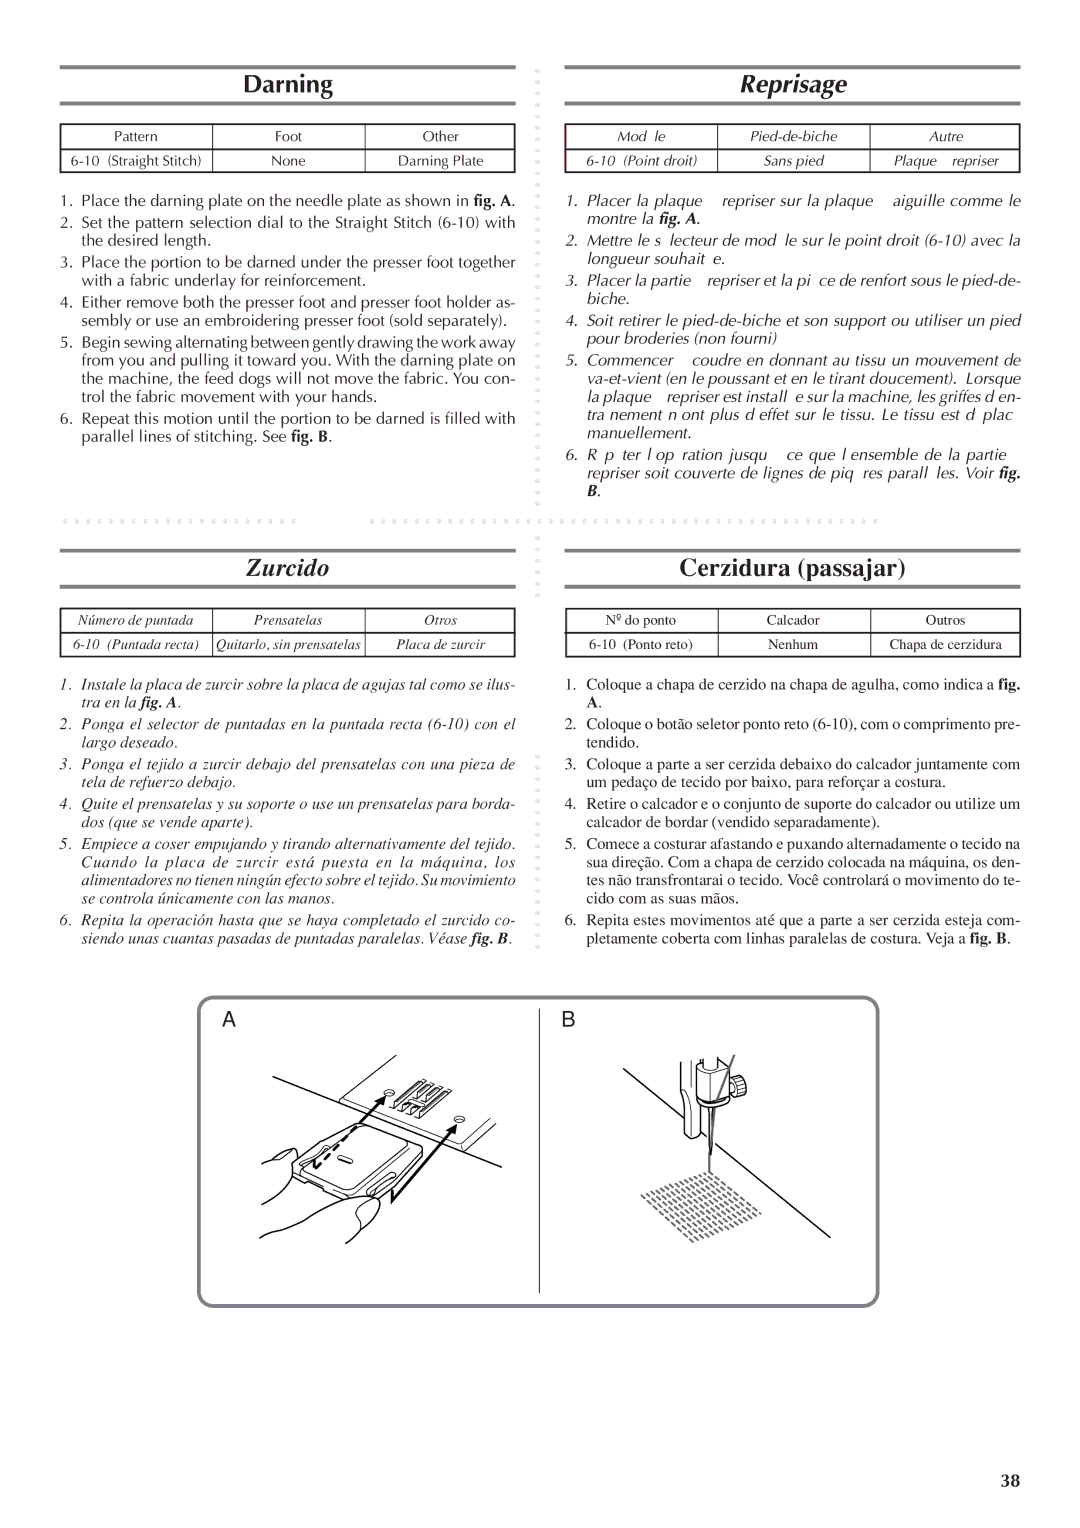
1.Place the darning plate on the needle plate as shown in fig. A.

2.Set the pattern selection dial to the Straight Stitch (6-10) with the desired length.

3.Place the portion to be darned under the presser foot together with a fabric underlay for reinforcement.

4.Either remove both the presser foot and presser foot holder as- sembly or use an embroidering presser foot (sold separately).

5.Begin sewing alternating between gently drawing the work away from you and pulling it toward you. With the darning plate on the machine, the feed dogs will not move the fabric. You con- trol the fabric movement with your hands.

6.Repeat this motion until the portion to be darned is filled with parallel lines of stitching. See fig. B.

Reprisage

Modèle

Pied-de-biche

Autre


6-10 (Point droit)

Sans pied

Plaque à repriser

1.Placer la plaque à repriser sur la plaque à aiguille comme le montre la fig. A.

2.Mettre le sélecteur de modèle sur le point droit (6-10) avec la longueur souhaitée.

3.Placer la partie à repriser et la pièce de renfort sous le pied-de- biche.

4.Soit retirer le pied-de-biche et son support ou utiliser un pied pour broderies (non fourni)

5.Commencer à coudre en donnant au tissu un mouvement de va-et-vient (en le poussant et en le tirant doucement). Lorsque la plaque à repriser est installée sur la machine, les griffes d’en- traînement n’ont plus d’effet sur le tissu. Le tissu est déplacé manuellement.

6.Répéter l’opération jusqu’à ce que l’ensemble de la partie à repriser soit couverte de lignes de piqûres parallèles. Voir fig. B.

Zurcido

Número de puntada

Prensatelas

Otros


6-10 (Puntada recta)

Quitarlo, sin prensatelas

Placa de zurcir


1.Instale la placa de zurcir sobre la placa de agujas tal como se ilus- tra en la fig. A.

2.Ponga el selector de puntadas en la puntada recta (6-10) con el largo deseado.

3.Ponga el tejido a zurcir debajo del prensatelas con una pieza de tela de refuerzo debajo.

4.Quite el prensatelas y su soporte o use un prensatelas para borda- dos (que se vende aparte).

5.Empiece a coser empujando y tirando alternativamente del tejido. Cuando la placa de zurcir está puesta en la máquina, los alimentadores no tienen ningún efecto sobre el tejido. Su movimiento se controla únicamente con las manos.

6.Repita la operación hasta que se haya completado el zurcido co- siendo unas cuantas pasadas de puntadas paralelas. Véase fig. B.

Cerzidura (passajar)

Nº do ponto

Calcador

Outros


6-10 (Ponto reto)

Nenhum

Chapa de cerzidura


1.Coloque a chapa de cerzido na chapa de agulha, como indica a fig. A.

2.Coloque o botão seletor ponto reto (6-10), com o comprimento pre- tendido.

3.Coloque a parte a ser cerzida debaixo do calcador juntamente com um pedaço de tecido por baixo, para reforçar a costura.

4.Retire o calcador e o conjunto de suporte do calcador ou utilize um calcador de bordar (vendido separadamente).

5.Comece a costurar afastando e puxando alternadamente o tecido na sua direção. Com a chapa de cerzido colocada na máquina, os den- tes não transfrontarai o tecido. Você controlará o movimento do te- cido com as suas mãos.

6.Repita estes movimentos até que a parte a ser cerzida esteja com- pletamente coberta com linhas paralelas de costura. Veja a fig. B.

A

B

38

Page 46
Image 46
Brother LS 1520 instruction manual Darning, Reprisage, Zurcido, Cerzidura passajar

LS 1520 specifications

The Brother LS 1520 is a versatile sewing machine designed to cater to both beginners and more experienced sewers alike. Lightweight and portable, the LS 1520 is an ideal choice for hobbyists who might want to travel with their sewing projects. With its user-friendly design, this machine offers a range of features that make sewing an enjoyable and efficient experience.

One of the key characteristics of the Brother LS 1520 is its straight stitch capability, which is perfect for various sewing tasks, from hemming to quilting. The machine boasts 14 built-in stitch patterns, including decorative stitches and a one-step buttonhole, allowing for creative sewing applications. The easy stitch selection dial allows users to quickly choose the desired stitch pattern, ensuring a smooth transition between projects.

The LS 1520 incorporates a top-loading bobbin system, which simplifies the process of loading and threading the bobbin. This design not only enhances convenience but also allows for smooth and consistent sewing. Additionally, the machine features an automatic needle threader, eliminating the frustration of manual threading, especially for those with visual impairments.

Another noteworthy aspect of the Brother LS 1520 is its adjustable stitch length and sewing speed, providing flexibility to customize each project according to specific requirements. The machine offers a free arm, perfect for sewing cylindrical items like sleeves and pant hems, allowing for greater versatility in project design.

The Brother LS 1520 also emphasizes safety, featuring a finger guard that helps prevent accidental injuries during operation. The machine operates quietly, making it suitable for home use, without disturbing the household.

Durability is a key characteristic of the LS 1520; it is built to last with high-quality components that withstand regular use. Brother's reputation for precision engineering is evident in this model, ensuring reliable performance in every stitch.

In conclusion, the Brother LS 1520 is an excellent sewing machine that balances user-friendliness with advanced features. Its combination of multiple stitch patterns, ease of use, safety features, and portability make it a popular choice among sewers of all levels. Whether tackling simple repairs or intricate projects, the LS 1520 promises a satisfying sewing experience.