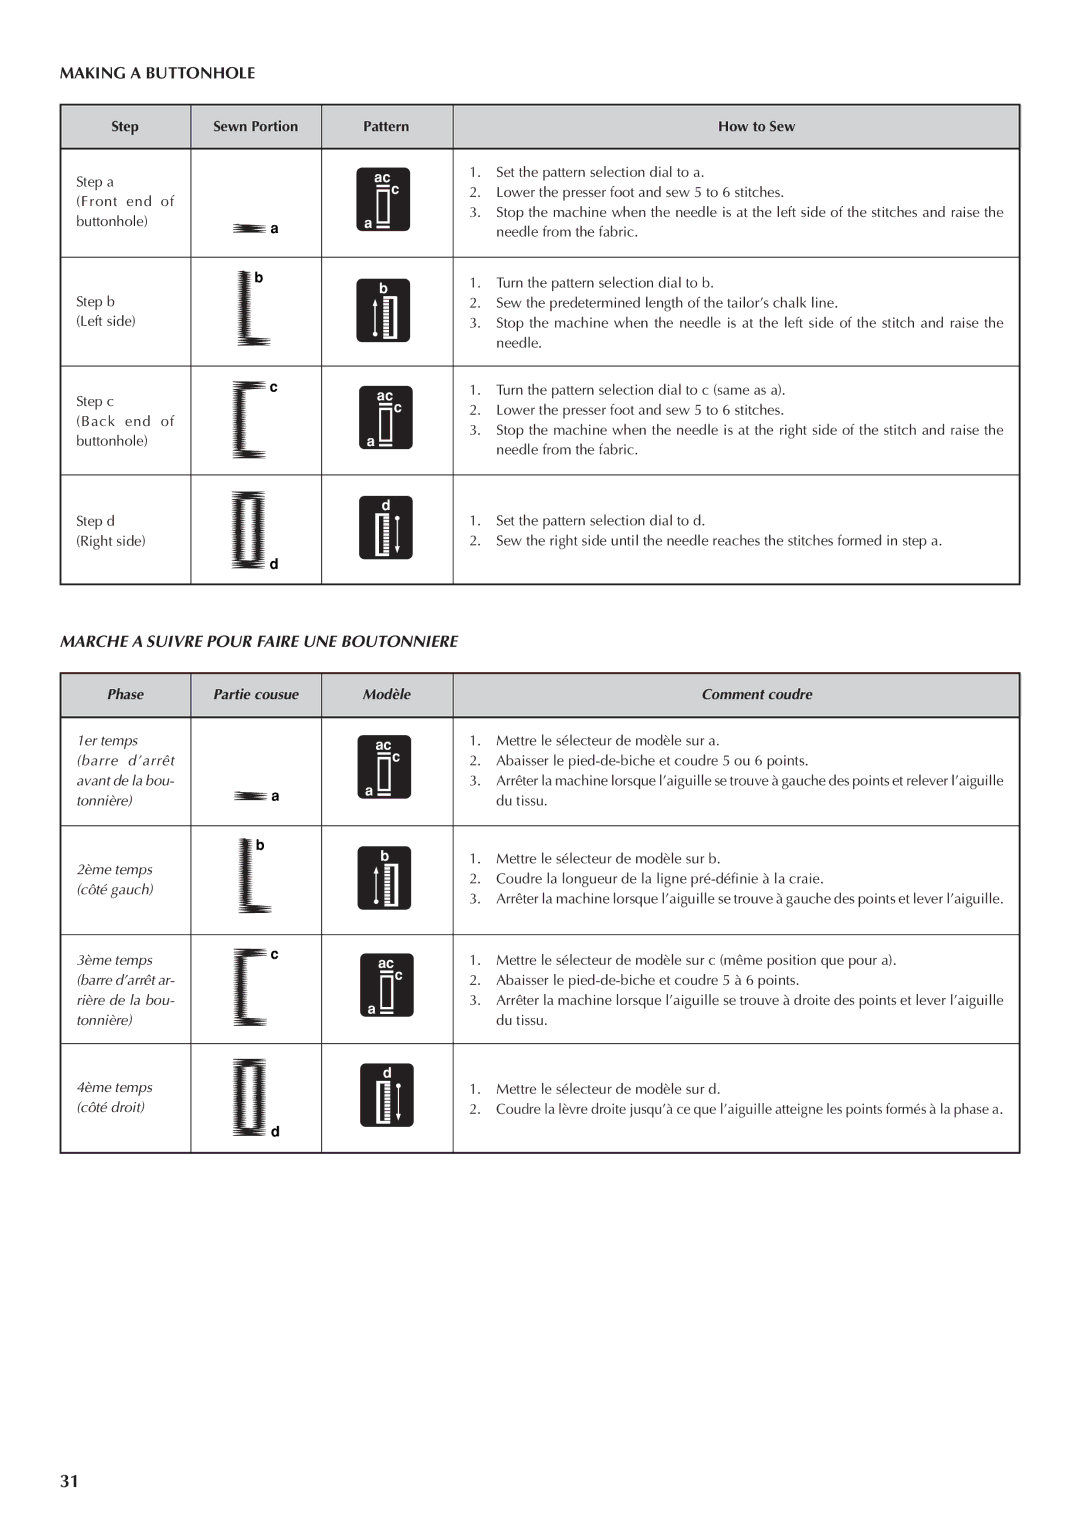
MAKING A BUTTONHOLE

Step


Sewn Portion

Pattern


How to Sew


Step a


ac

1.

Set the pattern selection dial to a.


c

2.

Lower the presser foot and sew 5 to 6 stitches.

(Front end

of


3.

Stop the machine when the needle is at the left side of the stitches and raise the

buttonhole)


a

a


needle from the fabric.


b


b

1.

Turn the pattern selection dial to b.


Step b


2.

Sew the predetermined length of the tailor’s chalk line.


(Left side)


3.

Stop the machine when the needle is at the left side of the stitch and raise the


needle.


Step c


c


ac

1.

Turn the pattern selection dial to c (same as a).


c

2.

Lower the presser foot and sew 5 to 6 stitches.

(Back end

of


3.

Stop the machine when the needle is at the right side of the stitch and raise the

buttonhole)


a


needle from the fabric.


Step d


d

1.

Set the pattern selection dial to d.


(Right side)


d


2.

Sew the right side until the needle reaches the stitches formed in step a.


MARCHE A SUIVRE POUR FAIRE UNE BOUTONNIERE


Phase

Partie cousue

Modèle


Comment coudre


1er temps


ac

1.

Mettre le sélecteur de modèle sur a.


(barre d’arrêt


c

2.

Abaisser le pied-de-biche et coudre 5 ou 6 points.


avant de la bou-

a

a


3.

Arrêter la machine lorsque l’aiguille se trouve à gauche des points et relever l’aiguille


tonnière)


du tissu.


b


b

1.

Mettre le sélecteur de modèle sur b.


2ème temps


2. Coudre la longueur de la ligne pré-définie à la craie.


(côté gauch)


3.

Arrêter la machine lorsque l’aiguille se trouve à gauche des points et lever l’aiguille.


3ème temps

c


ac

1.

Mettre le sélecteur de modèle sur c (même position que pour a).


(barre d’arrêt ar-


c

2.

Abaisser le pied-de-biche et coudre 5 à 6 points.


rière de la bou-


a


3.

Arrêter la machine lorsque l’aiguille se trouve à droite des points et lever l’aiguille


tonnière)


du tissu.


4ème temps


d

1.

Mettre le sélecteur de modèle sur d.


(côté droit)


2.

Coudre la lèvre droite jusqu’à ce que l’aiguille atteigne les points formés à la phase a.


d

31

Page 39
Image 39
Brother LS 1520 instruction manual Marche a Suivre Pour Faire UNE Boutonniere, Step Sewn Portion Pattern How to Sew

LS 1520 specifications

The Brother LS 1520 is a versatile sewing machine designed to cater to both beginners and more experienced sewers alike. Lightweight and portable, the LS 1520 is an ideal choice for hobbyists who might want to travel with their sewing projects. With its user-friendly design, this machine offers a range of features that make sewing an enjoyable and efficient experience.

One of the key characteristics of the Brother LS 1520 is its straight stitch capability, which is perfect for various sewing tasks, from hemming to quilting. The machine boasts 14 built-in stitch patterns, including decorative stitches and a one-step buttonhole, allowing for creative sewing applications. The easy stitch selection dial allows users to quickly choose the desired stitch pattern, ensuring a smooth transition between projects.

The LS 1520 incorporates a top-loading bobbin system, which simplifies the process of loading and threading the bobbin. This design not only enhances convenience but also allows for smooth and consistent sewing. Additionally, the machine features an automatic needle threader, eliminating the frustration of manual threading, especially for those with visual impairments.

Another noteworthy aspect of the Brother LS 1520 is its adjustable stitch length and sewing speed, providing flexibility to customize each project according to specific requirements. The machine offers a free arm, perfect for sewing cylindrical items like sleeves and pant hems, allowing for greater versatility in project design.

The Brother LS 1520 also emphasizes safety, featuring a finger guard that helps prevent accidental injuries during operation. The machine operates quietly, making it suitable for home use, without disturbing the household.

Durability is a key characteristic of the LS 1520; it is built to last with high-quality components that withstand regular use. Brother's reputation for precision engineering is evident in this model, ensuring reliable performance in every stitch.

In conclusion, the Brother LS 1520 is an excellent sewing machine that balances user-friendliness with advanced features. Its combination of multiple stitch patterns, ease of use, safety features, and portability make it a popular choice among sewers of all levels. Whether tackling simple repairs or intricate projects, the LS 1520 promises a satisfying sewing experience.