Brother X-3 manual Enhebrado superior de la aguja, Заправка верхней нити

Models: X-3

1 84
Download 84 pages 48.31 Kb
Page 28
Image 28

СВЕДЕНИЯCONOZCAOMPELUKONEESEENKNOWING ОSUYOUR ШВЕЙНОЙSEWING QUINA МАШИНЕDETUTUSTUMINENMACHINE COSER

1

2

2

3

3

AB

1

5 4

C

4

6

D

Enhebrado superior (de la aguja)

1Portacarretes

2 Guía hilos

3 Palanca tirahilos

4 Disco de tensión superior (de aguja)

5 Resorte de verificación del hilo

6 Guía hilos inferior

1.Levante el prensatelas con la palanca y gire la ruedecilla hacia usted (en el sentido contrario al de las manecillas de un reloj) para subir la palanca tirahilos a su posición más alta.

2.Levante el portacarretes y coloque un carrete en el eje.

3.Pase el hilo a través de la primera guía como se indica y, a con- tinuación, hacia delante, a través de la ranura derecha situada en la parte anterior de la máquina.

4.Tire del hilo hacia abajo desde la ranura derecha pasándolo por el disco de control de la tensión superior hacia la izquierda de tal forma que el hilo enganche el resorte de verificación del hilo a la izquierda del área de tensión (fig. A y B).

5.Guíe el hilo hacia arriba por la ranura izquierda de forma que quede a la derecha de la palanca tirahilos y hasta que se en- cuentre detrás de ésta. Lleve el hilo hacia la izquierda, tire de él, y, a continuación, bájelo por la ranura izquierda hacia la aguja. Este movimiento debería enhebrar automáticamente la palanca (fig. C).

6.Baje el hilo y páselo por detrás de la guía (fig. D).

7.Enhebre la aguja de delante hacia atrás y saque unos 5 cm (2") de hilo.

NOTA:

Si el hilo está mal enhebrado, puede romperse, así como provocar que se salten puntadas o se frunza el tejido.

17

Заправка верхней нити

1Стержень для катушки

2 Нитенаправитель

3 Рычаг нитепритягивателя

4 Натяжитель верхней нити

5 Контрольная пружина

6 Нижний нитенаправитель

1.Поднимите прижимную лапку ее рычагом и, вращая маховик на себя (против часовой стрелки), полностью поднимите рычаг нитепритягивателя.

2.Вытяните стержень и установите на него катушку с нитью.

3.Проведите нить через первый нитенаправитель, как показано на рисунке, а затем на себя и в правую щель на передней стороне машины.

4.Проведите нить через правую щель вниз и вокруг натяжителя влево, чтобы она захватила контрольную пружину с левой стороны натяжителя. (рис. A и B)

5.Проведите нить через левую щель вверх, при этом нить должна проходить справа от рычага нитепритягивателя, пока не зайдет за этот рычаг. Заведите нить влево за рычаг нитепритягивателя и затем проведите ее через левую щель вниз к игле. При этом движении нить автоматически проденется через рычаг нитепритягивателя. (рис. C)

6.Протяните нить вниз в зону иглы, проведя ее за нитенаправителем непосредственно над иглой. (рис. D)

7.Проденьте нить в иглу спереди назад и оставьте конец нити около 5 см.

ПРИМЕЧАНИЕ:

При неправильной подаче нить может порваться, что приведет к пропуску стежков или к образованию складок на ткани.

Page 28
Image 28
Brother X-3 manual Enhebrado superior de la aguja, Заправка верхней нити

X-3 specifications

The Brother X-3 is a remarkable piece of technology that redefines the expectations of modern sewing machines. Designed for both amateur and professional users, it seamlessly blends functionality with user-friendly features. One of the most significant aspects of the Brother X-3 is its advanced sewing capabilities, making it ideal for various sewing projects, including quilting, garment construction, and home décor.

At the heart of the Brother X-3 lies its robust and dependable motor that provides exceptional sewing speed and reliability. The machine can reach speeds of up to 850 stitches per minute, ensuring that users can complete their projects efficiently. This high-speed performance is complemented by the large work area, allowing for the management of larger fabrics and intricate designs with ease.

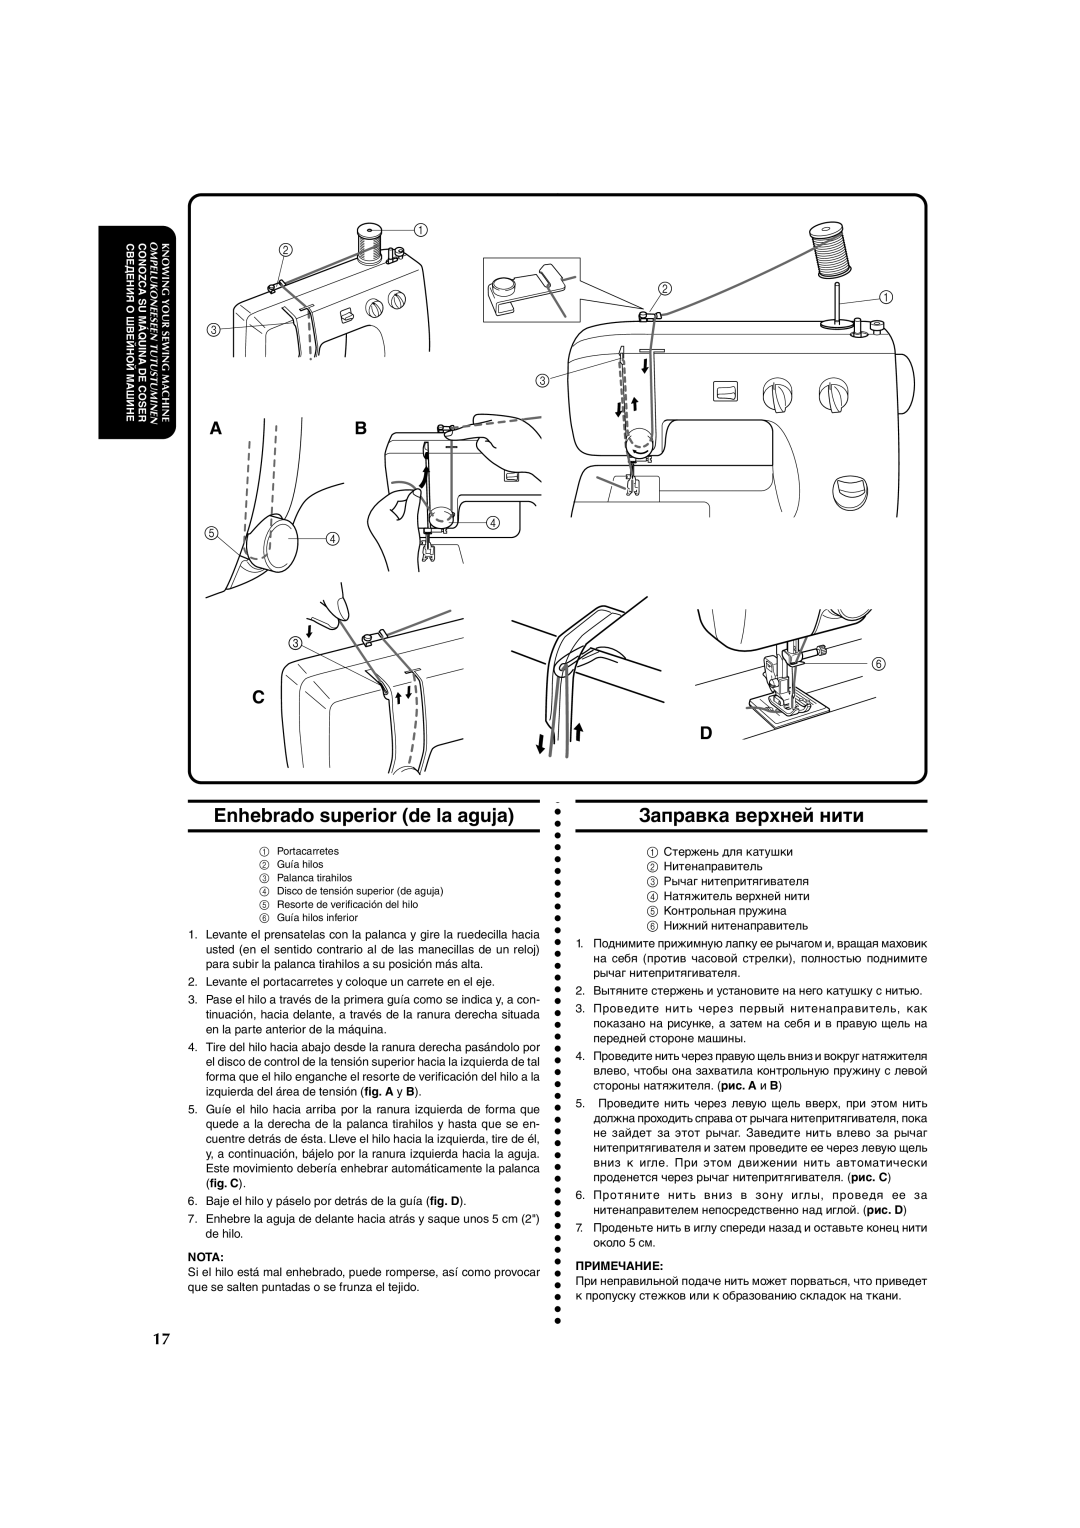
The Brother X-3 incorporates an array of built-in stitches, providing users with over 100 unique stitch patterns, including utility stitches, decorative stitches, and quilting stitches. This extensive variety enables users to experiment with their creativity while producing professional-quality finishes. Additionally, the machine features an automatic needle threader, which simplifies the sewing process by quickly threading the needle in seconds.

One of the standout technologies in the Brother X-3 is its LCD display, which provides a clear and intuitive interface for users. This screen allows for easy selection of stitch patterns, adjustments of stitch length and width, and even provides on-screen tutorials, making it accessible for beginners. The machine also boasts an automatic one-step buttonhole function, ensuring precision and consistency in creating buttonholes and enhancing garment durability.

Another remarkable characteristic of the Brother X-3 is its versatility. It comes equipped with a variety of accessory feet that cater to different sewing needs, such as quilting, zippers, and appliqué. Users can effortlessly switch between these feet, allowing for the execution of diverse sewing techniques.

In terms of portability and convenience, the Brother X-3 is lightweight and comes with a sturdy carrying case, making it easy to transport for classes or sewing groups. Its compact design does not compromise on workspace, thanks to the extension table that provides additional support for larger projects.

Overall, the Brother X-3 stands out as a cutting-edge sewing machine that merges technology, creativity, and ease of use, making it an ideal choice for sewists of all skill levels. Whether you are a beginner learning the ropes or an experienced sewist tackling intricate designs, the Brother X-3 is equipped to meet your sewing needs with precision and flair.