СВЕДЕНИЯCONOZCAOMPELUKONEESEENKNOWING ОSUYOUR ШВЕЙНОЙSEWING QUINA МАШИНЕDETUTUSTUMINENMACHINE COSER

Twin-Needle Sewing (Option)

Your sewing machine is designed for twin needle sewing, which al- lows you to sew using two upper threads. You can use the same color or two different colors of thread for decorative stitches. Be sure that the two upper threads used for threading the twin needle have the same weight. If the threads do not have the same weight, the stitching may not be consistent.

INSERTING THE TWIN NEEDLE

Insert the twin needle in the same way that a single needle is inserted. (See note.) The flat side of the needle should face toward the back and the rounded side should face toward you.

SETTING THE EXTRA SPOOL PIN

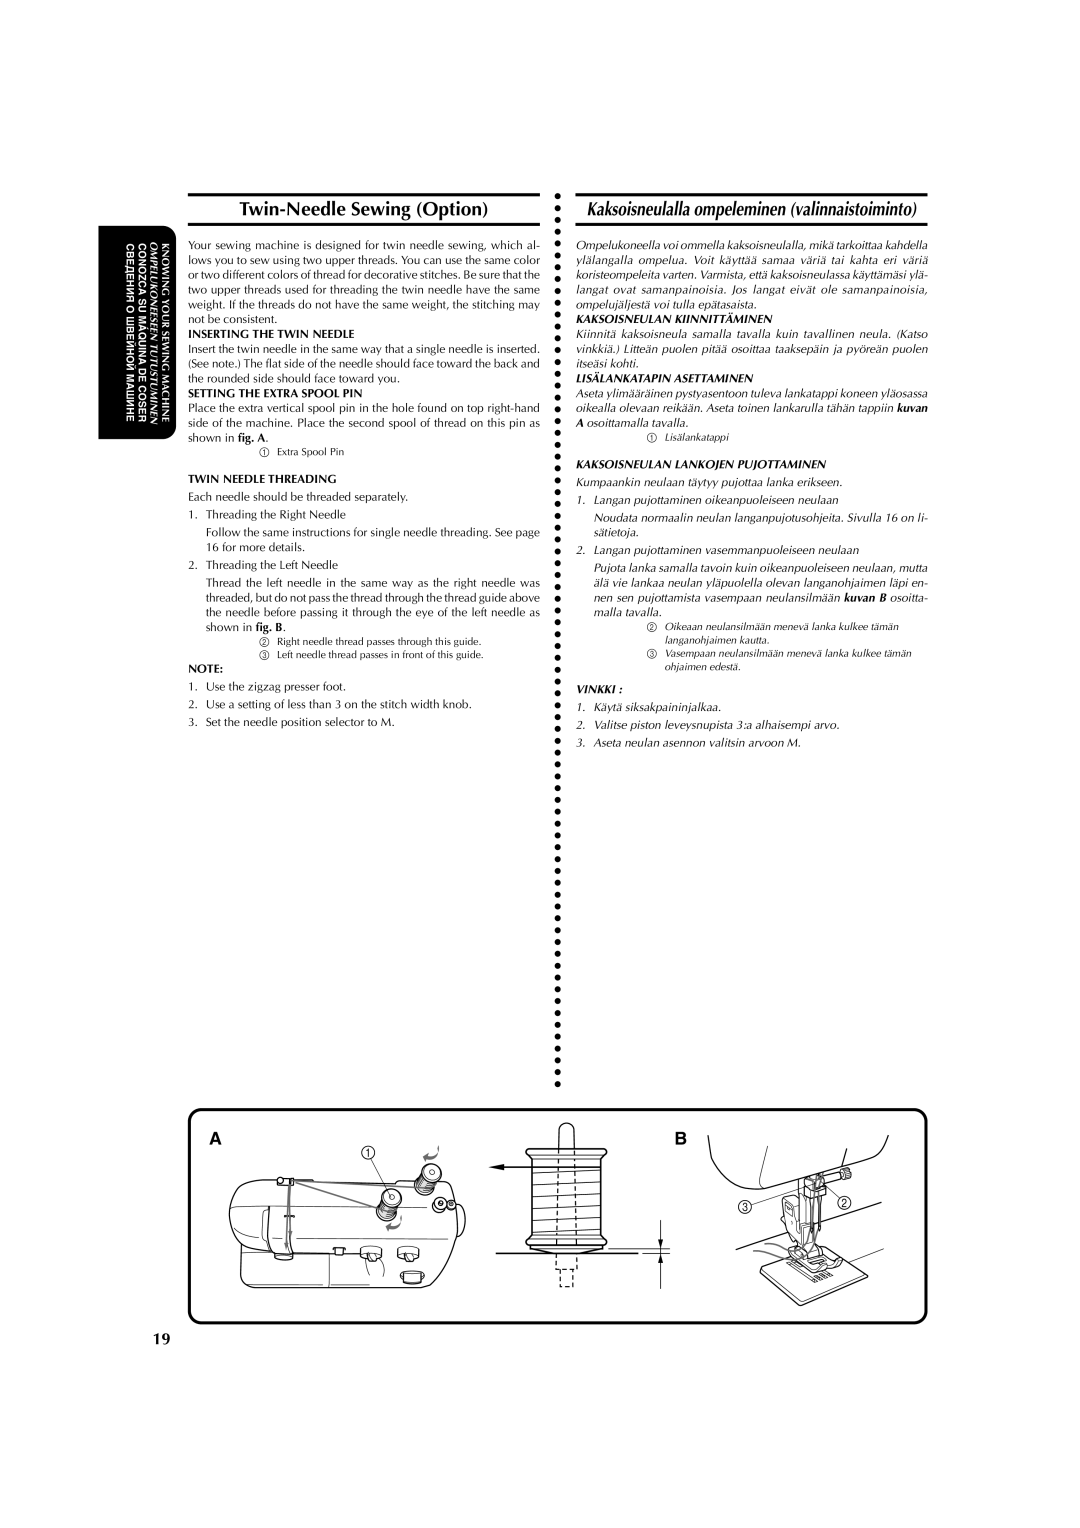
Place the extra vertical spool pin in the hole found on top right-hand side of the machine. Place the second spool of thread on this pin as shown in fig. A.

1Extra Spool Pin

TWIN NEEDLE THREADING

Each needle should be threaded separately.

1.Threading the Right Needle

Follow the same instructions for single needle threading. See page 16 for more details.

2.Threading the Left Needle

Thread the left needle in the same way as the right needle was threaded, but do not pass the thread through the thread guide above the needle before passing it through the eye of the left needle as shown in fig. B.

2 Right needle thread passes through this guide. 3 Left needle thread passes in front of this guide.

NOTE:

1.Use the zigzag presser foot.

2.Use a setting of less than 3 on the stitch width knob.

3.Set the needle position selector to M.

Kaksoisneulalla ompeleminen (valinnaistoiminto)

Ompelukoneella voi ommella kaksoisneulalla, mikä tarkoittaa kahdella ylälangalla ompelua. Voit käyttää samaa väriä tai kahta eri väriä koristeompeleita varten. Varmista, että kaksoisneulassa käyttämäsi ylä- langat ovat samanpainoisia. Jos langat eivät ole samanpainoisia, ompelujäljestä voi tulla epätasaista.

KAKSOISNEULAN KIINNITTÄMINEN

Kiinnitä kaksoisneula samalla tavalla kuin tavallinen neula. (Katso vinkkiä.) Litteän puolen pitää osoittaa taaksepäin ja pyöreän puolen itseäsi kohti.

LISÄLANKATAPIN ASETTAMINEN

Aseta ylimääräinen pystyasentoon tuleva lankatappi koneen yläosassa oikealla olevaan reikään. Aseta toinen lankarulla tähän tappiin kuvan A osoittamalla tavalla.

1Lisälankatappi

KAKSOISNEULAN LANKOJEN PUJOTTAMINEN

Kumpaankin neulaan täytyy pujottaa lanka erikseen.

1.Langan pujottaminen oikeanpuoleiseen neulaan

Noudata normaalin neulan langanpujotusohjeita. Sivulla 16 on li- sätietoja.

2.Langan pujottaminen vasemmanpuoleiseen neulaan

Pujota lanka samalla tavoin kuin oikeanpuoleiseen neulaan, mutta älä vie lankaa neulan yläpuolella olevan langanohjaimen läpi en- nen sen pujottamista vasempaan neulansilmään kuvan B osoitta- malla tavalla.

2 Oikeaan neulansilmään menevä lanka kulkee tämän langanohjaimen kautta.

3 Vasempaan neulansilmään menevä lanka kulkee tämän ohjaimen edestä.

VINKKI :

1.Käytä siksakpaininjalkaa.

2.Valitse piston leveysnupista 3:a alhaisempi arvo.

3.Aseta neulan asennon valitsin arvoon M.

AB

19

Page 30
Image 30
Brother X-3 manual Twin-Needle Sewing Option, Inserting the Twin Needle

X-3 specifications

The Brother X-3 is a remarkable piece of technology that redefines the expectations of modern sewing machines. Designed for both amateur and professional users, it seamlessly blends functionality with user-friendly features. One of the most significant aspects of the Brother X-3 is its advanced sewing capabilities, making it ideal for various sewing projects, including quilting, garment construction, and home décor.

At the heart of the Brother X-3 lies its robust and dependable motor that provides exceptional sewing speed and reliability. The machine can reach speeds of up to 850 stitches per minute, ensuring that users can complete their projects efficiently. This high-speed performance is complemented by the large work area, allowing for the management of larger fabrics and intricate designs with ease.

The Brother X-3 incorporates an array of built-in stitches, providing users with over 100 unique stitch patterns, including utility stitches, decorative stitches, and quilting stitches. This extensive variety enables users to experiment with their creativity while producing professional-quality finishes. Additionally, the machine features an automatic needle threader, which simplifies the sewing process by quickly threading the needle in seconds.

One of the standout technologies in the Brother X-3 is its LCD display, which provides a clear and intuitive interface for users. This screen allows for easy selection of stitch patterns, adjustments of stitch length and width, and even provides on-screen tutorials, making it accessible for beginners. The machine also boasts an automatic one-step buttonhole function, ensuring precision and consistency in creating buttonholes and enhancing garment durability.

Another remarkable characteristic of the Brother X-3 is its versatility. It comes equipped with a variety of accessory feet that cater to different sewing needs, such as quilting, zippers, and appliqué. Users can effortlessly switch between these feet, allowing for the execution of diverse sewing techniques.

In terms of portability and convenience, the Brother X-3 is lightweight and comes with a sturdy carrying case, making it easy to transport for classes or sewing groups. Its compact design does not compromise on workspace, thanks to the extension table that provides additional support for larger projects.

Overall, the Brother X-3 stands out as a cutting-edge sewing machine that merges technology, creativity, and ease of use, making it an ideal choice for sewists of all skill levels. Whether you are a beginner learning the ropes or an experienced sewist tackling intricate designs, the Brother X-3 is equipped to meet your sewing needs with precision and flair.