1

2

2

3

3

AB

1

KNOWING YOUR SEWING MACHINE OMPELUKONEESEEN TUTUSTUMINEN CONOZCA SU MÁQUINA DE COSER СВЕДЕНИЯ О ШВЕЙНОЙ МАШИНЕ

5 4

C

4

6

D

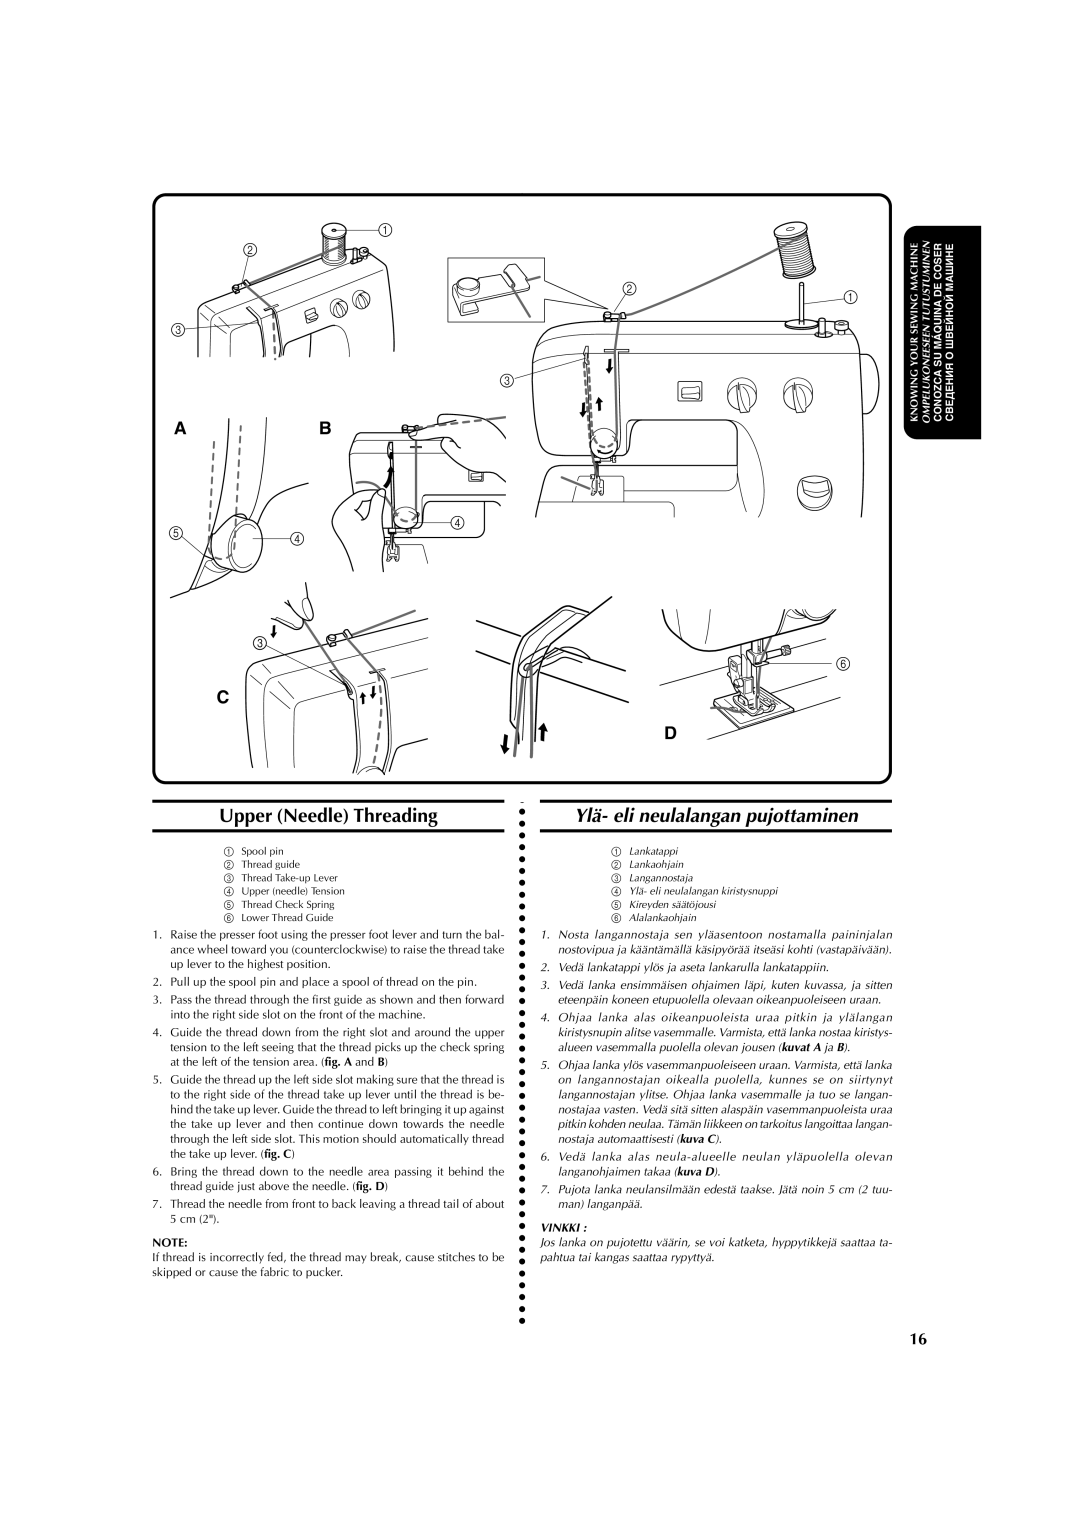
Upper (Needle) Threading

1Spool pin

2 Thread guide

3 Thread Take-up Lever

4 Upper (needle) Tension

5 Thread Check Spring

6 Lower Thread Guide

1.Raise the presser foot using the presser foot lever and turn the bal- ance wheel toward you (counterclockwise) to raise the thread take up lever to the highest position.

2.Pull up the spool pin and place a spool of thread on the pin.

3.Pass the thread through the first guide as shown and then forward into the right side slot on the front of the machine.

4.Guide the thread down from the right slot and around the upper tension to the left seeing that the thread picks up the check spring at the left of the tension area. (fig. A and B)

5.Guide the thread up the left side slot making sure that the thread is to the right side of the thread take up lever until the thread is be- hind the take up lever. Guide the thread to left bringing it up against the take up lever and then continue down towards the needle through the left side slot. This motion should automatically thread the take up lever. (fig. C)

6.Bring the thread down to the needle area passing it behind the thread guide just above the needle. (fig. D)

7.Thread the needle from front to back leaving a thread tail of about 5 cm (2").

NOTE:

If thread is incorrectly fed, the thread may break, cause stitches to be skipped or cause the fabric to pucker.

Ylä- eli neulalangan pujottaminen

1Lankatappi

2 Lankaohjain

3 Langannostaja

4 Ylä- eli neulalangan kiristysnuppi

5 Kireyden säätöjousi

6 Alalankaohjain

1.Nosta langannostaja sen yläasentoon nostamalla paininjalan nostovipua ja kääntämällä käsipyörää itseäsi kohti (vastapäivään).

2.Vedä lankatappi ylös ja aseta lankarulla lankatappiin.

3.Vedä lanka ensimmäisen ohjaimen läpi, kuten kuvassa, ja sitten eteenpäin koneen etupuolella olevaan oikeanpuoleiseen uraan.

4.Ohjaa lanka alas oikeanpuoleista uraa pitkin ja ylälangan kiristysnupin alitse vasemmalle. Varmista, että lanka nostaa kiristys- alueen vasemmalla puolella olevan jousen (kuvat A ja B).

5.Ohjaa lanka ylös vasemmanpuoleiseen uraan. Varmista, että lanka on langannostajan oikealla puolella, kunnes se on siirtynyt langannostajan ylitse. Ohjaa lanka vasemmalle ja tuo se langan- nostajaa vasten. Vedä sitä sitten alaspäin vasemmanpuoleista uraa pitkin kohden neulaa. Tämän liikkeen on tarkoitus langoittaa langan- nostaja automaattisesti (kuva C).

6.Vedä lanka alas neula-alueelle neulan yläpuolella olevan langanohjaimen takaa (kuva D).

7.Pujota lanka neulansilmään edestä taakse. Jätä noin 5 cm (2 tuu- man) langanpää.

VINKKI :

Jos lanka on pujotettu väärin, se voi katketa, hyppytikkejä saattaa ta- pahtua tai kangas saattaa rypyttyä.

16

Page 27
Image 27
Brother X-3 manual Upper Needle Threading, Ylä- eli neulalangan pujottaminen

X-3 specifications

The Brother X-3 is a remarkable piece of technology that redefines the expectations of modern sewing machines. Designed for both amateur and professional users, it seamlessly blends functionality with user-friendly features. One of the most significant aspects of the Brother X-3 is its advanced sewing capabilities, making it ideal for various sewing projects, including quilting, garment construction, and home décor.

At the heart of the Brother X-3 lies its robust and dependable motor that provides exceptional sewing speed and reliability. The machine can reach speeds of up to 850 stitches per minute, ensuring that users can complete their projects efficiently. This high-speed performance is complemented by the large work area, allowing for the management of larger fabrics and intricate designs with ease.

The Brother X-3 incorporates an array of built-in stitches, providing users with over 100 unique stitch patterns, including utility stitches, decorative stitches, and quilting stitches. This extensive variety enables users to experiment with their creativity while producing professional-quality finishes. Additionally, the machine features an automatic needle threader, which simplifies the sewing process by quickly threading the needle in seconds.

One of the standout technologies in the Brother X-3 is its LCD display, which provides a clear and intuitive interface for users. This screen allows for easy selection of stitch patterns, adjustments of stitch length and width, and even provides on-screen tutorials, making it accessible for beginners. The machine also boasts an automatic one-step buttonhole function, ensuring precision and consistency in creating buttonholes and enhancing garment durability.

Another remarkable characteristic of the Brother X-3 is its versatility. It comes equipped with a variety of accessory feet that cater to different sewing needs, such as quilting, zippers, and appliqué. Users can effortlessly switch between these feet, allowing for the execution of diverse sewing techniques.

In terms of portability and convenience, the Brother X-3 is lightweight and comes with a sturdy carrying case, making it easy to transport for classes or sewing groups. Its compact design does not compromise on workspace, thanks to the extension table that provides additional support for larger projects.

Overall, the Brother X-3 stands out as a cutting-edge sewing machine that merges technology, creativity, and ease of use, making it an ideal choice for sewists of all skill levels. Whether you are a beginner learning the ropes or an experienced sewist tackling intricate designs, the Brother X-3 is equipped to meet your sewing needs with precision and flair.