Buttonhole Sewing


Napinläven ompeleminen

STITCH LENGTH

Set between 0 and 1 (F) for the Satin Stitch.


STITCH WIDTH

See the instructions below.


NEEDLE POSITION

R (right position)


PRESSER FOOT

Zigzag


NEEDLE

Single


Making a buttonhole

NOTE:

1.It is recommended to practice making a buttonhole on a scrap piece of fabric before attempting it on your project.

2.Using tailor’s chalk to mark the position and length of the buttonhole on the fabric is also recommended.

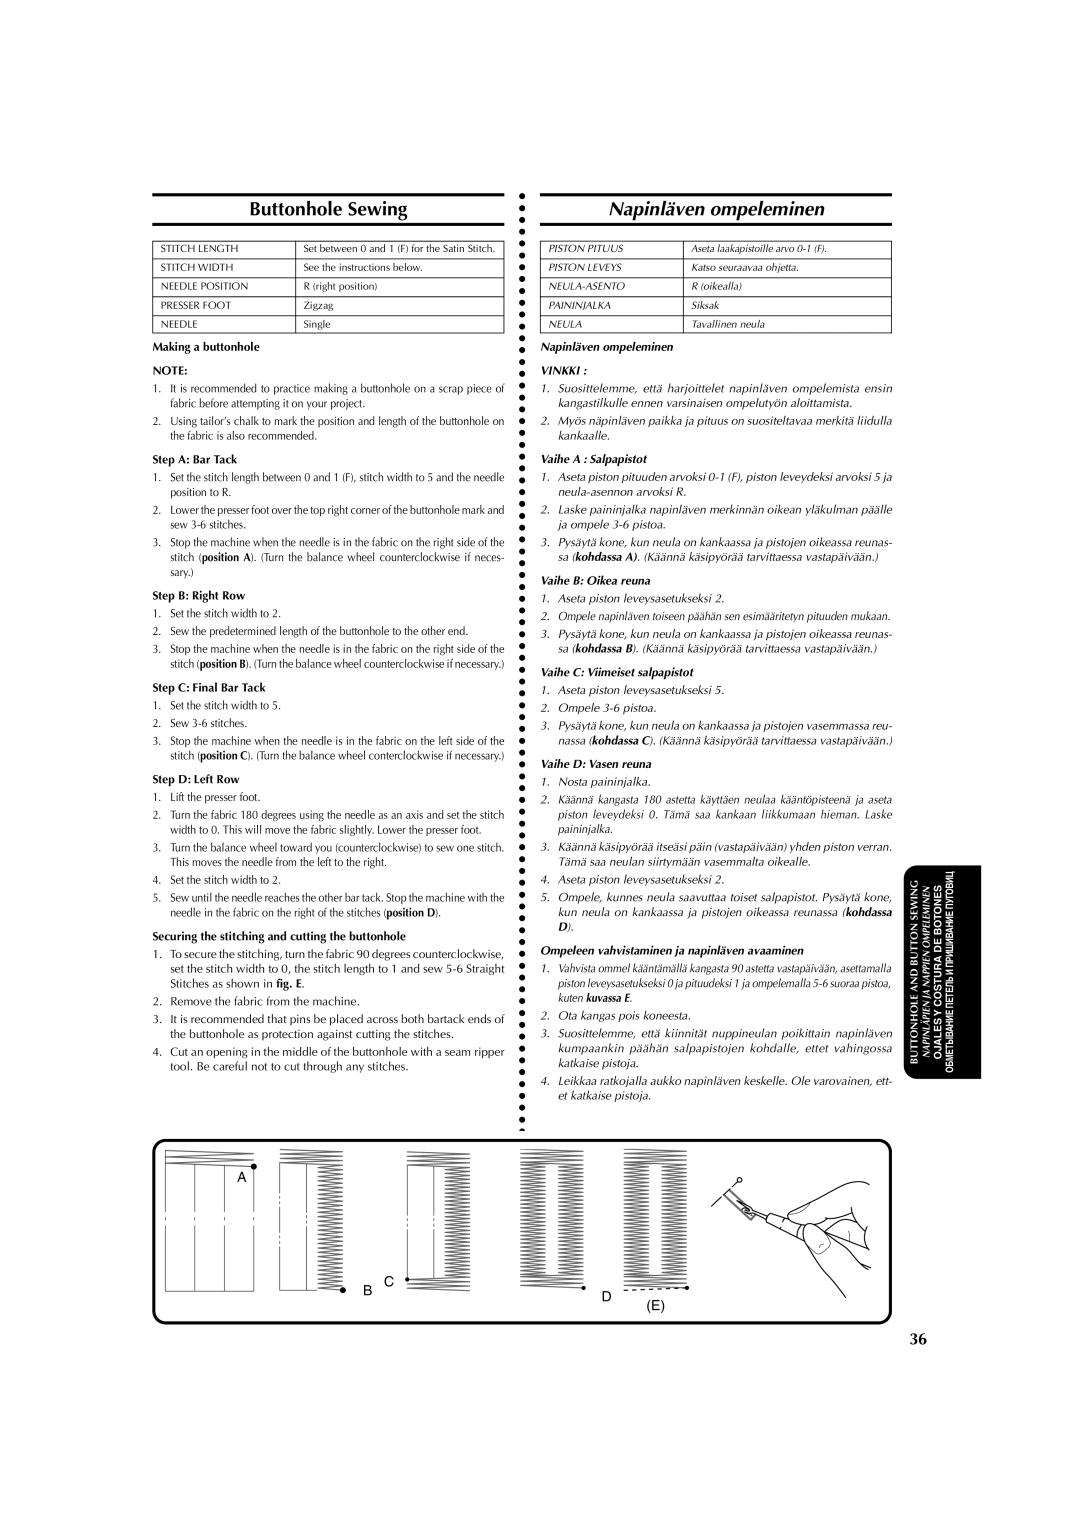
Step A: Bar Tack

1.Set the stitch length between 0 and 1 (F), stitch width to 5 and the needle position to R.

2.Lower the presser foot over the top right corner of the buttonhole mark and sew 3-6 stitches.

3.Stop the machine when the needle is in the fabric on the right side of the stitch (position A). (Turn the balance wheel counterclockwise if neces- sary.)

Step B: Right Row

1.Set the stitch width to 2.

2.Sew the predetermined length of the buttonhole to the other end.

3.Stop the machine when the needle is in the fabric on the right side of the stitch (position B). (Turn the balance wheel counterclockwise if necessary.)

Step C: Final Bar Tack

1.Set the stitch width to 5.

2.Sew 3-6 stitches.

3.Stop the machine when the needle is in the fabric on the left side of the stitch (position C). (Turn the balance wheel conterclockwise if necessary.)

Step D: Left Row

1.Lift the presser foot.

2.Turn the fabric 180 degrees using the needle as an axis and set the stitch width to 0. This will move the fabric slightly. Lower the presser foot.

3.Turn the balance wheel toward you (counterclockwise) to sew one stitch. This moves the needle from the left to the right.

4.Set the stitch width to 2.

5.Sew until the needle reaches the other bar tack. Stop the machine with the needle in the fabric on the right of the stitches (position D).

Securing the stitching and cutting the buttonhole

1.To secure the stitching, turn the fabric 90 degrees counterclockwise, set the stitch width to 0, the stitch length to 1 and sew 5-6 Straight Stitches as shown in fig. E.

2.Remove the fabric from the machine.

3.It is recommended that pins be placed across both bartack ends of the buttonhole as protection against cutting the stitches.

4.Cut an opening in the middle of the buttonhole with a seam ripper tool. Be careful not to cut through any stitches.

PISTON PITUUS

Aseta laakapistoille arvo 0-1 (F).


PISTON LEVEYS

Katso seuraavaa ohjetta.


NEULA-ASENTO

R (oikealla)


PAININJALKA

Siksak


NEULA

Tavallinen neula


Napinläven ompeleminen

VINKKI :

1.Suosittelemme, että harjoittelet napinläven ompelemista ensin kangastilkulle ennen varsinaisen ompelutyön aloittamista.

2.Myös näpinläven paikka ja pituus on suositeltavaa merkitä liidulla kankaalle.

Vaihe A : Salpapistot

1.Aseta piston pituuden arvoksi 0-1 (F), piston leveydeksi arvoksi 5 ja neula-asennon arvoksi R.

2.Laske paininjalka napinläven merkinnän oikean yläkulman päälle ja ompele 3-6 pistoa.

3.Pysäytä kone, kun neula on kankaassa ja pistojen oikeassa reunas- sa (kohdassa A). (Käännä käsipyörää tarvittaessa vastapäivään.)

Vaihe B: Oikea reuna

1.Aseta piston leveysasetukseksi 2.

2.Ompele napinläven toiseen päähän sen esimääritetyn pituuden mukaan.

3.Pysäytä kone, kun neula on kankaassa ja pistojen oikeassa reunas- sa (kohdassa B). (Käännä käsipyörää tarvittaessa vastapäivään.)

Vaihe C: Viimeiset salpapistot

1.Aseta piston leveysasetukseksi 5.

2.Ompele 3-6 pistoa.

3.Pysäytä kone, kun neula on kankaassa ja pistojen vasemmassa reu- nassa (kohdassa C). (Käännä käsipyörää tarvittaessa vastapäivään.)

Vaihe D: Vasen reuna

1.Nosta paininjalka.

2.Käännä kangasta 180 astetta käyttäen neulaa kääntöpisteenä ja aseta piston leveydeksi 0. Tämä saa kankaan liikkumaan hieman. Laske paininjalka.

3.Käännä käsipyörää itseäsi päin (vastapäivään) yhden piston verran. Tämä saa neulan siirtymään vasemmalta oikealle.

4.Aseta piston leveysasetukseksi 2.

5.Ompele, kunnes neula saavuttaa toiset salpapistot. Pysäytä kone, kun neula on kankaassa ja pistojen oikeassa reunassa (kohdassa D).

Ompeleen vahvistaminen ja napinläven avaaminen

1.Vahvista ommel kääntämällä kangasta 90 astetta vastapäivään, asettamalla piston leveysasetukseksi 0 ja pituudeksi 1 ja ompelemalla 5-6 suoraa pistoa, kuten kuvassa E.

2.Ota kangas pois koneesta.

3.Suosittelemme, että kiinnität nuppineulan poikittain napinläven kumpaankin päähän salpapistojen kohdalle, ettet vahingossa katkaise pistoja.

4.Leikkaa ratkojalla aukko napinläven keskelle. Ole varovainen, ett- et katkaise pistoja.

BUTTONHOLE AND BUTTON SEWING

NAPINLÄPIEN JA NAPPIEN OMPELEMINEN

OJALES Y COSTURA DE BOTONES

ОБМЕТЫВАНИЕ ПЕТЕЛЬ И ПРИШИВАНИЕ ПУГОВИЦ

A

B C D

(E)

36

Page 47
Image 47
Brother X-3 manual Buttonhole Sewing, Napinläven ompeleminen

X-3 specifications

The Brother X-3 is a remarkable piece of technology that redefines the expectations of modern sewing machines. Designed for both amateur and professional users, it seamlessly blends functionality with user-friendly features. One of the most significant aspects of the Brother X-3 is its advanced sewing capabilities, making it ideal for various sewing projects, including quilting, garment construction, and home décor.

At the heart of the Brother X-3 lies its robust and dependable motor that provides exceptional sewing speed and reliability. The machine can reach speeds of up to 850 stitches per minute, ensuring that users can complete their projects efficiently. This high-speed performance is complemented by the large work area, allowing for the management of larger fabrics and intricate designs with ease.

The Brother X-3 incorporates an array of built-in stitches, providing users with over 100 unique stitch patterns, including utility stitches, decorative stitches, and quilting stitches. This extensive variety enables users to experiment with their creativity while producing professional-quality finishes. Additionally, the machine features an automatic needle threader, which simplifies the sewing process by quickly threading the needle in seconds.

One of the standout technologies in the Brother X-3 is its LCD display, which provides a clear and intuitive interface for users. This screen allows for easy selection of stitch patterns, adjustments of stitch length and width, and even provides on-screen tutorials, making it accessible for beginners. The machine also boasts an automatic one-step buttonhole function, ensuring precision and consistency in creating buttonholes and enhancing garment durability.

Another remarkable characteristic of the Brother X-3 is its versatility. It comes equipped with a variety of accessory feet that cater to different sewing needs, such as quilting, zippers, and appliqué. Users can effortlessly switch between these feet, allowing for the execution of diverse sewing techniques.

In terms of portability and convenience, the Brother X-3 is lightweight and comes with a sturdy carrying case, making it easy to transport for classes or sewing groups. Its compact design does not compromise on workspace, thanks to the extension table that provides additional support for larger projects.

Overall, the Brother X-3 stands out as a cutting-edge sewing machine that merges technology, creativity, and ease of use, making it an ideal choice for sewists of all skill levels. Whether you are a beginner learning the ropes or an experienced sewist tackling intricate designs, the Brother X-3 is equipped to meet your sewing needs with precision and flair.