Darning


Parsinta

STITCH LENGTH

F-2


STITCH WIDTH

0


NEEDLE POSITION

M


PRESSER FOOT

None


NEEDLE

Single


OTHER

Darning plate


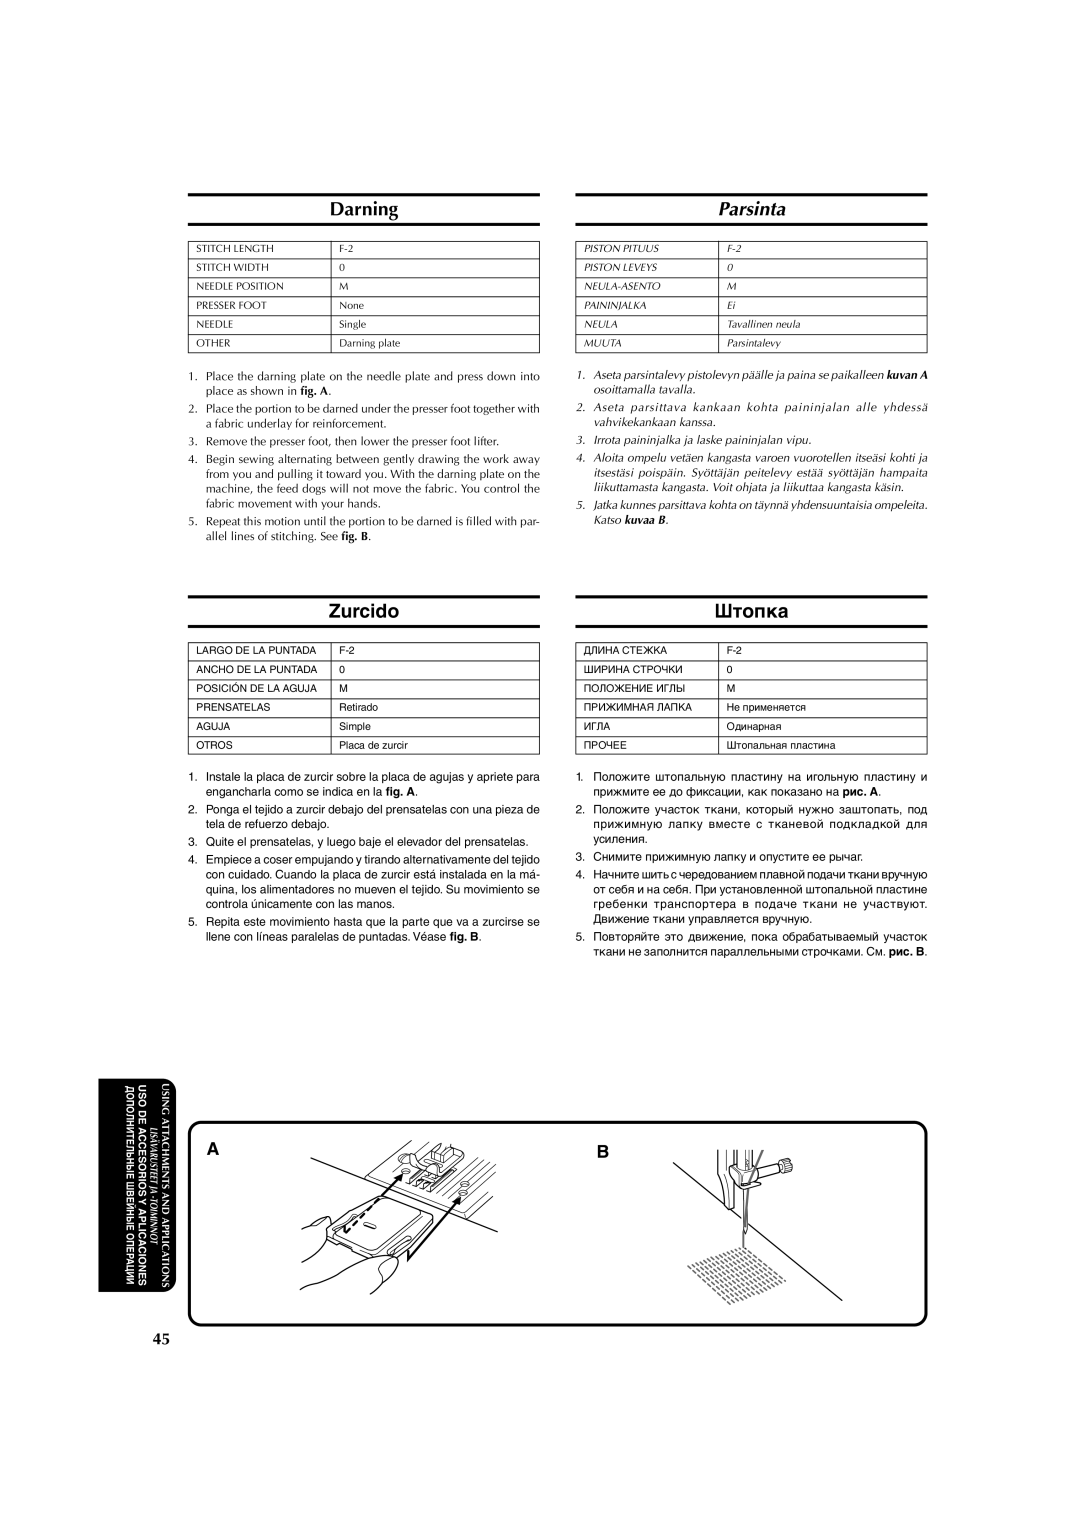
1.Place the darning plate on the needle plate and press down into place as shown in fig. A.

2.Place the portion to be darned under the presser foot together with a fabric underlay for reinforcement.

3.Remove the presser foot, then lower the presser foot lifter.

4.Begin sewing alternating between gently drawing the work away from you and pulling it toward you. With the darning plate on the machine, the feed dogs will not move the fabric. You control the fabric movement with your hands.

5.Repeat this motion until the portion to be darned is filled with par- allel lines of stitching. See fig. B.

PISTON PITUUS

F-2


PISTON LEVEYS

0


NEULA-ASENTO

M


PAININJALKA

Ei


NEULA

Tavallinen neula


MUUTA

Parsintalevy


1.Aseta parsintalevy pistolevyn päälle ja paina se paikalleen kuvan A osoittamalla tavalla.

2.Aseta parsittava kankaan kohta paininjalan alle yhdessä vahvikekankaan kanssa.

3.Irrota paininjalka ja laske paininjalan vipu.

4.Aloita ompelu vetäen kangasta varoen vuorotellen itseäsi kohti ja itsestäsi poispäin. Syöttäjän peitelevy estää syöttäjän hampaita liikuttamasta kangasta. Voit ohjata ja liikuttaa kangasta käsin.

5.Jatka kunnes parsittava kohta on täynnä yhdensuuntaisia ompeleita. Katso kuvaa B.

Zurcido


Штопка

ДОПОЛНИТЕЛЬНЫЕ ШВЕЙНЫЕ ОПЕРАЦИИ

USO DE ACCESORIOS Y

APLICACIONES

LISÄ VARUSTEET JA

-TOIMINNOT

USING ATTACHMENTS

AND APPLICA TIONS

LARGO DE LA PUNTADA

F-2


ANCHO DE LA PUNTADA

0


POSICIÓN DE LA AGUJA

M


PRENSATELAS

Retirado


AGUJA

Simple


OTROS

Placa de zurcir


1.Instale la placa de zurcir sobre la placa de agujas y apriete para engancharla como se indica en la fig. A.

2.Ponga el tejido a zurcir debajo del prensatelas con una pieza de tela de refuerzo debajo.

3.Quite el prensatelas, y luego baje el elevador del prensatelas.

4.Empiece a coser empujando y tirando alternativamente del tejido con cuidado. Cuando la placa de zurcir está instalada en la má- quina, los alimentadores no mueven el tejido. Su movimiento se controla únicamente con las manos.

5.Repita este movimiento hasta que la parte que va a zurcirse se llene con líneas paralelas de puntadas. Véase fig. B.

A

ДЛИНА СТЕЖКА

F-2


ШИРИНА СТРОЧКИ

0


ПОЛОЖЕНИЕ ИГЛЫ

M


ПРИЖИМНАЯ ЛАПКА

Не применяется


ИГЛА

Одинарная


ПРОЧЕЕ

Штопальная пластина


1.Положите штопальную пластину на игольную пластину и прижмите ее до фиксации, как показано на рис. A.

2.Положите участок ткани, который нужно заштопать, под прижимную лапку вместе с тканевой подкладкой для усиления.

3.Снимите прижимную лапку и опустите ее рычаг.

4.Начните шить с чередованием плавной подачи ткани вручную от себя и на себя. При установленной штопальной пластине гребенки транспортера в подаче ткани не участвуют. Движение ткани управляется вручную.

5.Повторяйте это движение, пока обрабатываемый участок ткани не заполнится параллельными строчками. См. рис. B.

B

45

Page 56
Image 56
Brother X-3 manual Darning, Parsinta, Zurcido Штопка

X-3 specifications

The Brother X-3 is a remarkable piece of technology that redefines the expectations of modern sewing machines. Designed for both amateur and professional users, it seamlessly blends functionality with user-friendly features. One of the most significant aspects of the Brother X-3 is its advanced sewing capabilities, making it ideal for various sewing projects, including quilting, garment construction, and home décor.

At the heart of the Brother X-3 lies its robust and dependable motor that provides exceptional sewing speed and reliability. The machine can reach speeds of up to 850 stitches per minute, ensuring that users can complete their projects efficiently. This high-speed performance is complemented by the large work area, allowing for the management of larger fabrics and intricate designs with ease.

The Brother X-3 incorporates an array of built-in stitches, providing users with over 100 unique stitch patterns, including utility stitches, decorative stitches, and quilting stitches. This extensive variety enables users to experiment with their creativity while producing professional-quality finishes. Additionally, the machine features an automatic needle threader, which simplifies the sewing process by quickly threading the needle in seconds.

One of the standout technologies in the Brother X-3 is its LCD display, which provides a clear and intuitive interface for users. This screen allows for easy selection of stitch patterns, adjustments of stitch length and width, and even provides on-screen tutorials, making it accessible for beginners. The machine also boasts an automatic one-step buttonhole function, ensuring precision and consistency in creating buttonholes and enhancing garment durability.

Another remarkable characteristic of the Brother X-3 is its versatility. It comes equipped with a variety of accessory feet that cater to different sewing needs, such as quilting, zippers, and appliqué. Users can effortlessly switch between these feet, allowing for the execution of diverse sewing techniques.

In terms of portability and convenience, the Brother X-3 is lightweight and comes with a sturdy carrying case, making it easy to transport for classes or sewing groups. Its compact design does not compromise on workspace, thanks to the extension table that provides additional support for larger projects.

Overall, the Brother X-3 stands out as a cutting-edge sewing machine that merges technology, creativity, and ease of use, making it an ideal choice for sewists of all skill levels. Whether you are a beginner learning the ropes or an experienced sewist tackling intricate designs, the Brother X-3 is equipped to meet your sewing needs with precision and flair.