Limpieza


Чистка

Para sacar el garfio de la lanzadera

1.Levante la aguja a su posición más alta.

2.Abra la cubierta de la lanzadera ubicada en la parte delantera del brazo libre.

3.Saque el portacanilla abriendo su pestillo y retirándolo de la pista de la lanzadera.

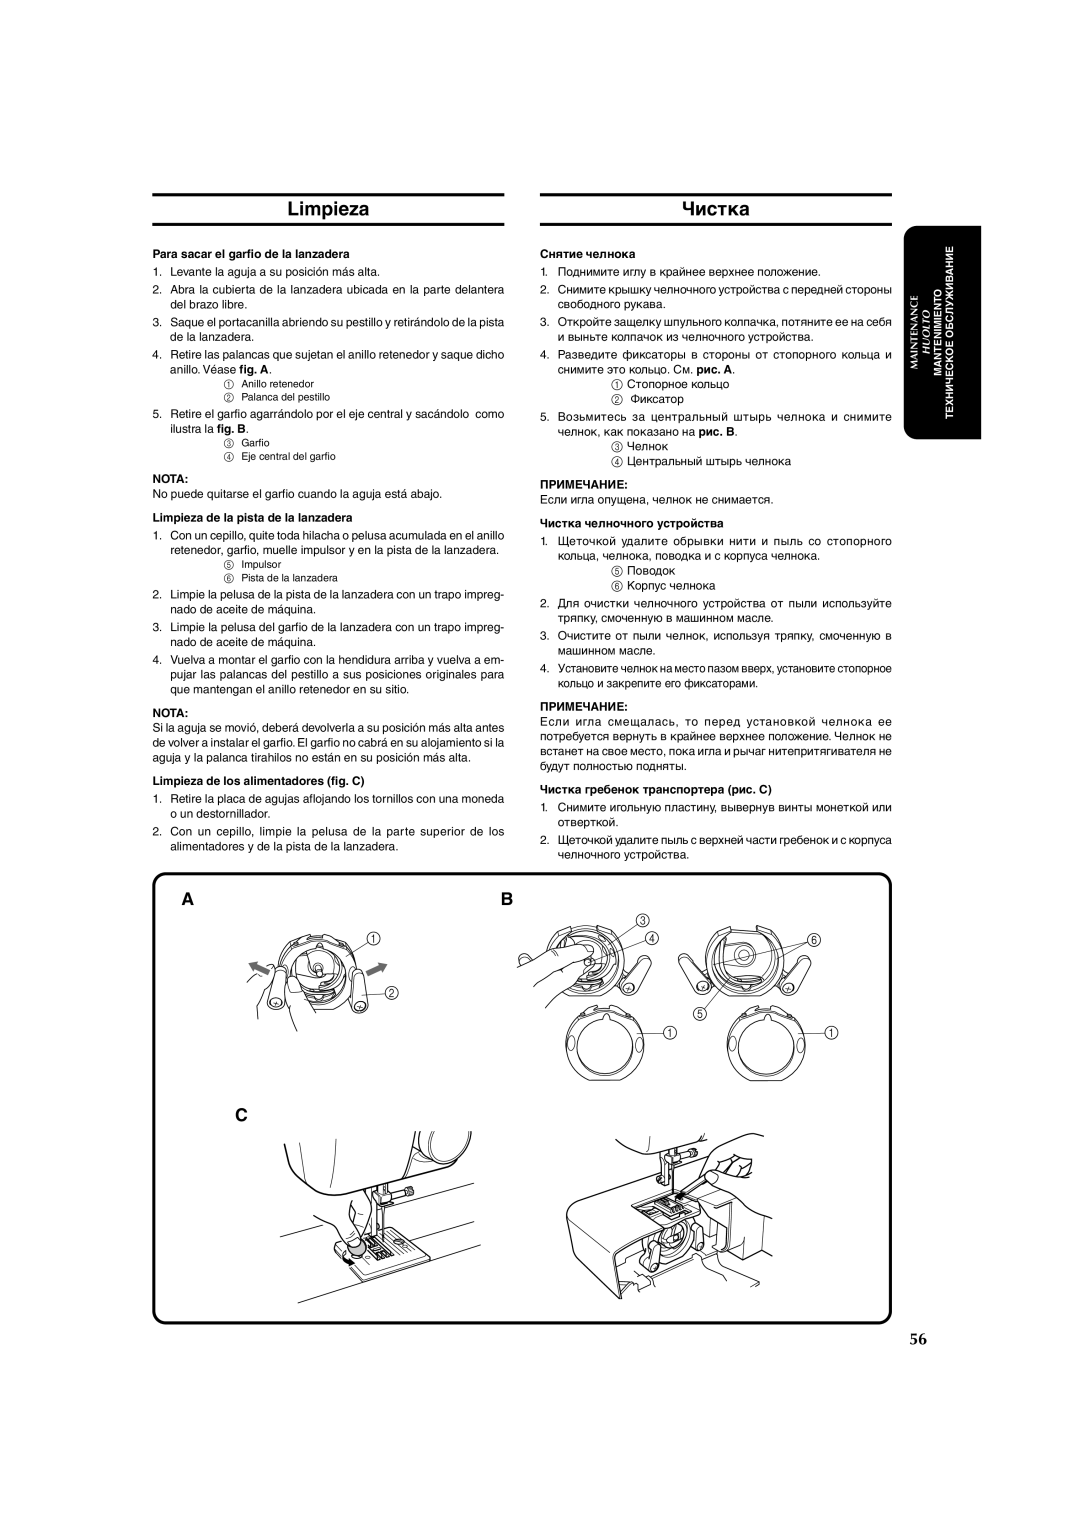
4.Retire las palancas que sujetan el anillo retenedor y saque dicho anillo. Véase fig. A.

1 Anillo retenedor

2 Palanca del pestillo

5.Retire el garfio agarrándolo por el eje central y sacándolo como ilustra la fig. B.

3 Garfio

4 Eje central del garfio

NOTA:

No puede quitarse el garfio cuando la aguja está abajo.

Limpieza de la pista de la lanzadera

1.Con un cepillo, quite toda hilacha o pelusa acumulada en el anillo retenedor, garfio, muelle impulsor y en la pista de la lanzadera.

5 Impulsor

6 Pista de la lanzadera

2.Limpie la pelusa de la pista de la lanzadera con un trapo impreg- nado de aceite de máquina.

3.Limpie la pelusa del garfio de la lanzadera con un trapo impreg- nado de aceite de máquina.

4.Vuelva a montar el garfio con la hendidura arriba y vuelva a em- pujar las palancas del pestillo a sus posiciones originales para que mantengan el anillo retenedor en su sitio.

NOTA:

Si la aguja se movió, deberá devolverla a su posición más alta antes de volver a instalar el garfio. El garfio no cabrá en su alojamiento si la aguja y la palanca tirahilos no están en su posición más alta.

Limpieza de los alimentadores (fig. C)

1.Retire la placa de agujas aflojando los tornillos con una moneda o un destornillador.

2.Con un cepillo, limpie la pelusa de la parte superior de los alimentadores y de la pista de la lanzadera.

Снятие челнока

1.Поднимите иглу в крайнее верхнее положение.

2.Снимите крышку челночного устройства с передней стороны свободного рукава.

3.Откройте защелку шпульного колпачка, потяните ее на себя и выньте колпачок из челночного устройства.

4.Разведите фиксаторы в стороны от стопорного кольца и снимите это кольцо. См. рис. A.

1 Стопорное кольцо

2 Фиксатор

5.Возьмитесь за центральный штырь челнока и снимите челнок, как показано на рис. B.

3 Челнок

4 Центральный штырь челнока

ПРИМЕЧАНИЕ:

Если игла опущена, челнок не снимается.

Чистка челночного устройства

1.Щеточкой удалите обрывки нити и пыль со стопорного кольца, челнока, поводка и с корпуса челнока.

5 Поводок

6 Корпус челнока

2.Для очистки челночного устройства от пыли используйте тряпку, смоченную в машинном масле.

3.Очистите от пыли челнок, используя тряпку, смоченную в машинном масле.

4.Установите челнок на место пазом вверх, установите стопорное кольцо и закрепите его фиксаторами.

ПРИМЕЧАНИЕ:

Если игла смещалась, то перед установкой челнока ее потребуется вернуть в крайнее верхнее положение. Челнок не встанет на свое место, пока игла и рычаг нитепритягивателя не будут полностью подняты.

Чистка гребенок транспортера (рис. C)

1.Снимите игольную пластину, вывернув винты монеткой или отверткой.

2.Щеточкой удалите пыль с верхней части гребенок и с корпуса челночного устройства.

MAINTENANCE

HUOLTO

MANTENIMIENTO

ТЕХНИЧЕСКОЕОБСЛУЖИВАНИЕ

AB


3


1

4

6

2

5

1 1

C

56

Page 67
Image 67
Brother X-3 manual Limpieza Чистка, Para sacar el garfio de la lanzadera, Limpieza de la pista de la lanzadera

X-3 specifications

The Brother X-3 is a remarkable piece of technology that redefines the expectations of modern sewing machines. Designed for both amateur and professional users, it seamlessly blends functionality with user-friendly features. One of the most significant aspects of the Brother X-3 is its advanced sewing capabilities, making it ideal for various sewing projects, including quilting, garment construction, and home décor.

At the heart of the Brother X-3 lies its robust and dependable motor that provides exceptional sewing speed and reliability. The machine can reach speeds of up to 850 stitches per minute, ensuring that users can complete their projects efficiently. This high-speed performance is complemented by the large work area, allowing for the management of larger fabrics and intricate designs with ease.

The Brother X-3 incorporates an array of built-in stitches, providing users with over 100 unique stitch patterns, including utility stitches, decorative stitches, and quilting stitches. This extensive variety enables users to experiment with their creativity while producing professional-quality finishes. Additionally, the machine features an automatic needle threader, which simplifies the sewing process by quickly threading the needle in seconds.

One of the standout technologies in the Brother X-3 is its LCD display, which provides a clear and intuitive interface for users. This screen allows for easy selection of stitch patterns, adjustments of stitch length and width, and even provides on-screen tutorials, making it accessible for beginners. The machine also boasts an automatic one-step buttonhole function, ensuring precision and consistency in creating buttonholes and enhancing garment durability.

Another remarkable characteristic of the Brother X-3 is its versatility. It comes equipped with a variety of accessory feet that cater to different sewing needs, such as quilting, zippers, and appliqué. Users can effortlessly switch between these feet, allowing for the execution of diverse sewing techniques.

In terms of portability and convenience, the Brother X-3 is lightweight and comes with a sturdy carrying case, making it easy to transport for classes or sewing groups. Its compact design does not compromise on workspace, thanks to the extension table that provides additional support for larger projects.

Overall, the Brother X-3 stands out as a cutting-edge sewing machine that merges technology, creativity, and ease of use, making it an ideal choice for sewists of all skill levels. Whether you are a beginner learning the ropes or an experienced sewist tackling intricate designs, the Brother X-3 is equipped to meet your sewing needs with precision and flair.