Zipper Insertion


Vetoketjun ompeleminen

STITCH LENGTH

2-3


STITCH WIDTH

0


NEEDLE POSITION

M


PRESSER FOOT

Zipper Foot


NEEDLE

Single


The zipper foot is used to sew on various types of zippers and can easily be positioned to the right or left side of the needle.

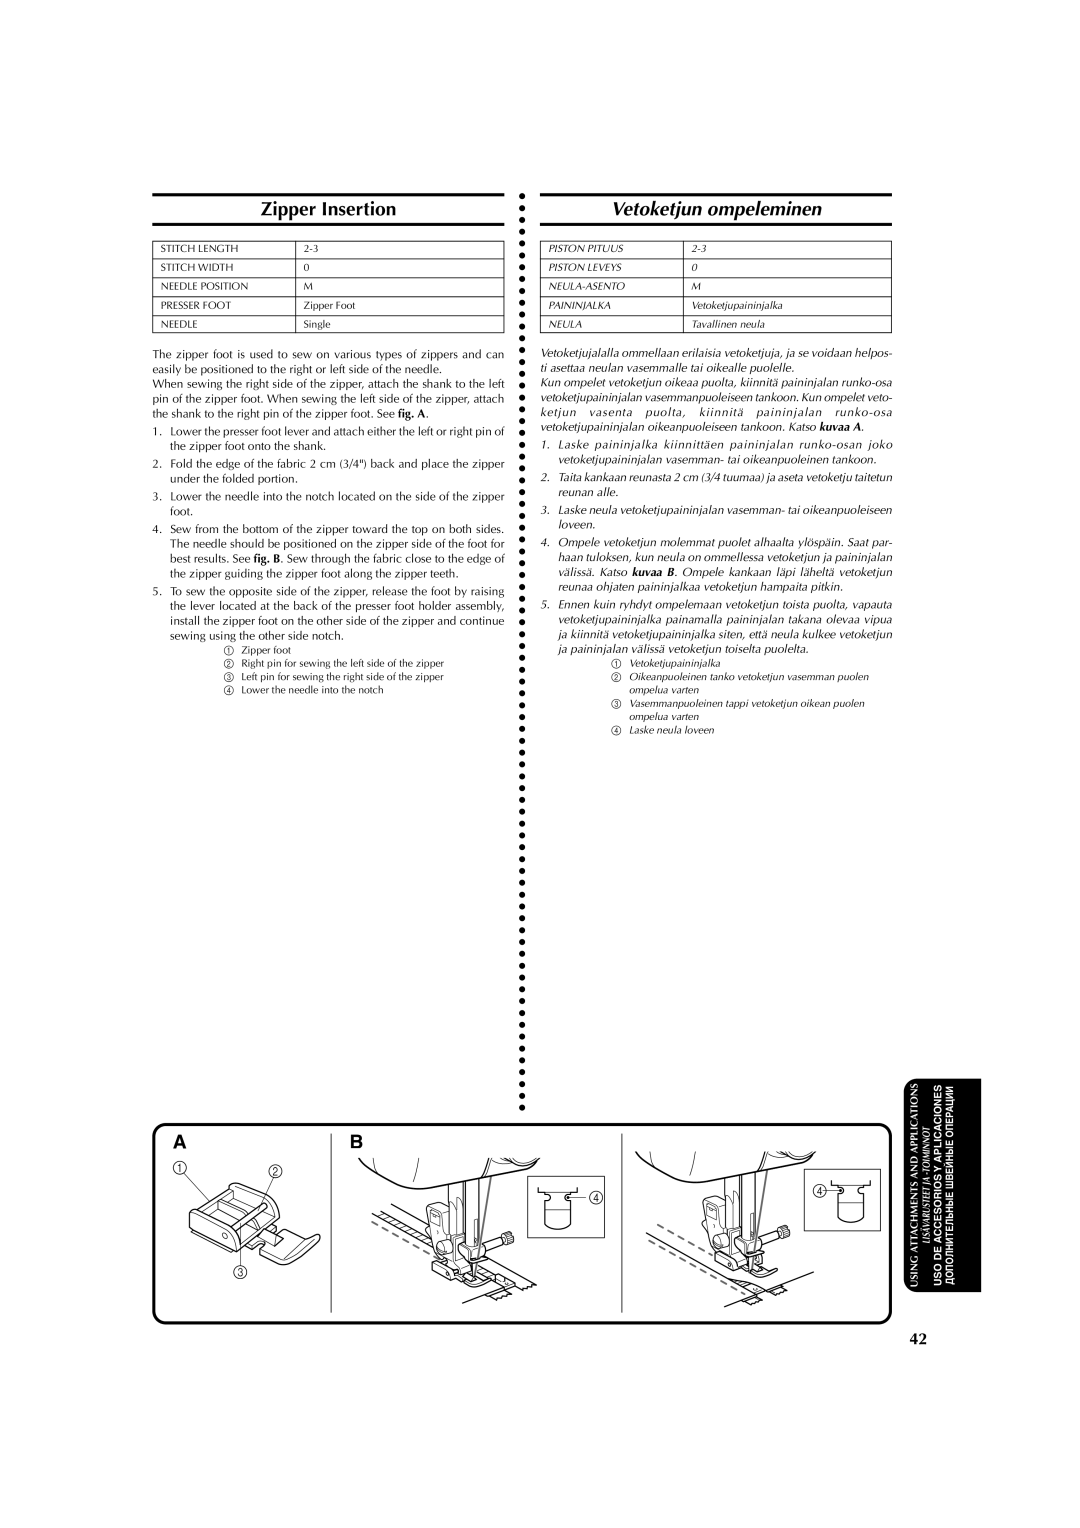
When sewing the right side of the zipper, attach the shank to the left pin of the zipper foot. When sewing the left side of the zipper, attach the shank to the right pin of the zipper foot. See fig. A.

1.Lower the presser foot lever and attach either the left or right pin of the zipper foot onto the shank.

2.Fold the edge of the fabric 2 cm (3/4") back and place the zipper under the folded portion.

3.Lower the needle into the notch located on the side of the zipper foot.

4.Sew from the bottom of the zipper toward the top on both sides. The needle should be positioned on the zipper side of the foot for best results. See fig. B. Sew through the fabric close to the edge of the zipper guiding the zipper foot along the zipper teeth.

5.To sew the opposite side of the zipper, release the foot by raising the lever located at the back of the presser foot holder assembly, install the zipper foot on the other side of the zipper and continue sewing using the other side notch.

1 Zipper foot

2 Right pin for sewing the left side of the zipper 3 Left pin for sewing the right side of the zipper 4 Lower the needle into the notch

PISTON PITUUS

2-3


PISTON LEVEYS

0


NEULA-ASENTO

M


PAININJALKA

Vetoketjupaininjalka


NEULA

Tavallinen neula


Vetoketjujalalla ommellaan erilaisia vetoketjuja, ja se voidaan helpos- ti asettaa neulan vasemmalle tai oikealle puolelle.

Kun ompelet vetoketjun oikeaa puolta, kiinnitä paininjalan runko-osa vetoketjupaininjalan vasemmanpuoleiseen tankoon. Kun ompelet veto- ketjun vasenta puolta, kiinnitä paininjalan runko-osa vetoketjupaininjalan oikeanpuoleiseen tankoon. Katso kuvaa A.

1.Laske paininjalka kiinnittäen paininjalan runko-osan joko vetoketjupaininjalan vasemman- tai oikeanpuoleinen tankoon.

2.Taita kankaan reunasta 2 cm (3/4 tuumaa) ja aseta vetoketju taitetun reunan alle.

3.Laske neula vetoketjupaininjalan vasemman- tai oikeanpuoleiseen loveen.

4.Ompele vetoketjun molemmat puolet alhaalta ylöspäin. Saat par- haan tuloksen, kun neula on ommellessa vetoketjun ja paininjalan välissä. Katso kuvaa B. Ompele kankaan läpi läheltä vetoketjun reunaa ohjaten paininjalkaa vetoketjun hampaita pitkin.

5.Ennen kuin ryhdyt ompelemaan vetoketjun toista puolta, vapauta vetoketjupaininjalka painamalla paininjalan takana olevaa vipua ja kiinnitä vetoketjupaininjalka siten, että neula kulkee vetoketjun ja paininjalan välissä vetoketjun toiselta puolelta.

1 Vetoketjupaininjalka

2 Oikeanpuoleinen tanko vetoketjun vasemman puolen ompelua varten

3 Vasemmanpuoleinen tappi vetoketjun oikean puolen ompelua varten

4 Laske neula loveen

A

B

1 2

3

4

4

USING ATTACHMENTS AND APPLICATIONS

LISÄVARUSTEET JA -TOIMINNOT

USO DE ACCESORIOS Y APLICACIONES

ДОПОЛНИТЕЛЬНЫЕ ШВЕЙНЫЕ ОПЕРАЦИИ

42

Page 53
Image 53
Brother X-3 manual Zipper Insertion, Vetoketjun ompeleminen

X-3 specifications

The Brother X-3 is a remarkable piece of technology that redefines the expectations of modern sewing machines. Designed for both amateur and professional users, it seamlessly blends functionality with user-friendly features. One of the most significant aspects of the Brother X-3 is its advanced sewing capabilities, making it ideal for various sewing projects, including quilting, garment construction, and home décor.

At the heart of the Brother X-3 lies its robust and dependable motor that provides exceptional sewing speed and reliability. The machine can reach speeds of up to 850 stitches per minute, ensuring that users can complete their projects efficiently. This high-speed performance is complemented by the large work area, allowing for the management of larger fabrics and intricate designs with ease.

The Brother X-3 incorporates an array of built-in stitches, providing users with over 100 unique stitch patterns, including utility stitches, decorative stitches, and quilting stitches. This extensive variety enables users to experiment with their creativity while producing professional-quality finishes. Additionally, the machine features an automatic needle threader, which simplifies the sewing process by quickly threading the needle in seconds.

One of the standout technologies in the Brother X-3 is its LCD display, which provides a clear and intuitive interface for users. This screen allows for easy selection of stitch patterns, adjustments of stitch length and width, and even provides on-screen tutorials, making it accessible for beginners. The machine also boasts an automatic one-step buttonhole function, ensuring precision and consistency in creating buttonholes and enhancing garment durability.

Another remarkable characteristic of the Brother X-3 is its versatility. It comes equipped with a variety of accessory feet that cater to different sewing needs, such as quilting, zippers, and appliqué. Users can effortlessly switch between these feet, allowing for the execution of diverse sewing techniques.

In terms of portability and convenience, the Brother X-3 is lightweight and comes with a sturdy carrying case, making it easy to transport for classes or sewing groups. Its compact design does not compromise on workspace, thanks to the extension table that provides additional support for larger projects.

Overall, the Brother X-3 stands out as a cutting-edge sewing machine that merges technology, creativity, and ease of use, making it an ideal choice for sewists of all skill levels. Whether you are a beginner learning the ropes or an experienced sewist tackling intricate designs, the Brother X-3 is equipped to meet your sewing needs with precision and flair.