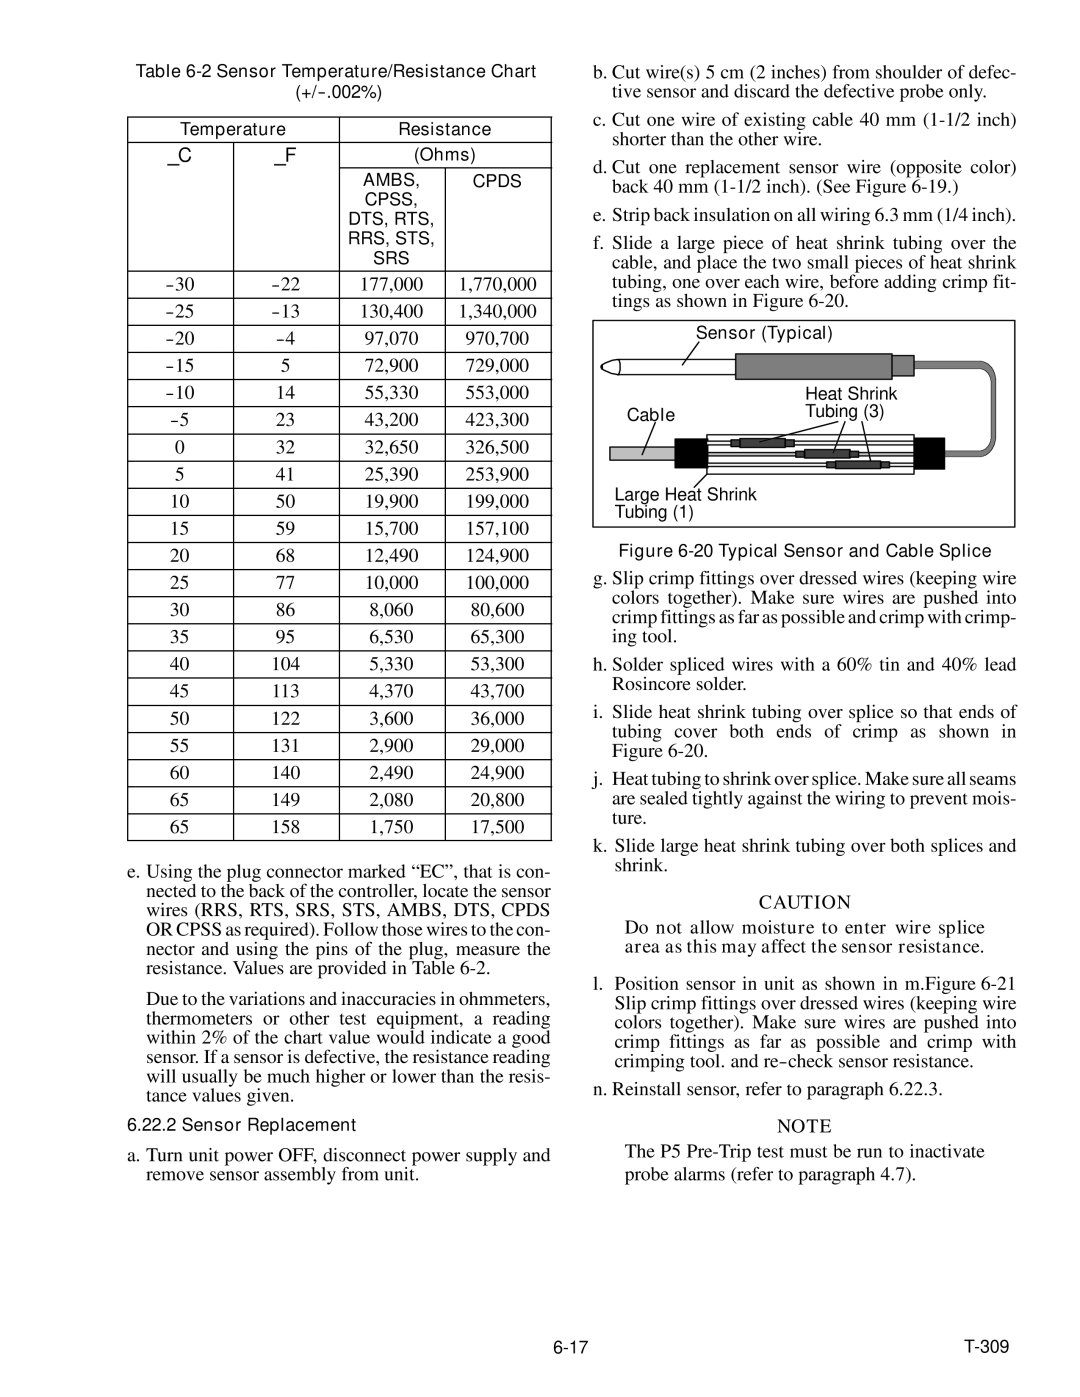
Table 6-2 Sensor Temperature/Resistance Chart

b. Cut wire(s) 5 cm (2 inches) from shoulder of defec-


(+/--.002%)


tive sensor and discard the defective probe only.

Temperature

Resistance

c. Cut one wire of existing cable 40 mm (1-1/2 inch)

shorter than the other wire.

_C

_F

(Ohms)

d. Cut one replacement sensor wire (opposite color)


AMBS,

CPDS


back 40 mm (1-1/2 inch). (See Figure 6-19.)


CPSS,


e. Strip back insulation on all wiring 6.3 mm (1/4 inch).


DTS, RTS,


RRS, STS,


f. Slide a large piece of heat shrink tubing over the


SRS


cable, and place the two small pieces of heat shrink

-30

-22

177,000

1,770,000

tubing, one over each wire, before adding crimp fit-

-25

-13

130,400

1,340,000

tings as shown in Figure 6-20.


Sensor (Typical)

-20

-4

97,070

970,700


-15

5

72,900

729,000


-10

14

55,330

553,000


Heat Shrink

-5

23

43,200

423,300

Cable

Tubing (3)

0

32

32,650

326,500


5

41

25,390

253,900

Large Heat Shrink

10

50

19,900

199,000

Tubing (1)


15

59

15,700

157,100


20

68

12,490

124,900

25

77

10,000

100,000

30

86

8,060

80,600

35

95

6,530

65,300

40

104

5,330

53,300

45

113

4,370

43,700

50

122

3,600

36,000

55

131

2,900

29,000

60

140

2,490

24,900

65

149

2,080

20,800

65

158

1,750

17,500

e. Using the plug connector marked “EC”, that is con- nected to the back of the controller, locate the sensor wires (RRS, RTS, SRS, STS, AMBS, DTS, CPDS OR CPSS as required). Follow those wires to the con- nector and using the pins of the plug, measure the resistance. Values are provided in Table 6-2.

Due to the variations and inaccuracies in ohmmeters, thermometers or other test equipment, a reading within 2% of the chart value would indicate a good sensor. If a sensor is defective, the resistance reading will usually be much higher or lower than the resis- tance values given.

6.22.2 Sensor Replacement

a. Turn unit power OFF, disconnect power supply and remove sensor assembly from unit.

Figure 6-20 Typical Sensor and Cable Splice

g. Slip crimp fittings over dressed wires (keeping wire colors together). Make sure wires are pushed into crimp fittings as far as possible and crimp with crimp- ing tool.

h. Solder spliced wires with a 60% tin and 40% lead Rosincore solder.

i.Slide heat shrink tubing over splice so that ends of tubing cover both ends of crimp as shown in Figure 6-20.

j.Heat tubing to shrink over splice. Make sure all seams are sealed tightly against the wiring to prevent mois- ture.

k.Slide large heat shrink tubing over both splices and shrink.

CAUTION

Do not allow moisture to enter wire splice area as this may affect the sensor resistance.

l.Position sensor in unit as shown in m.Figure 6-21 Slip crimp fittings over dressed wires (keeping wire colors together). Make sure wires are pushed into crimp fittings as far as possible and crimp with crimping tool. and re-check sensor resistance.

n. Reinstall sensor, refer to paragraph 6.22.3.

NOTE

The P5 Pre-Trip test must be run to inactivate probe alarms (refer to paragraph 4.7).

6-17

T-309

Page 81
Image 81
Carrier 69NT20-531-300 Cut wires 5 cm 2 inches from shoulder of defec, Tive sensor and discard the defective probe only

69NT20-531-300 specifications

The Carrier 69NT20-531-300 is a cutting-edge rooftop unit designed to meet the demanding requirements of commercial heating and cooling applications. This model embodies Carrier’s commitment to energy efficiency, reliability, and advanced technological features that enhance indoor comfort while minimizing operational costs.

One of the standout features of the Carrier 69NT20-531-300 is its high energy efficiency. It is equipped with advanced compressor technology that optimizes performance while reducing energy consumption. This ensures that businesses can maintain a comfortable indoor climate without incurring exorbitant utility bills. With a high Seasonal Energy Efficiency Ratio (SEER) and Energy Efficiency Ratio (EER), users can expect not only enhanced comfort but also significant cost savings over time.

The cooling capabilities of the 69NT20-531-300 are complemented by its robust heating options. This unit utilizes a gas heat exchanger, ensuring quick and even heating throughout the space. The combination of cooling and heating capabilities in one compact unit makes it a versatile choice for various applications, including retail spaces, offices, and warehouses.

In addition to its impressive performance specifications, the Carrier 69NT20-531-300 incorporates innovative technologies that further enhance its functionality. The unit comes with advanced controls, allowing for precise temperature regulation and zoning capabilities. This ensures that different areas of a building can maintain their desired temperatures based on usage, improving overall energy efficiency.

Durability is another hallmark of the Carrier 69NT20-531-300. The unit is constructed with high-quality materials and features a weather-proof cabinet that protects it from the elements, ensuring long-term reliability even in harsh conditions. Furthermore, its modular design simplifies maintenance, making it easy for technicians to access critical components.

The 69NT20-531-300 is also designed with low noise operation in mind. It employs sound-dampening technology to ensure that operations are quiet, making it an ideal choice for locations where noise reduction is a priority, such as schools or healthcare facilities.

Overall, the Carrier 69NT20-531-300 stands out as a premier choice for businesses looking for an efficient, reliable, and feature-rich rooftop HVAC unit. Its blend of energy efficiency, advanced technology, and durability positions it as a leader in commercial heating and cooling solutions, making it a valuable investment for any commercial property.