Cisco Systems, Inc
Page
N T E N T S
Additional Slots
Ports and Cabling
Safety Warnings Accessing Internal Modules
Installing and Removing NIMs and SMs
OIR Procedures
Objectives
Audience
Organization
Chapter Title Description
Conventions
Convention Indication
Bewaar Deze Instructies
Warnung Wichtige Sicherheitshinweise
Avvertenza Importanti Istruzioni Sulla Sicurezza
Aviso Instruções Importantes DE Segurança
Xiv
GEM Disse Anvisninger
Xvi
Related Documentation
Obtaining Documentation and Submitting a Service Request
Searching for Cisco Documents
Overview of the Cisco 4451-X Integrated Services Router
About the Cisco ISR
Safety Warnings
Safety Warnings for Finland, Norway and Sweden
Chassis Views
Cisco ISR 4451-X Chassis
On page 1-4- Bezel view with one PSU
Bezel side of the Cisco ISR 4451-X with two PSUs
Bezel Side Leds of the Single PSU Cisco ISR 4451-X Model
Platform Summary
Modular HDD Slot Factory-configured
Locating the Serial Number, PID, VID and Clei
ISC slot
Label Description
Labels on Cisco ISR
For Additional Help Locating Labels on the Router
Product ID
Hardware Features
Built-in Interface Ports
USB Serial Console Port
Dual Mode GE/SFP Ports
Front Panel Ethernet Ports
Front Panel PoE+ Ports
LED Indicators
Internal PoE card
Represents Color Description Location
Status Green Tbd Side Ports 0, 1 Amber Off Not present
Console Active Right Will be off
Active Left Will be off
Two PoE PSUs installed and operating Redundant mode
Removable and Interchangeable Modules and Cards
External Slots
Internal Slots
Network Interface Modules Cisco UCS E-Series Server Modules
Compact Flash
Solid State Drives
Packet Voice Digital Signal Processor Modules
Power Supplies
Memory
About Slot, Subslot Bay, and Port Numbering
About Slots and Interfaces
Fans, Ventilation, and Airflow
This section covers the following topics
Tuple Example Slot Bay Port
9shows the ports and slots on the Cisco ISR 4451-Xs
Console port
Slot Numbering
About Slot
Slots are numbered 0, 1
Gigabit Ethernet Management
Specifications
Subslot/Bay Numbering
About Fixed Interfaces
Is disabled. See xxxx for a list of supported modules
Description Specification
Power
Ports
Description Specification
Regulatory
Integrated Services Router document
For detailed compliance information, see the Regulatory
Periodic Inspection and Cleaning
General Safety Warnings
Standard Warning Statements
Page
Page
Page
Safety Recommendations
Safety with Electricity
Follow these guidelines to ensure general safety
Preparing for Router Installation Safety Recommendations
Preventing Electrostatic Discharge Damage
General Precautions
General Site Requirements
Site Selection Guidelines
Environmental Characteristic Minimum Maximum
Site Environmental Requirements
Height Width Depth Weight
Physical Characteristics
Characteristics
Rack Requirements
Router Environmental Requirements
Power Guidelines and Requirements
Network Cabling Specifications
Console and Auxiliary Port Considerations
Console Port Connections
Auxiliary Port Connections
USB Console OS Compatibility
Preparing for Network Connections
Ethernet Connections
OL-27644-01
Installation Checklist
Task Verified by Date
Creating a Site Log
Installing and Connecting the Router
Page
Before You Begin
CLI Console Access
What You Need to Know
Slot and Port Numbers
Installing the Router
Unpacking the Router
Rack-Mounting the Chassis
Attaching Rack-Mount Brackets
Statement
Inch SBC 1 brackets Inch EIA brackets
Inch SBC brackets Inch EIA brackets
Bracket Installation for Back Mounting
Mounting the Router in a Rack
5shows a typical installation in a rack
Grounding the Chassis
Mounting screws
Setting the Chassis on a Desktop
Chassis Grounding
Connecting Power
Chassis Ground Connection on the Cisco ISR 4451-X Chassis
Connecting to AC Power
15A, 120VAC 16A, 240VAC. Statement
Port Type Cable Section
Connecting to a Console Terminal or Modem
Connecting to the Serial Port with Microsoft Windows
Serial RJ-45 EIA RJ-45
Connecting to the Console Port with Mac OS
No parity Stop bit No flow control
Connecting to the Console Port with Linux
To disconnect the OS X USB console from the Terminal window
Installing the Cisco Microsoft Windows XP USB Driver
Installing the Cisco Microsoft Windows 2000 USB Driver
Installing the Cisco Microsoft Windows Vista USB Driver
Uninstalling the Cisco Microsoft Windows USB Driver
Using the Add Remove Programs utility
Using the Setup.exe program
Connecting to the Auxiliary Port
Uninstalling the Cisco Microsoft Windows Vista USB Driver
Connecting WAN, LAN, and Voice Interfaces
Connecting a Modem to the Cisco ISR
OL-27644-01
Ports and Cabling
Connection Procedures and Precautions
Data sheet
Port or Connection Port Type, Color1 Cable
OL-27644-01
Performing the Initial Configuration on the Router
Using Cisco Setup Command Facility
To proceed using the setup command facility, enter yes
You are now in the Setup Configuration Utility
Router when it is booted into Cisco IOS-XE
Basic management setup configures only enough connectivity
Following configuration command script was created
Summary of the available interfaces is displayed
Completing the Configuration
User prompt is displayed
Using Cisco IOS-XE CLI-Manual Configuration
Type enable to enter privileged Exec mode
Press Return to bring up the Router prompt
Configuring the Router Hostname
Command or Action Purpose
Example
Configuring the Enable and Enable Secret Passwords
Configuring the Console Idle Privileged Exec Timeout
Gigabit Ethernet Management Interface Overview
Default Gigabit Ethernet Configuration
Configuring Gigabit Ethernet Interfaces
Gigabit Ethernet Port Numbering
Description helps you remember what is attached to
Configuration mode
Optional Adds a description to an interface configuration
Troubleshooting
Configuring IP Routing and IP Protocols
Configuration Examples
Specifying a Default Route or Gateway of Last Resort
Configuring the GigabitEthernet Interface Example
Default Routes
Default Network
Gateway of Last Resort
Enables IP routing
Establishes a static route
Configuration Examples
Make sure that you configure all vty lines on your
Starts the line configuration command collection mode for
Virtual terminal lines vty for remote console access
Line vty ? command
Configuring the Auxiliary Line
What to Do Next
Enable Configure terminal Line aux
Auxiliary line
Verifying Network Connectivity
Saving Your Router Configuration
Saving Backup Copies of Configuration and System Image
Copying the Startup Configuration to a Tftp Server Example
Copying from Flash Memory to a Tftp Server Example
2012
Verifying the Initial Configuration
Initial Configuration Verifying the Initial Configuration
ROM Monitor Overview and Basic Procedures
Environmental Variables and the Configuration Register
ROM Monitor Overview
Network Management Access and ROM Monitor Mode
Entering ROM Monitor Mode
Accessing ROM Monitor Mode with a Terminal Connection
Checking the Current ROMmon Version
XXX-XXXX-XX
2describes the available help commands for ROM Monitor mode
Commonly Used ROM Monitor Commands
Displaying the Available ROM Monitor Commands
Examples
Displaying the Configuration Register Setting
Environment Variable Settings
Changing the ROM Monitor Prompt
Displaying Environment Variable Settings
Frequently Used Environmental Variables
Saving Environment Variable Settings
Exiting ROM Monitor Mode
Entering Environment Variable Settings
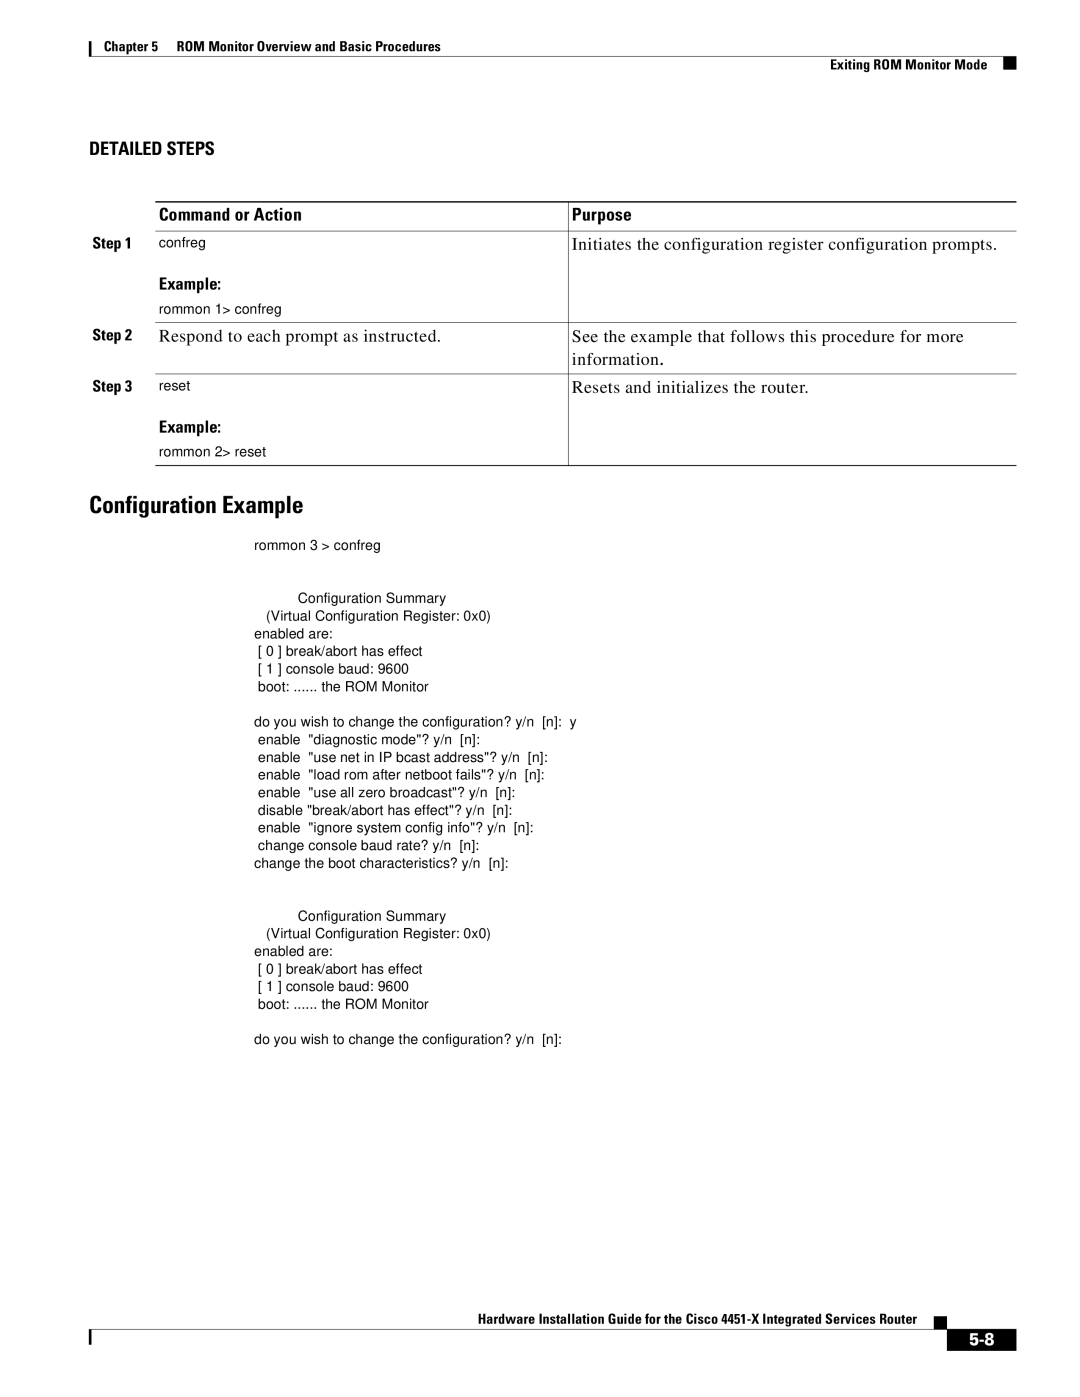
Respond to each prompt as instructed
Configuration Example
Initiates the configuration register configuration prompts
Resets and initializes the router
Example of Upgrade
Upgrading the ROMmon for a Router
Router# show romvar
Internal and External Modules
FRUs
Safety Warnings
1029 T1 SFP Statement
Removing the Cover
Accessing Internal Modules
Removing and Replacing the Chassis Cover
Replacing the Cover
Locating Internal and External Slots for Modules
Cover screws
NIM-SSD Slot 0 Factory-configured
Overview of the SSD Carrier Card NIM NIM-SSD
ISC slot DIMMs
Overview
3shows the front panel of the SSD NIM
Represents Color Description
LEDs on the NIM-SSD
1describes the LEDs on the NIM-SSD as shown in Figure
Solid state drive Green SSD present Slot Off No SSD in slot
Environmental
2lists the specifications of the SSD Carrier Card NIM
Power consumption maximum 20W
Transportation and Storage
Solid State Drives SSD
Top View of the SSD Carrier Card NIM with Serial Number
Solid State Drive SSD
Installing the SSD Drives into the NIM Carrier Card
Opening the SSD Slot Cover
Removing the SSD Drives from the NIM-SSD
Tabs to pull out the SSD drives
10 Pulling out the Solid State Drives
Removing and Replacing the Cisco ISR 4451-X NIM-SSD Drives
Restrictions
Removing the NIM-SSD from the Router
12 Removing the NIM-SSD from the Router
Installing and Removing DDR DIMMs
Replacing the NIM-SSD on the Router
Locating and Orienting Dimm
Polarization notch
14 Dimm Showing Polarization Notch
Removing a Dimm
15 Removing a Dimm
Installing a Dimm
16 Dimm Showing Polarization Notch
17 Handling the DIMMs
Installing and Removing NIMs and SMs
18 Installing a Dimm
Locating an SM or NIM
Installing an SM
Software Requirement for SMs
Removing an SM or NIM
Installing and Removing the PVDM4
Verifying SM Installation
Tools and Equipment Required During Installation
PVDM4 Location and Orientation
Ground
Installing the PVDM4 on the Motherboard of the Cisco ISR
Any module replacement
Remove the cover
Screws Connector
Removing the PVDM4 from the Motherboard of the Cisco ISR
Standoffs
Captive Screws Ports Network Card
22 Network Interface Module with PVDM4
Removing and Replacing the USB Flash Token Memory Stick
Replacing the Cisco ISR 4451-X Power Supply
This completes the USB Flash memory installation procedure
24 Power Supply Unit
Replacing the Power Supply on the Cisco ISR 4451-Xs
Inserting PoE Supply in an Ethernet Switch Network Module
Replacing the Cisco ISR 4451-X Fan Tray
Cisco ISR 4451-X Power and RPS Error Messages
Replacing a Fan Tray
Before Hot-Swapping a Fan Tray
26 Cisco ISR 4451-X Fan Tray Replacement
Fan Tray
Removing and Installing a CompactFlash Memory Card
Removing a CompactFlash Memory Card
Installing a CompactFlash Memory Card
Installing SFP Modules
1544.53 DWDM-SFP-4612
DWDM-SFP-4373
1543.73 DWDM-SFP-4453
1546.12 DWDM-SFP-4692
Laser Safety Guidelines
Removing SFP Modules
Connect the network cable to the SFP module
Removing, Replacing, and Installing an Internal PoE Card
Disconnect the SFP latch. See Figure
29 Location of the PoE Card
Online Insertion and Removal OIR Hot-Swapping
Requirement
Removing a Module
OIR Procedures
Hot-Swapping Procedures
Inserting a Data or Voice Module