Dell PowerEdge 840 Systems
W . d e l l . c o m s u p p o r t . d e l l . c o m
June DJ894
Contents
Page
General Memory Module Installation Guidelines
Replacing the SAS Controller Card Battery
Front I/O Panel Service-Only Parts Procedure
Troubleshooting an External Scsi Tape Drive 103
Troubleshooting IRQ Assignment Conflicts
Troubleshooting System Cooling Problems
100
112
Returning Items for Warranty Repair or Credit 123
111
113
Glossary Index
Other Information You May Need
About Your System
Accessing System Features During Startup
Page
Power-on indicator On System power is on
Turned off immediately after the power button is pressed
Power button is enabled in the System Setup program. When
Connected to the power source
Page
Page
Diagnostics Indicator Codes
Other failure Ensure that the diskette drive, optical drive
Appropriate drives installed in your
System board failure See Getting Help on
System
Hard-Drive Indicator Codes
Hard-Drive Indicators Drive status indicator
System Messages
Nvramclr jumper is installed Remove the Nvramclr jumper
Remote Configuration is Wait until the process is complete
Bios remote update failed Retry update
Faulty diskette, diskette drive
Configuration is incorrect Configuration guidelines, a list
Controller. See Using the System
Setup Program on
Memory configurations
Loose or improperly connected
Faulty keyboard controller
System is incorrectly configured
Persists, see Getting Help on
Faulty system board See Getting Help on
Faulty or missing diskette drive
Problem persists, replace the drive
Not a bootable diskette Use a bootable diskette
Jumper location. Check for a Bios
Error encountered in initializing
PCI device faulty system board
Faulty hard-disk drive Replace the hard-disk drive. See
Faulty memory module See Troubleshooting System
System Setup program. See
Appropriate drive installed in your
Invalid memory configuration See General Memory Module
On the boot hard drive
Faulty system battery See Using the System Setup
System Battery on
Troubleshooting a Hard Drive on
System Beep Codes
Slave interrupt-mask register failure
Alert Messages
Diagnostics Messages
Baseboard Management Controller Messages
Using the System Setup Program
Entering the System Setup Program
Responding to Error Messages
Using the System Setup Program
System Setup Options
Main Screen
Main System Setup Program Screen
Installation and disable Off after installation
Settings
Off default
System memory test option, and redundant memory status
CPU Information Screens
Integrated Devices Screen
Console Redirection Screen
System Security Screen
Setup Password
System Security Screen Options Description System Password
You to assign and verify a new system password
Access to your system using the system password feature
Using the System Password
System and Setup Password Features
Exit Screen
Using the System Setup Program
Using the Setup Password
Using the System Setup Program
Installing System Components
Recommended Tools
Page
Page
Front-Panel
Removing the Cover
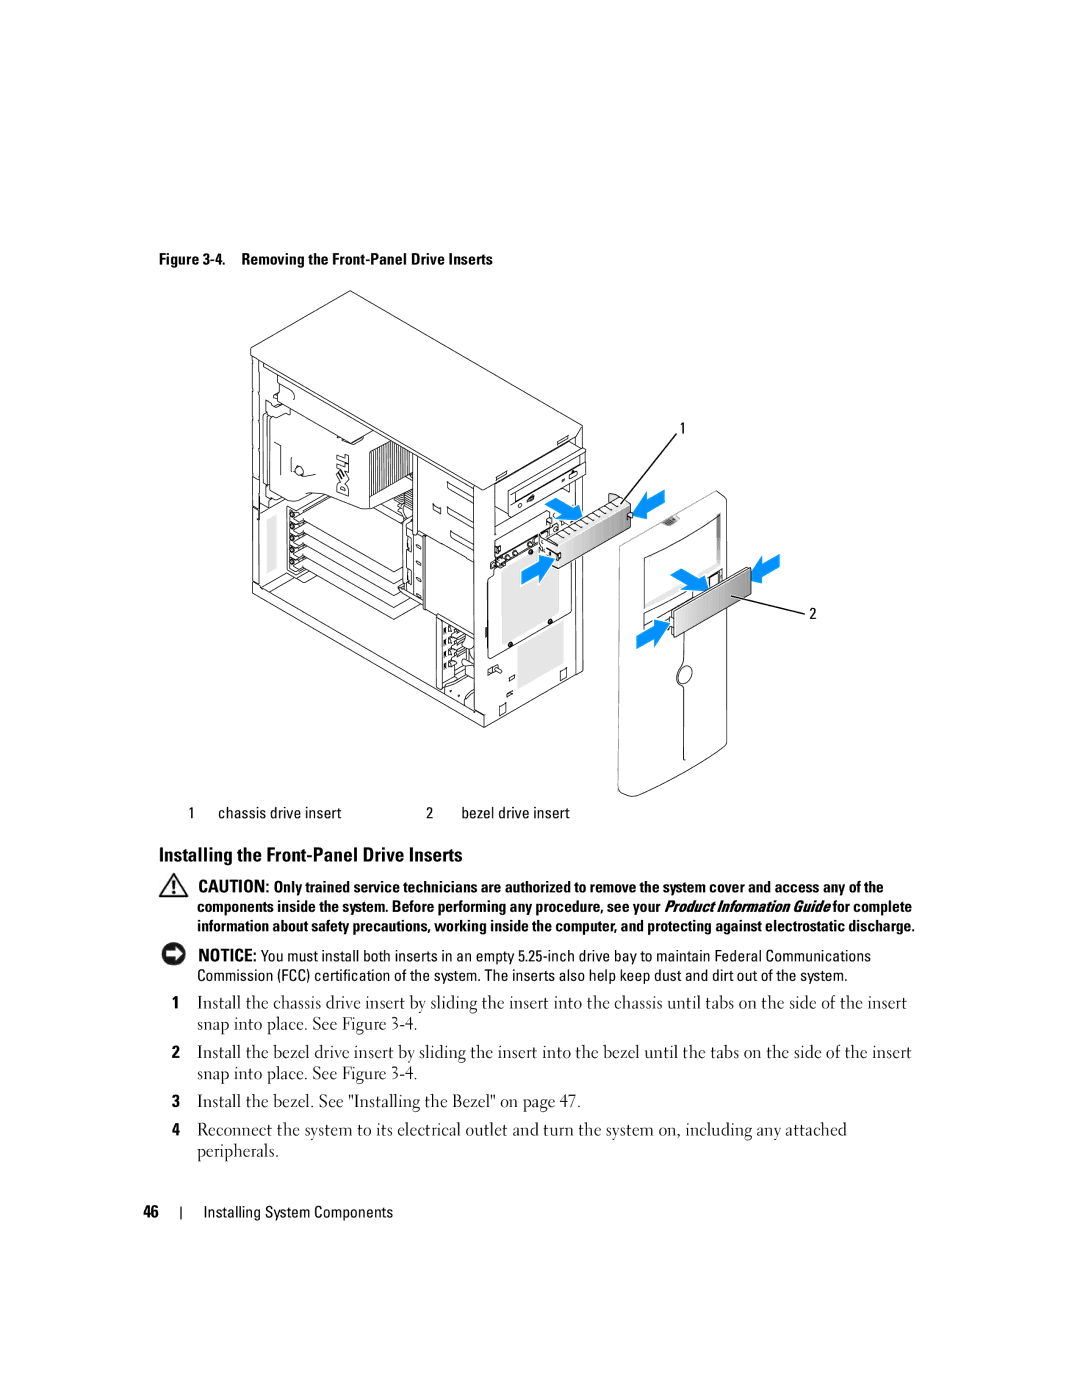
Removing the Front-Panel Drive Inserts
Installing
Commission
Connecting Drives
Closing the System
Diskette Drive
DC Power Cables
Installing a Diskette Drive
Removing a Diskette Drive
Page
Installing an Optical or Tape Drive
Page
Page
Hard Drives
Hard Drive Installation Guidelines
Test the drive
Configuring the Boot Drive
Removing a Hard Drive from the Drive Bay
Installing a Hard Drive in the Drive Bay
Installing System Components
SATA0 connector Installing System Components
Sata interface cable
SAS controller card
Removing a Hard Drive from a Lever-Release Drive Carrier
Page
Hot-Plug Sata Hard Drives Using the SAS Backplane
12. Installing the SAS Release tab Data cable
Interface connector on
SAS controller card Installing System Components
Removing a Hot-Plug SAS or Sata Hard Drive
Cooling Shroud
Removing the Cooling Shroud
Installing the Cooling Shroud
Cooling Fans
Removing the Front System
Installing the Front System Fan
Removing the Back System Fan
Page
Power Supply
Removing the Power Supply
Page
Expansion Cards
Page
Expansion-card connector
Removing an Expansion Card
Installing System Components
Replacing the SAS Controller Card Battery
Disconnect the battery cable from the SAS controller card
Sample Memory Configurations Total Memory
General Memory Module Installation Guidelines
Installing Memory Modules
Memory
Page
Microprocessor
Removing Memory Modules
Removing the Processor
Page
Page
Installing System Components
System Battery
Installing a RAC Card
Replacing the System Battery
Page
Front I/O Panel Service-Only Parts Procedure
Installing System Components Chassis
Mounting screws
Installing the Control Panel Assembly
System Board Service-Only Parts Procedure
Removing the System Board
Installing System Components
Page
Installing System Components
Start-Up Routine
Safety First-For You and Your System
Software Monitors power indicator
Start-Up Routine Indications Look/listen for Action
Monitor is not working properly Video memory is faulty
Troubleshooting IRQ Assignment Conflicts
Troubleshooting the Video Subsystem
Checking the Equipment
Troubleshooting the Keyboard
Troubleshooting the Mouse
Troubleshooting Serial I/O Problems
Troubleshooting a Serial I/O Device
Troubleshooting a USB Device
Troubleshooting a NIC
NIC cannot communicate with network
Troubleshooting a Wet System
Troubleshooting External Connections
Liquid spilled on the system Excessive humidity
Troubleshooting a Damaged System
System was dropped or damaged
Troubleshooting the System Battery
Troubleshooting Power Supplies
Troubleshooting System Cooling Problems
Troubleshooting a Fan
Troubleshooting System Memory
Error message indicates a diskette drive problem
Troubleshooting a Diskette Drive
101
Troubleshooting an Optical Drive
Troubleshooting an External Scsi Tape Drive
103
Troubleshooting a Hard Drive
Troubleshooting a Sata Hard Drive
Troubleshooting Sata Hard Drives
105
Troubleshooting a Sata Hard Drive in a RAID Configuration
Troubleshooting a SAS RAID Controller
107
Troubleshooting Expansion Cards
Troubleshooting the Microprocessor
109
Troubleshooting Your System
Running System Diagnostics
Using Dell PowerEdge Diagnostics
System Diagnostics Features
111
From Removable Bootable Media
When to Use the System Diagnostics
Running the System Diagnostics
From the Utility Partition
Selecting Devices for Testing
System Diagnostics Testing Options
Using the Custom Test Options
Selecting Diagnostics Options
114
System Board Jumpers
Jumpers and Connectors
115
Page
117
Page
119
Disabling a Forgotten Password
121
Online Services
Obtaining Assistance
Getting Help
Support Service
AutoTech Service
Automated Order-Status Service
Electronic Quote Service
123
Before You Call
125
Mail la-techsupport@dell.com Technical Support Toll-free
Contacting Dell
126
Mail la-techsupport@dell.com Technical Support
Sales
Technical Support Toll-free Technical Support Services
127
Website support.ap.dell.com
Mail la-techsupport@dell.com General Support Toll-free
128
General Support Toll-free
129
130
General Support calling from Guayaquil
131
3355
132
133
Mail la-techsupport@dell.com General Support
134
135
136
137
Mail krsupport@dell.com
138
139
Technical Support Claracom
140
Fax 21 424 01
141
142
Country Code Precision Technical Support PowerApp, PowerEdge
143
Mail delldirectsupport@dell.com Customer Care website
International Access Code Country Code City Code
144
Home and Small Business Fax 0870 907
145
146
BTU British thermal unit
147
Amperes AC Alternating current
Celsius
148
Cm Centimeters Cmos Complementary metal-oxide semiconductor
149
Fahrenheit
150
LVD Low voltage differential Meters MA Milliamperes
151
TCP/IP Transmission Control Protocol/Internet Protocol
System diskette See bootable diskette
152
TOE TCP/IP offload engine
153
Volts VAC Volts alternating current VDC Volts direct current
154
Interface cables, 47 power cables
Removing and replacing, 83 troubleshooting the RAID card
Partition, 112 using Dell PowerEdge
155
Fans installing, 67-68 removing
Post
157
Upgrades processor