InstallationDirectives d’installationInstructions
E
AntiDispositif-Tip Deviceantibasculement
| E1 |
| Installationtalling the |
| ||||||||
|
|
| Device |
|
|
|
|
|
|
|
|
|
| Avant |
|
|
|
|
|
|
|
|
| ||
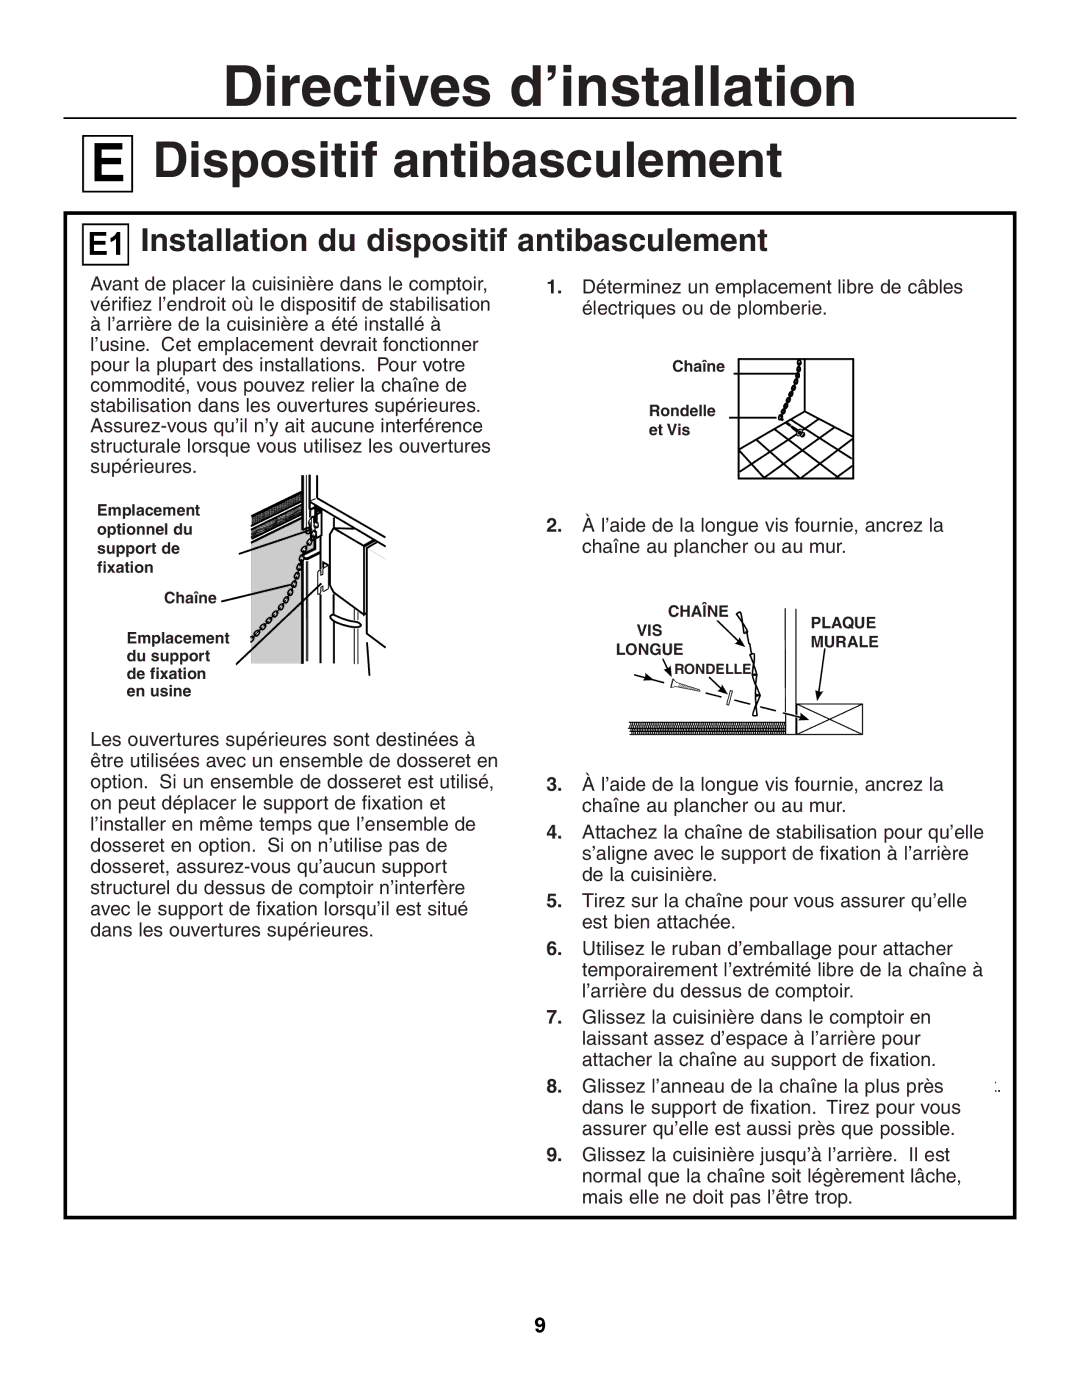
| de placer la cuisinière dans le comptoir, |
| 1. Déterminez un emplacement libre de câbles | |||||||||
Before placing range in the counter, check the |
| |||||||||||
| vérifiez l’endroit où le dispositif de stabilisation |
| 1. Decide on a location that has no electrical wiring | |||||||||
factory location of the stability device on the back |
| électriques ou de plomberie. | ||||||||||
| à l’arrière de la cuisinière a été installé à |
| or plumbing. | |||||||||
of the range. This location should work for most |
|
|
|
|
|
|
|
|
| |||
|
|
|
|
|
|
|
|
| ||||
| l’usine. Cet emplacement devrait fonctionner |
|
|
|
|
|
|
|
|
| ||
installations. For convenience you can hook the |
|
|
|
|
|
|
|
|
| |||
|
| Chaîne |
|
|
|
|
|
| ||||
| pour la plupart des installations. Pour votre |
|
|
| ||||||||
stabilitycommodité,chainvousin thepouvezupper setrelierof holes.la chaîneMakede |
|
| Chain |
|
|
|
| |||||
| ||||||||||||
|
|
|
|
|
|
|
|
| ||||
surestabilisationthere is nodansstructuralles ouverturesinterferencesupérieureswhen .Rondelle
usingAssurezthe
supérieures.
Emplacement
Bracket
optionnel du Optional
support de fixation Location
ChaîneChain
Emplacement Bracket
du support Factory
de fixation Location
en usine
The upper set of holes are intended for use with Les ouvertures supérieures sont destinées à an optional backsplash kit. If a backsplash kit is être utilisées avec un ensemble de dosseret en being used, the stability bracket can be relocated option. Si un ensemble de dosseret est utilisé, and put on the same time as the optional
on peut déplacer le support de fixation et backsplash kit. If the backsplash is not being l’installer en même temps que l’ensemble de used, make sure that there are no countertop dosseret en option. Si on n’utilise pas de structural supports which will interfere with the dosseret,
avec le support de fixation lorsqu’il est situé dans les ouvertures supérieures.
2.À l’aide de la longue vis fournie, ancrez la
2.chaîneWith theaulongplanchers rew ouprovidedau muranchor. the chain to the floor or wall.
CHAÎNECHAIN
WALLPLAQUE
LONGPLATE
VIS
LONGUESCREW ![]() MURALE
MURALE
![]() RONDELLE
RONDELLE
3.À l’aide de la longue vis fournie, ancrez la chaîne au plancher ou au mur.
3.Make sure the screw is going into the wall plate
4.Attachez la chaîne de stabilisation pour qu’elle or stud at the base of the wall at least 3/4". s’aligne avec le support de fixation à l’arrière
4.deAttachla cuisinièrethe stability. chain so that it lines up with the bracket on the back of the range.
5.Tirez sur la chaîne pour vous assurer qu’elle
5.estTugbienthe chainattachéeto make. sure it is securely fas- tened.
6.Utilisez le ruban d’emballage pour attacher
6.temporairementTake the packagingl’extrémitétape andlibretemporarilyde la chaîneattachà l’arrièrethe looseduenddessusof thedechaincomptoirto the. rear of the countertop.
7.Glissez la cuisinière dans le comptoir en
7.laissantSlide theassezranged’espaceinto the counterà l’arrièreleavingpourenough
attachersp e behindla chaîneto attachau supportthe chaindetofixationthe bracket. .
88.. GlissezSlip the nearestl’anneaulinkde ofla thechaînechainlaontoplustheprèsbracket.
dansPull tolemakesupportsuredeit fixationis as snug. Tirezas possiblepour vous.
9.assurerSlide thequ’ellerange estall theaussiwayprèsbackque. Itpossibleis normal. to
9.Glissezhave somela cuisinièreslack in thejusqu’àchain,l’arrièrebut it should. Il estnot normalbe excessiveque la. chaîne soit légèrement lâche, mais elle ne doit pas l’être trop.
9
