10/100 Secure Network Interface Card
User Guide
United States Government Legend
Contents
Installing and Configuring Data Encryption Offloads
Configuring the NIC
Running NIC Diagnostics
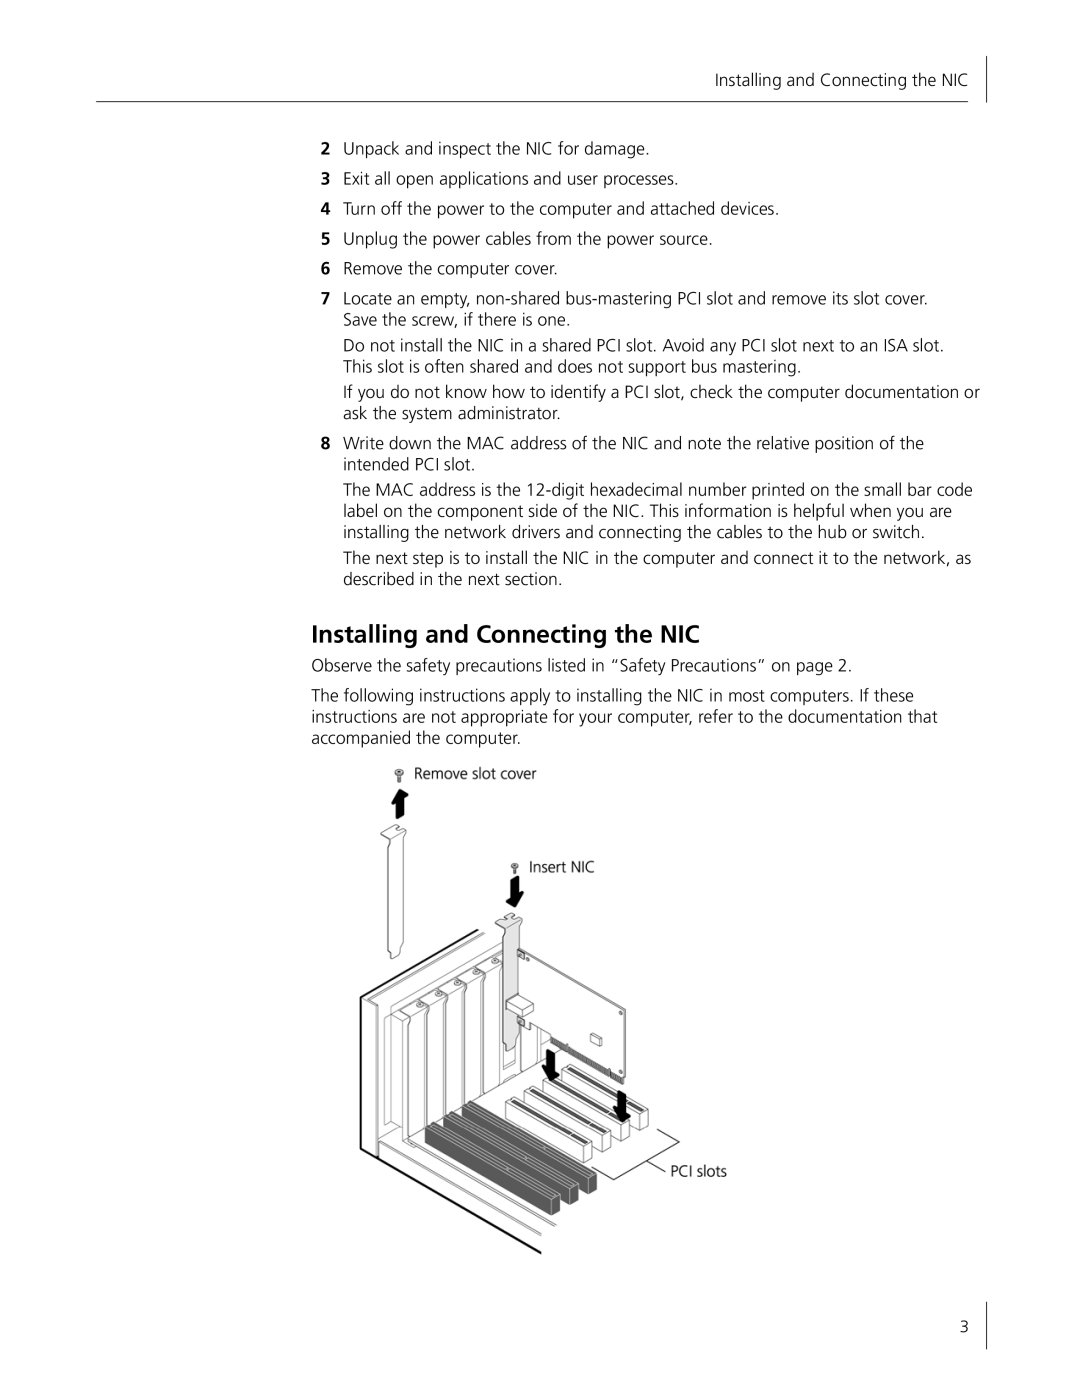
Installing and Connecting the NIC
Minimum Installation Requirements
Installation Overview
Safety Precautions
Preparing the NIC and the Computer
Network Environment Cable Required Maximum Cable Length
Installing and Connecting the NIC
3CR990B-97 NIC
Verifying the Network Driver Installation
Installing the Network Driver
Install without Diagnostic Program-installs the driver only
Double click Network Connections
Windows 2003 Server Driver Installation
Windows XP Driver Installation
Windows XP Driver Installation
Windows 2000 Driver Installation
Windows 2000 Driver Installation
Click Have Disk
Windows NT 4.0 Driver Installation
Verifying the Network Driver Installation
Windows 98 SE Driver Installation
Windows 98 SE Driver Installation
Novell NetWare Driver Installation
Installing the Driver in Novell NetWare Server 5.1
Installation During Novell OS Installation
Identifying the Slot Number
Installation with Novell Already Installed
Choose Select a driver
Select Save parameters and load driver
Load ODINEB.NLM
Verifying or Modifying NIC Parameters
Removing Drivers from Autoexec.ncf
Installing the Driver in Novell NetWare Server
Page
Cd /tmp/3c990/3c990 make
Linux 2.4 Driver Installation
Linux 2.4 Driver Installation
Overview
Offloading Encryption Processing
Selecting Basic or Strong Encryption Processing
Configuring IPSec in Windows 2003, Windows XP, and Windows
Creating a Security Policy
Encryption Type Level Description
Defining the Console
Clear the Activate the default response rule check box
Creating the Policy
Select IP Security Policy Management, and then click Add
Creating a Filter
Binding the Filter
Creating the Filter Action
Enabling Encryption
Binding the Filter Action
Disabling Encryption
Select Un-assign
Installing and Configuring Data Encryption Offloads
Installing 3Com Advanced Server Features for Windows
About the Advanced Server Features
3Com DynamicAccess Advanced Server Features
Failover
Load Balancing
VLANs
Server Features Using Other NICs
Verifying the Installation
Installing 3Com Advanced Server Software
Planning the Configuration
Configuring Groups and VLANs
Number of VLANs
Working With Server Features
Creating a Group
Windows 2003, Windows XP, and Windows
Windows NT
Specifying a Dedicated IP Address
Adding NICs to a Group
Creating a Vlan
Click Configure
Changing an IP Address
Specifying Traffic Priorities
Disabling Load Balancing for a Group
Saving the Configuration
Changing the Primary NIC
Removing a NIC from a Group
SymptomTip
Troubleshooting a Load Balancing Configuration
Displaying NIC Properties
Displaying Group Properties
Double-clickNetwork Adapters
Enabling Offloads
Value Offload Function Enables
Configuring Offloads for a Group of Different NICs
Default NIC Settings
Configuring the NIC
Option Description Settings
Disabled
All
Configuring the NIC
Method Description Requirements
Configuration Methods
Installing the 3Com NIC Diagnostics Program
Changing General NIC Configuration Settings
Using the 3Com NIC Diagnostics Program
Starting the 3Com NIC Diagnostics Program
Using the 3Com DOS Configuration Program
Enabling or Disabling the Boot ROM Setting
Configuring the Managed PC Boot Agent MBA
Booting From the Network
BBS BIOS-Compatible PCs
Disabling the 3Com Logo
Non-BBS BIOS-Compatible PCs
Interpreting the NIC LEDs
Troubleshooting the NIC
3CR990B-97 NIC
State Meaning
Viewing the NIC LEDs in the Diagnostics Program
Troubleshooting Problems with the LEDs
3CR990B-FX-97 NIC
Accessing the 3Com Knowledgebase
Accessing 3Com Support Databases
Accessing the 3Com NIC Help System
Accessing Release Notes and Frequently Asked Questions
Troubleshooting the NIC Installation
Problems or Error Messages
Cleaning Up a Failed Installation
Tip Description
Troubleshooting the Network Connection
Troubleshooting a Network Connection
Troubleshooting Remote Wake-Up
RJ-45 Cabling Pinouts Copper NIC Only
Troubleshooting Hubs
Removing the Network Driver
Windows 2003, Windows XP, and Windows
Windows NT
Windows 98 SE
Removing 3Com DynamicAccess Advanced Server Features
From the Start menu, select Settings/Control Panel
NetWare
Running the 3Com DOS Diagnostics Program
Running NIC Diagnostics
Tab Description
Running the NIC Diagnostics Tests
Running the Network Test
Running the NIC Test
Click Perform NIC Test
Viewing the NIC LEDs in the 3Com Diagnostics Program
Using the 3Com Icon in the Windows System Tray
Viewing Network Statistics
Removing the 3Com NIC Diagnostics Program
Enabling the Icon
Displaying Network Statistics
Running NIC Diagnostics
Hardware
3CR990B-97 NIC Specifications
Network Interface
Standards Conformance
3CR990B-FX-97 NIC Specifications
Cabling Requirements
RJ-45 Connector Pin Assignments
About the 3Com DMI Agent
Installing the 3Com DMI Agent
Click NIC Software Click Install 3Com DMI Agent Now
Installing the 3Com DMI Agent
System Requirements
Network Management Requirements
Page
Installing the 3Com DMI Agent
Obtaining Support for your Product
Contact Us
Telephone Technical Support and Repair
Country Telephone Number Asia, Pacific Rim
Country Telephone Number
Europe, Middle East, and Africa
Latin America
North America Telephone Support and Repair 1
Country
Interference Handbook
FCC Class B Statement
FCC Declaration of Conformity
MIC Class B Compliance Korea Safety Compliance Statement