Control-panel messages about jams
The following table explains
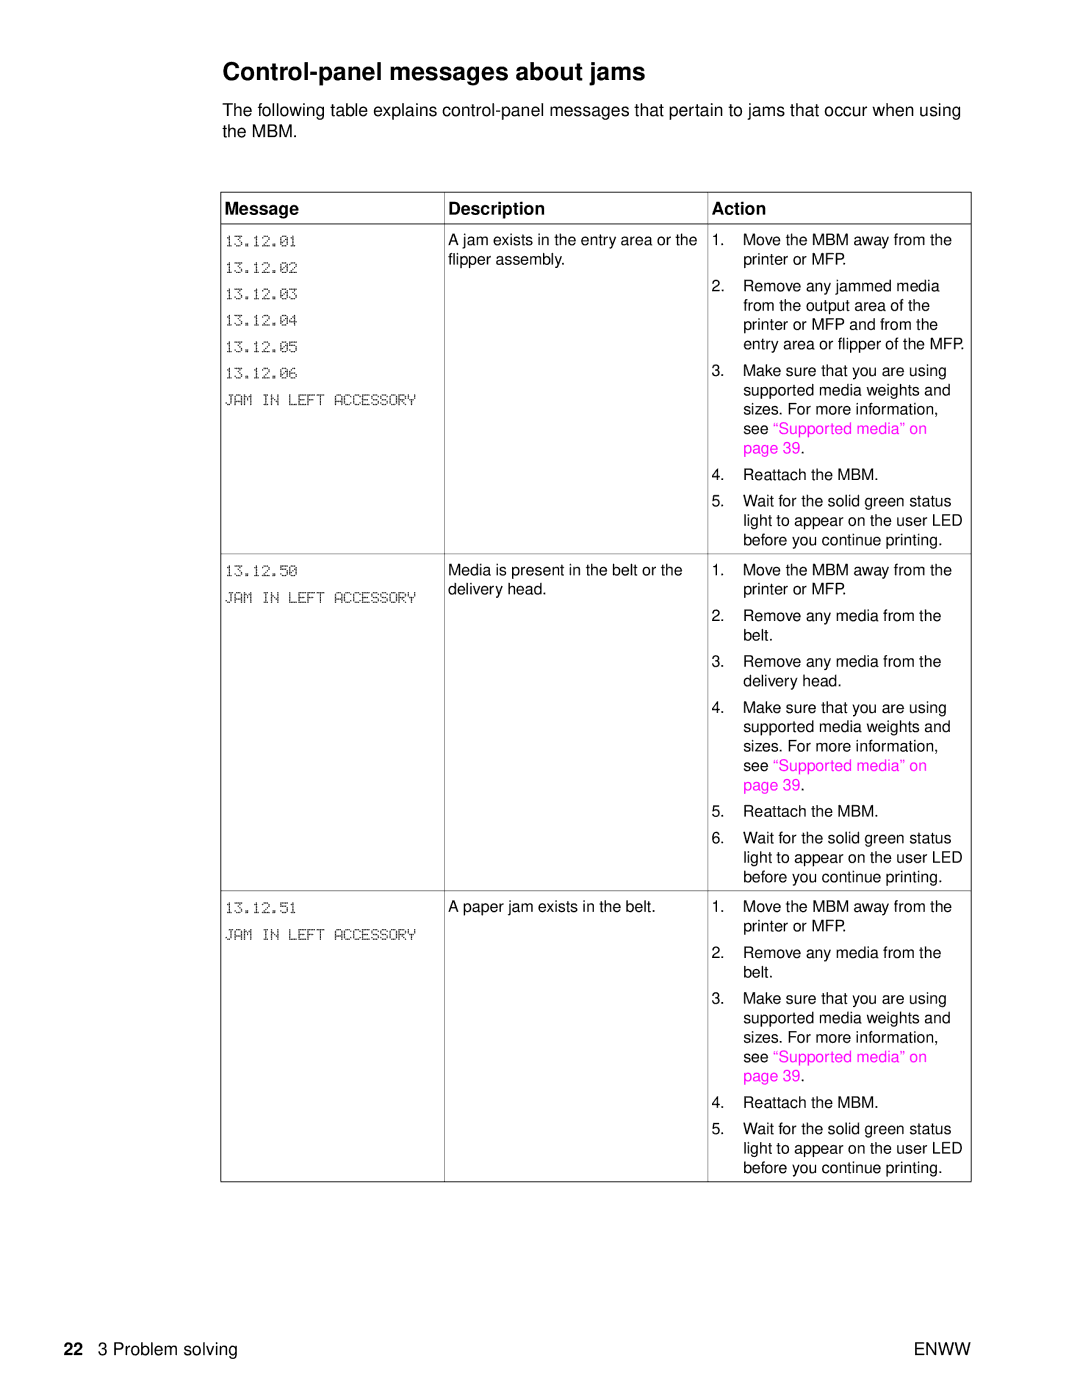
Message | Description | Action | |
|
|
|
|
13.12.01 | A jam exists in the entry area or the | 1. | Move the MBM away from the |
13.12.02 | flipper assembly. |
| printer or MFP. |
|
|
| |
13.12.03 |
| 2. | Remove any jammed media |
|
| from the output area of the | |
|
|
| |
13.12.04 |
|
| printer or MFP and from the |
|
|
| |
13.12.05 |
|
| entry area or flipper of the MFP. |
13.12.06 |
| 3. | Make sure that you are using |
JAM IN LEFT ACCESSORY |
|
| supported media weights and |
|
| sizes. For more information, | |
|
|
| |
|
|
| see “Supported media” on |
|
|
| page 39. |
|
| 4. | Reattach the MBM. |
|
| 5. | Wait for the solid green status |
|
|
| light to appear on the user LED |
|
|
| before you continue printing. |
|
|
|
|
13.12.50 | Media is present in the belt or the | 1. | Move the MBM away from the |
JAM IN LEFT ACCESSORY | delivery head. |
| printer or MFP. |
|
|
| |
|
| 2. | Remove any media from the |
|
|
| belt. |
|
| 3. | Remove any media from the |
|
|
| delivery head. |
|
| 4. | Make sure that you are using |
|
|
| supported media weights and |
|
|
| sizes. For more information, |
|
|
| see “Supported media” on |
|
|
| page 39. |
|
| 5. | Reattach the MBM. |
|
| 6. | Wait for the solid green status |
|
|
| light to appear on the user LED |
|
|
| before you continue printing. |
|
|
|
|
13.12.51 | A paper jam exists in the belt. | 1. | Move the MBM away from the |
JAM IN LEFT ACCESSORY |
|
| printer or MFP. |
|
|
| |
|
| 2. | Remove any media from the |
|
|
| belt. |
|
| 3. | Make sure that you are using |
|
|
| supported media weights and |
|
|
| sizes. For more information, |
|
|
| see “Supported media” on |
|
|
| page 39. |
|
| 4. | Reattach the MBM. |
|
| 5. | Wait for the solid green status |
|
|
| light to appear on the user LED |
|
|
| before you continue printing. |
|
|
|
|
22 3 Problem solving | ENWW |