Manuals
/
Invacare
/
Personal Care
/
Mobility Aid
Invacare
Powered Seating
manual
Wheelchairs with Elevate Wheelchairs with Ventilator Trays
Models:
Powered Seating
1
8
76
76
Download
76 pages
176 b
5
6
7
8
9
10
11
12
Troubleshooting
Install
Signal Word Meaning
Warranty
Disassembly
Cleaning Battery Terminals
Inspect/Adjust Initially
Weight
How to
Safety
Page 8
Image 8
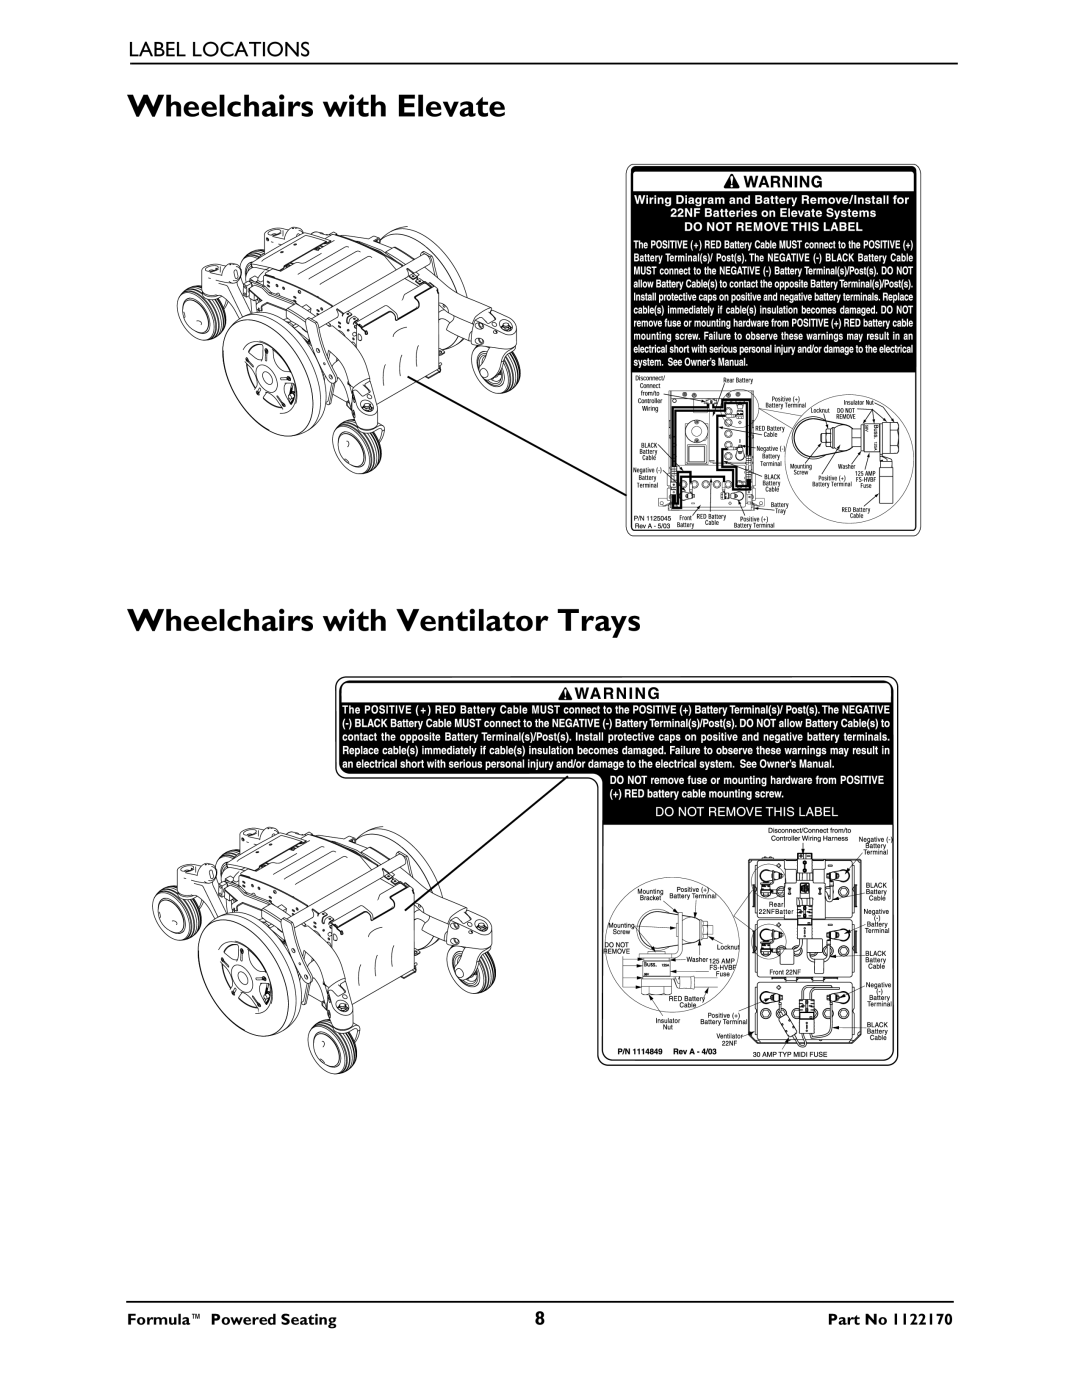
LABEL LOCATIONS
Wheelchairs with Elevate
Wheelchairs with Ventilator Trays
Formula™ Powered Seating
8
Part No 1122170
Page 7
Page 9
Page 8
Image 8
Page 7
Page 9
Contents
Formula Powered Seating
Dealer This manual Must be given to the user of the product
Document Part Number
Reference Documents
Reference Documents
Table of Contents
Register Your Product
Wheelchair TIE-DOWN Restraints and Seat Restraints Trbkts
Signal Word Meaning
Special Notes
Powered Seating System Warnings
Label Locations
All Wheelchairs
Wheelchairs with Elevate Wheelchairs with Ventilator Trays
Contoura Backs Conventional
Formula Powered Seating Systems
Typical Product Parameters
Typical Product Parameters Contoura Backs Conventional
Backs
Operation Information
Repair or Service Information
General Guidelines
General Guidelines
General Guidelines
Weight Training
Weight Limitation
EMI Information
EMI Information
EMI Information
SAFETY/HANDLING of Wheelchairs
Pinch Points
Inspect/Adjust Initially
Safety INSPECTION/ Troubleshooting
Safety Inspection Checklists
Inspect/Adjust Periodically
Inspect/Adjust Weekly
Inspect/Adjust Monthly
Troubleshooting
Symptom Probable Cause Solutions
JS REV TOO Large
Tilt Warning displays
Wheelchair Operation
Switch Option Through
Operating Powered Seating Systems
System Type Joystick Powered Seating Control
Using the Powered Seating Switch
Using the Four Way Switch
Seating System Four WAY Switch
Right
Using the MPJ+ joystick
Icon Description
Using the MPJ+ joystick
Speed Control
MPJ+ Joystick Switches and Indicators
Drive Select Toggle Switch
LCD Display Screens
Joystick
Charger/Programming Input
LCD Display
ECU
Wheelchair Operation Icon
Programmable Mono Port 1/2 or External Mode Switch
Remote On/Off Switch
Memory Card Slot
Mode Switch
Preparing the Joystick for Use
Repositioning the Joystick
PHAL4A, 70 and PW93
Installing/Removing Footrests
Front Riggings
PHAL4A Front Riggings
Footrest Height Adjustment
Taper
Footrest Height Adjustment PW93
PW93
Adjusting/Replacing Telescoping Front Rigging Support
Raising/Lowering Elevating Front Riggings
Adjusting/Replacing Telescoping Front Rigging Support
Installing Adjustable Angle Flip-up Footplate Hinge
Installing Adjustable Angle Flip-up Footplates
Adjusting Adjustable Angle Flip-Up Footplates
Depth Adjustment
Angle Adjustment
Perpendicular and/or Inversion/Eversion Adjustment
Assembly
Composite/Articulating Footplate Heel Loop Replacement
Disassembly
Removing
Installing/Removing Elevating Legrests
Installing
Adjusting Calfpads
Raising/Lowering Elevating Legrests
Removing/Installing the Center Mount Footrest
15 Removing/Installing the Center Mount Footrest
Adjusting the Height of the Center Mount Footrest
16 Adjusting the Height of the Center Mount Footrest
After 2/14/07
Adjusting the Angle of the Manual Center Mount Footrest
Adjusting the Footplate Angle
Adjusting the Tension of the Flip Up Footplate
Before 2/15/07
Calf Pad Adjustment for Power Center Mount Footrests
21 Calf Pad Adjustment for Power Center Mount Footrests
Installing the Power Elevating Legrests
Installing/Removing the Power Elevating Legrests
Height and Width Adjustment
Removing the Power Elevating Legrests
22 Installing/Removing the Power Elevating Legrests
Installing/Removing Flip Back Armrests
Arms
Adjusting Flip Back Armrests
Adjusting
Positioning Flip Back Armrests for User Transfer
Positioning Flip Back Armrests for Use
Removing Armrests
Removing/Installing Reclining Armrests
Installing Armrests
Adjusting Reclining Armrest Height
Adjusting Reclining Armrest Height
Adjusting the Back Angle
Seat
Replacing Seat Positioning Strap
Replacing Seat Positioning Strap
Removing/Installing/Adjusting Headrest
Headrest
Replacing Headrest
Adjusting Headrest Height
Adjusting Headrest Depth/Direction
Elevate Batteries
Using the Proper Batteries
Replacing Batteries
Elevate Batteries
Replacing Batteries
Cleaning Battery Terminals
Removing/Installing the Batteries From/Into the Wheelchair
Removing the Battery Door and Rear Shrouds
Immediately
Removing the Battery Door and Rear Shrouds
Installing Batteries
Removing the Batteries
Installing the Battery Door and Rear Shroud
Installing Batteries
When to Charge Batteries
Charging Batteries
Description and Use of Battery Chargers
Tool Quantity Comments
Charging Batteries
Ventilator Tray
Preparing the Ventilator Tray for Use
Preparing the Ventilator Tray for Use
Global Limited Warranty Excluding Canada
Global Limited Warranty Excluding Canada
Canada Limited Warranty
USA
Top
Page
Image
Contents