Owner’s Operator and Maintenance Manual
Recumbent Handcycle Series
Top End XLT Top End XLT Jr Top End XLT Pro Top End XLT Gold
Top End Force
ACCESSORIES WARNING
Recumbent Handcycle Series
TABLE OF CONTENTS
TABLE OF CONTENTS
SECTION 2-SAFETY AND HANDLING
SECTION 3-SAFETY INSPECTION
TABLE OF CONTENTS
TABLE OF CONTENTS
Adjusting Hand Crank Height - All Models Except Top End XLT Gold
Adjusting Top End XLT Gold Hand Crank
TABLE OF CONTENTS
TABLE OF CONTENTS
SECTION 8-SERVICE PROCEDURES
Installing/Removing/Adjusting the Steering Dampener
TABLE OF CONTENTS
TABLE OF CONTENTS
SECTION 9-OPTIONS
Horizontal Handles/Delrin Handles
REGISTER YOUR PRODUCT
Register ONLINE at warranty.invacare.com
LIMITED WARRANTY
DEALER/TECHNICIAN INFORMATION
SPECIAL NOTES
HANDCYCLE USER
HANDCYCLE TIE-DOWN RESTRAINTS AND SEAT POSITIONING STRAPS
SPECIAL NOTES
TYPICAL PRODUCT PARAMETERS
TYPICAL PRODUCT PARAMETERS
TOP END XLT
TOP END XLT JR
TOP END XLT PRO
TOP END XLT GOLD
TYPICAL PRODUCT PARAMETERS
SECTION 1-GENERAL GUIDELINES
Proper Fit
Operating Information
Care MUST be taken when operating on roads, streets or highways
Weight Limitation
Tire Pressure
SECTION 2-SAFETY AND HANDLING
Safety and Handling of the Handcycle
Stability and Balance
A Note to Handcycle Assistants
Percentage of Weight Distribution
Transferring Into/Out of the Handcycle
NOTE For this procedure, refer to FIGURE 2.1 on page
6. Shift body weight onto object while transferring
If installed, parking brake
Wheel locks MUST be engaged if installed
MUST be secured
SECTION 3-SAFETY INSPECTION
Safety Inspection Checklist
Inspect/Adjust Weekly
SECTION 3-SAFETY INSPECTION
Inspect/Adjust Monthly
Inspect/Adjust Periodically
SECTION 3-SAFETY INSPECTION
Troubleshooting
Maintenance
Maintenance Safety Precautions
Suggested Maintenance Procedures
4. Clean/oil quick‐release axles once a week with a Teflon lubricant
SECTION 4-INITIAL SETUP
Initial Setup
SECTION 4-INITIAL SETUP
FIGURE 4.1 Initial Setup
NOTE Parking brake located on left side of seat frame
Top End XLT/XLT Jr
SECTION 4-INITIAL SETUP
FIGURE 4.2 Initial Setup
Hand Crank Assembly
Back
SECTION 5-OPERATION
Riding the Handcycle
NOTE For this procedure, refer to FIGURE 5.1 on page
Shifting Gears
NOTE For this procedure, refer to FIGURE
NOTE This procedure applies to the Top End XLT and XLT Jr. ONLY
Seven Speed Hub
NOTE For this procedure, refer to FIGURE 5.3 on page
Hands-On Rapid Fire Shifter/Brake System Twenty-seven Speeds
Lower Derailleur Right Side Shifter
Upper Derailleur Manual Shifter
Backing-Up
Braking
Reversing Drum Brakes
Using Parking Brake
NOTE For this procedure, refer to FIGURE
NOTE For this procedure, refer to FIGURE
Hand Brakes/Hands-On Brakes
Steering/Cornering
NOTE For this procedure, refer to FIGURE
Slots or Hook and Loop Strap Not Shown Handle
Handle UP
Replacing/Adjusting the Footrest and Leg Guard
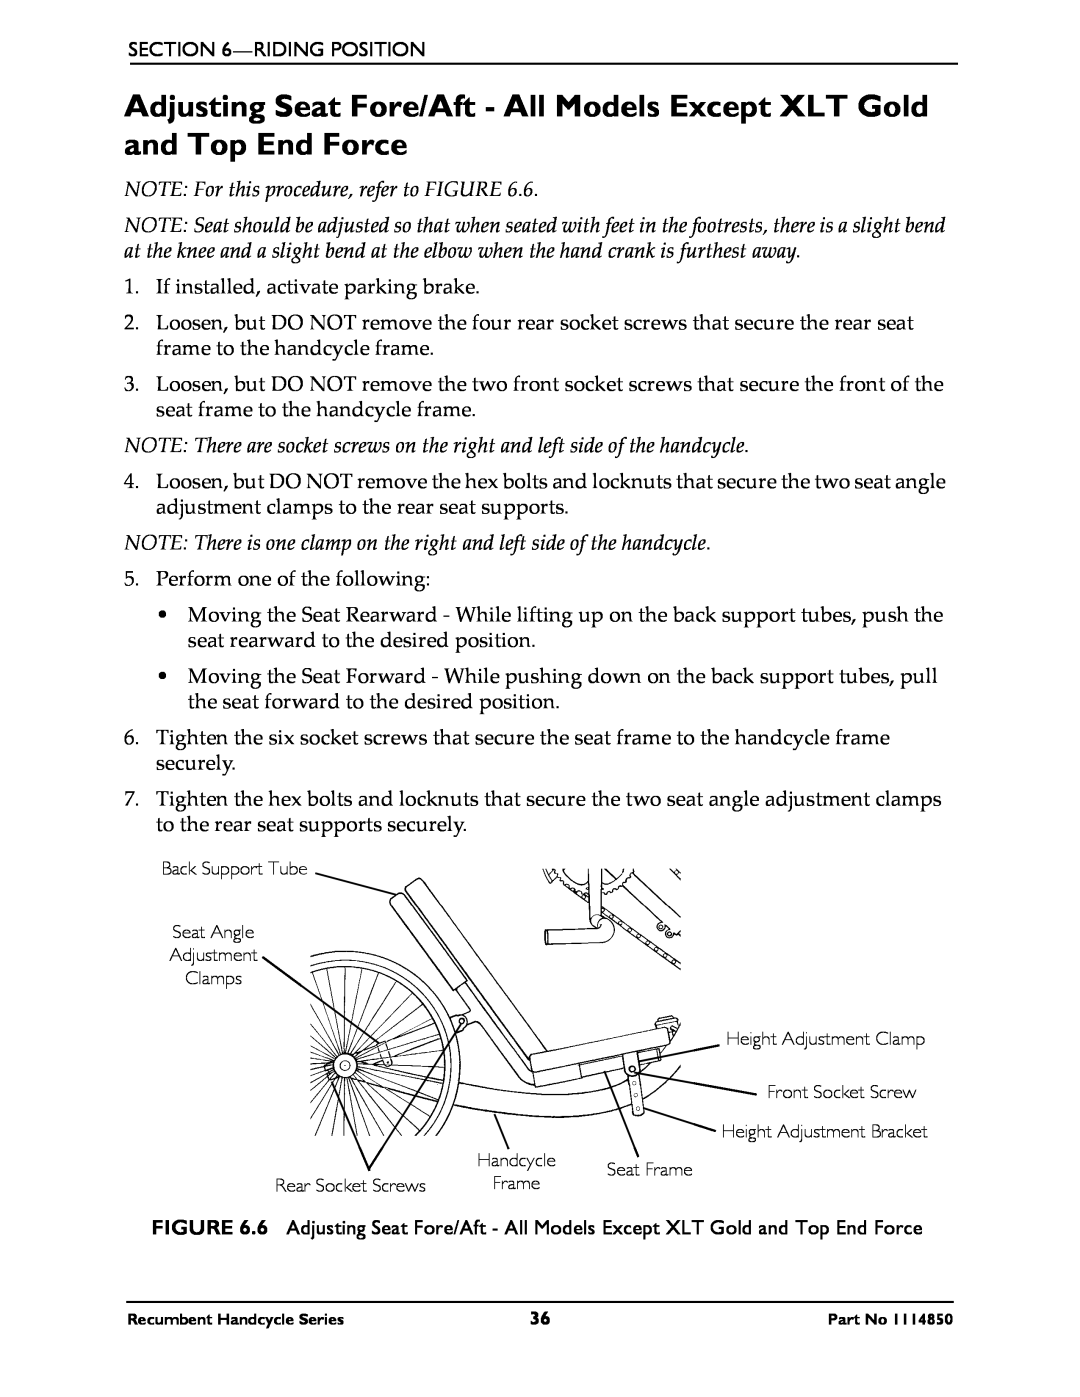
SECTION 6-RIDING POSITION
NOTE For this procedure, refer to FIGURE
NOTE This procedure is for Top End XLT, XLT Jr., and XLT Pro ONLY
Using/Replacing Footrest Strap
Using Footrest Strap
NOTE For this procedure, refer to
NOTE For this procedure, refer to FIGURE
Adjusting Hand Crank
Adjusting Hand Crank Height - All Models Except Top End XLT Gold
NOTE For this procedure, refer to FIGURE
Adjusting Top End XLT Gold Hand Crank
NOTE For this procedure, refer to FIGURE
Adjusting Hand Crank Height
NOTE For this procedure, refer to FIGURE
1. If installed, activate parking brake
NOTE There is one clamp on the right and left side of the handcycle
Adjusting Seat Fore/Aft - XLT Gold and Top End Force Only
NOTE For this procedure, refer to FIGURE
Adjusting Seat Height - All Models Except XLT Gold and Top End Force
NOTE For this procedure, refer to FIGURE
Adjusting Back Angle - All Models Except XLT Gold and Top End Force
NOTE For this procedure, refer to FIGURE
NOTE There is one clamp on the right and left side of the handcycle
Adjusting Back Angle - XLT Gold
NOTE For this procedure, refer to FIGURE
NOTE Wheel not shown for clarity
Adjusting Back Height - Wide Back Option Only
NOTE For this procedure, refer to FIGURE
Push pin MUST protrude through hole in back cane
Installing/Adjusting the Rear Wheel and Quick-Release Axles
SECTION 7-WHEELS
NOTE For this procedure, refer to FIGURE
Installing the Rear Wheels with Threaded Axles
Replacing Tire/Tube and Tuning/Replacement of Spokes
NOTE For this procedure, refer to FIGURE
FIGURE 7.2 Installing the Rear Wheels with Threaded Axles
Determining/Adjusting Toe In/Toe Out
NOTE For this procedure, refer to FIGURE
Determining Toe In/Toe Out
NOTE For optimum accuracy, perform STEP 2 with the handcycle occupied
Replacing Camber Inserts
Adjusting Toe In/Toe Out
NOTE For this procedure, refer to FIGURE
SECTION 8-SERVICE PROCEDURES
Replacing the Fork/Crank Assembly
NOTE For this procedure, refer to FIGURE 8.1 on page
NOTE Laying the chain flat will prevent kinks in the chain
20. Slide the new fork into the frame
SECTION 8-SERVICE PROCEDURES
FIGURE 8.1 Replacing the Fork/Crank Assembly
Assembly
STEPS 1, 2, 3, 36
Replacing the Crank Arms - XLT Gold, XLT PRO and Top End Force
NOTE For this procedure, refer to FIGURE 8.2 on page
Replacing the Left Side Crank Arms
Replacing the Right Side Crank Arms
Installing/Removing/Adjusting the Road Crown Compensator
Installing Road Crown Compensator
NOTE For this procedure, refer to FIGURE 8.3 on page
Adjusting Road Crown Compensator
Removing Road Crown Compensator
Road Crown
Compensator
Installing Steering Dampener
Adjusting Steering Dampener
NOTE For this procedure, refer to FIGURE 8.4 on page
Removing Steering Dampener
Installing Seven Speed Shifter Cable
NOTE For this procedure, refer to FIGURE
NOTE This procedure applies to the Top End XLT only
mounting position on the hand crank assembly
Adjusting/Replacing Seven Speed Shifter
Installing/Adjusting Seven Speed Hub Chain
Seven Speed Hub Chain Installation
NOTE For this procedure, refer to FIGURE 8.6 on page
Installing/Adjusting Twenty-Seven Speed Cassette Chain
Adjusting Seven Speed Hub Chain
Installing Twenty-Seven Speed Cassette Chain
NOTE For this procedure, refer to FIGURE 8.7 on page
Adjusting Twenty-Seven Speed Cassette Chain
NOTE For this procedure, refer to FIGURE
Adjusting/Replacing the Parking Brake
NOTE For this procedure, refer to FIGURE
Cable
Brake Pads
Replacing Seat Upholstery
NOTE For this procedure, refer to
Parking Brake
Replacing Back Upholstery
NOTE For this procedure, refer to
NOTE For this procedure, refer to
Replacing Wide Back Upholstery
Installing Rear Safety Light
SECTION 9-OPTIONS
NOTE For this procedure, refer to
NOTE Rear wheels removed for clarity
Installing the Water Bottle
Installing/Using the Tow Bar
NOTE For this procedure, refer to FIGURE
NOTE For this procedure, refer to FIGURE
Installing the Draft Bumper
Installing the Safety Flag
Using Safety Helmet
NOTE For this procedure, refer to FIGURE
Installing Seat Positioning Strap
Installing the Computer
NOTE For this procedure, refer to FIGURE
NOTE For this procedure, refer to FIGURE
Installing Hand Crank Handles
Installing V/S Crankarm Handles
NOTE For this procedure, refer to FIGURE
Failure to install handle assembly properly could result in injury
Failure to install handle assembly properly could result in injury
NOTE For this procedure, refer to FIGURE
For Models Made After 7/12/07
2. Firmly tighten the bolt
Installing Gloves
Mountain Drive Transmission Option
Switching to Mountain Drive Transmission Option
Mountain Drive Transmission Option Maintenance
Using the Travel Ready Option
Removing/Installing the Camber Bar
NOTE For this procedure, refer to FIGURE 9.14 on page
NOTE For this procedure, refer to FIGURE 9.14 on page
Installing the Fork
NOTE For this procedure, refer to FIGURE 9.15 on page
Removing the Fork
NOTE For this procedure, refer to FIGURE 9.16 on page
Clamps
NOTE For this procedure, refer to FIGURE 9.17 on page
Removing the Front Wheel
Assembling/Using/Adjusting the Handcycle Rack
Installing the Front Wheel
NOTE For this procedure, refer to FIGURE 9.18 on page
Assembling the Handcycle Rack
Using the Handcycle Rack
Adjusting the Handcycle Rack
Wheel Tray Bracket
Rear Wheel Bar Brackets
Rear Wheel Bar
Using the Alignment Gauge
NOTE For this procedure, refer to FIGURE
Alignment Gauge
Rear Tires
LIMITED WARRANTY
LIMITED WARRANTY
This warranty pertains to the Top End Series Only
Canada