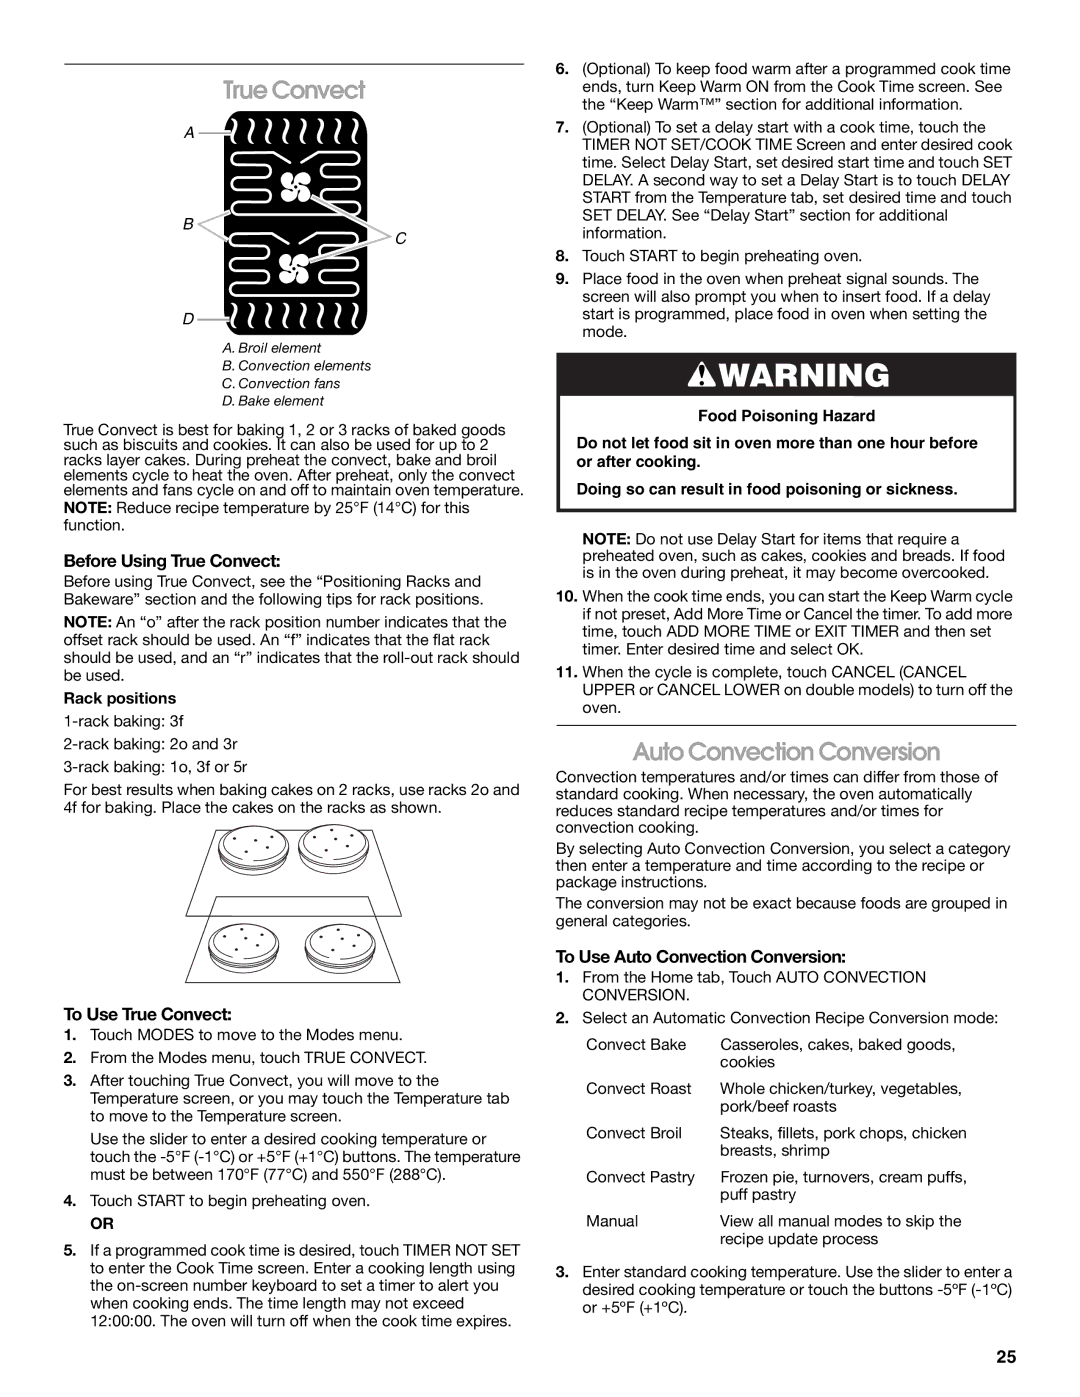
True Convect
A
B
C
D
A. Broil element
B. Convection elements
C. Convection fans
D. Bake element
True Convect is best for baking 1, 2 or 3 racks of baked goods such as biscuits and cookies. It can also be used for up to 2 racks layer cakes. During preheat the convect, bake and broil elements cycle to heat the oven. After preheat, only the convect elements and fans cycle on and off to maintain oven temperature.
NOTE: Reduce recipe temperature by 25°F (14°C) for this function.
Before Using True Convect:
Before using True Convect, see the “Positioning Racks and Bakeware” section and the following tips for rack positions.
NOTE: An “o” after the rack position number indicates that the offset rack should be used. An “f” indicates that the flat rack should be used, and an “r” indicates that the
Rack positions
For best results when baking cakes on 2 racks, use racks 2o and 4f for baking. Place the cakes on the racks as shown.
To Use True Convect:
1.Touch MODES to move to the Modes menu.
2.From the Modes menu, touch TRUE CONVECT.
3.After touching True Convect, you will move to the Temperature screen, or you may touch the Temperature tab to move to the Temperature screen.
Use the slider to enter a desired cooking temperature or touch the
4.Touch START to begin preheating oven.
OR
5.If a programmed cook time is desired, touch TIMER NOT SET to enter the Cook Time screen. Enter a cooking length using the
6.(Optional) To keep food warm after a programmed cook time ends, turn Keep Warm ON from the Cook Time screen. See the “Keep Warm™” section for additional information.
7.(Optional) To set a delay start with a cook time, touch the TIMER NOT SET/COOK TIME Screen and enter desired cook time. Select Delay Start, set desired start time and touch SET DELAY. A second way to set a Delay Start is to touch DELAY START from the Temperature tab, set desired time and touch SET DELAY. See “Delay Start” section for additional information.
8.Touch START to begin preheating oven.
9.Place food in the oven when preheat signal sounds. The screen will also prompt you when to insert food. If a delay start is programmed, place food in oven when setting the mode.
![]() WARNING
WARNING
Food Poisoning Hazard
Do not let food sit in oven more than one hour before or after cooking.
Doing so can result in food poisoning or sickness.
NOTE: Do not use Delay Start for items that require a preheated oven, such as cakes, cookies and breads. If food is in the oven during preheat, it may become overcooked.
10.When the cook time ends, you can start the Keep Warm cycle if not preset, Add More Time or Cancel the timer. To add more time, touch ADD MORE TIME or EXIT TIMER and then set timer. Enter desired time and select OK.
11.When the cycle is complete, touch CANCEL (CANCEL UPPER or CANCEL LOWER on double models) to turn off the oven.
Auto Convection Conversion
Convection temperatures and/or times can differ from those of standard cooking. When necessary, the oven automatically reduces standard recipe temperatures and/or times for convection cooking.
By selecting Auto Convection Conversion, you select a category then enter a temperature and time according to the recipe or package instructions.
The conversion may not be exact because foods are grouped in general categories.
To Use Auto Convection Conversion:
1.From the Home tab, Touch AUTO CONVECTION CONVERSION.
2.Select an Automatic Convection Recipe Conversion mode:
Convect Bake | Casseroles, cakes, baked goods, |
| cookies |
Convect Roast | Whole chicken/turkey, vegetables, |
| pork/beef roasts |
Convect Broil | Steaks, fillets, pork chops, chicken |
| breasts, shrimp |
Convect Pastry | Frozen pie, turnovers, cream puffs, |
| puff pastry |
Manual | View all manual modes to skip the |
| recipe update process |
3.Enter standard cooking temperature. Use the slider to enter a desired cooking temperature or touch the buttons
25
