User
If you have questions, call
Important Safety Instructions
General Instructions
To Prevent Fire or Smoke Damage
About Your Appliance
Child Safety
Cooking Safety
Case of Fire
Save These Instructions for Future Reference
Important Safety INSTRUCTIONS,
Pilotless Ignition
Suggested Heat Settings
Surface Cooking
Surface Controls
Cooktop
Surface COOKING,
Press Convect Bake pad
Oven Cooking
Function Pads
Control Options
Setting the Timer Beeps
To Cancel
Oven COOKING,
To Eliminate 12 Hour Turn OFF
To Restore
To Adjust the Oven TEMPERA- Ture
Oven FAN
Oven Bottom
Baking and ROASTING, and Convection Baking and Roasting
Oven Vent
Oven Light
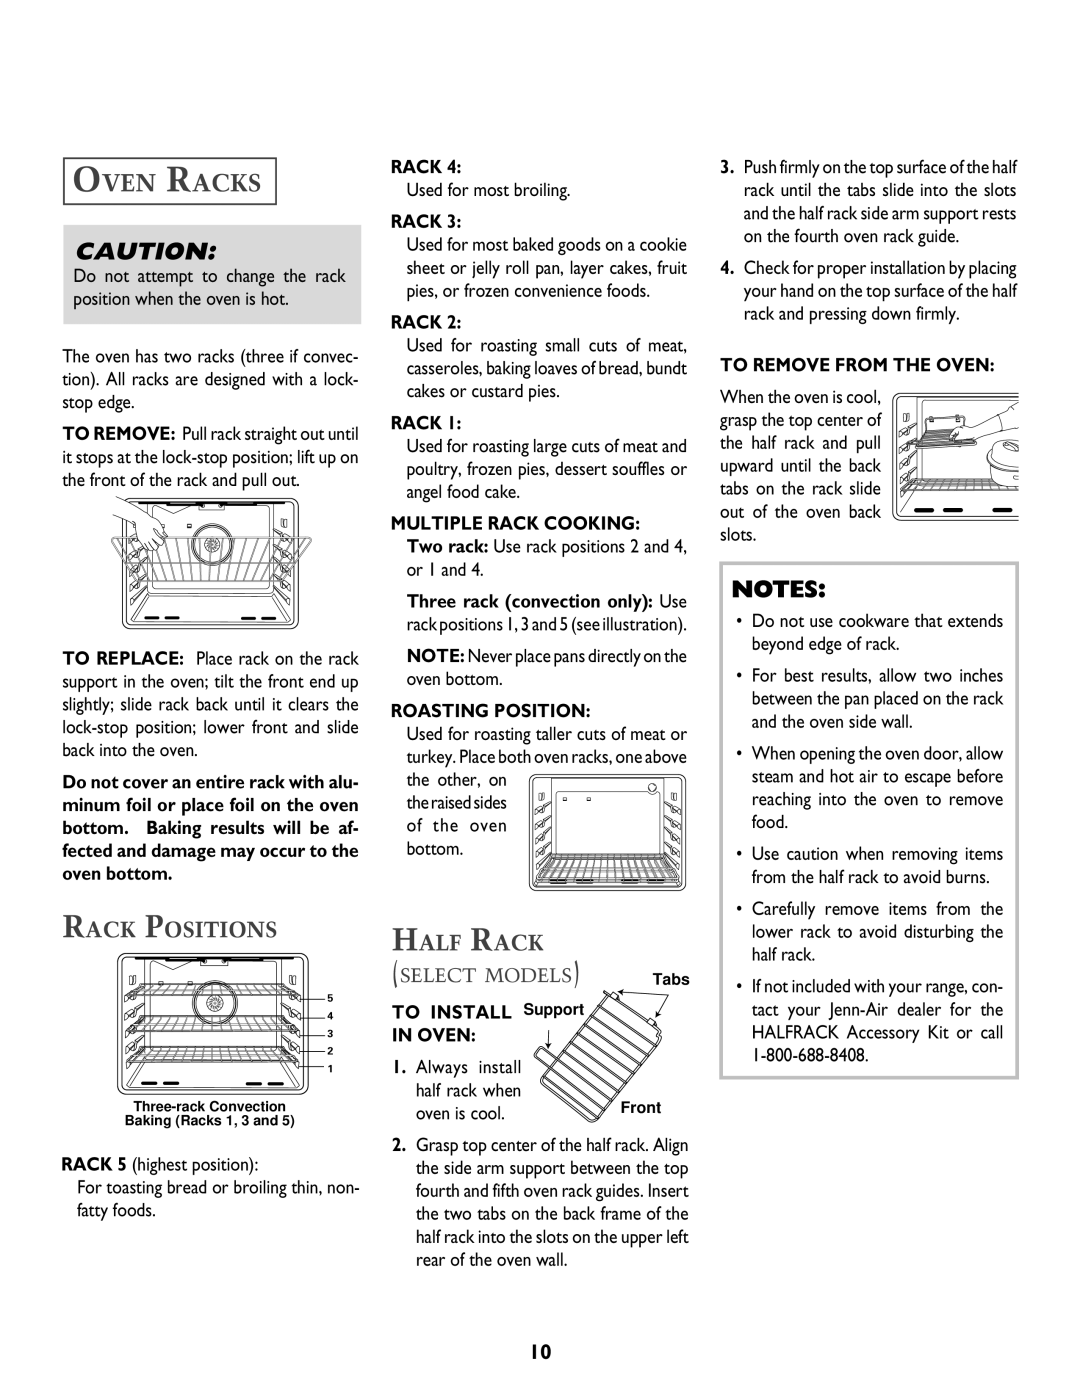
Half Rack
Oven Racks
Rack Positions
Broiling
Broiling Chart
Setting the Controls for Broiling
Clock Controlled Oven Cooking
Warming Chart
Warming Drawer
Press the Cook Time pad
To Delay the Start and Turn OFF Automatically
Setting the Controls
To Start Immediately and Turn OFF Automatically
Drying
Drying
Ing guide on page 15 for drying
Tomatoes Carrots Hot Peppers
Drying Guide
Apples Apricots Bananas Cherries
Pears Pineapple
Door gasket with a
Care & Cleaning
SELF-CLEAN Oven
Setting the Controls for a SELF-CLEAN Cycle
To Cancel SELF-CLEAN
Care & CLEANING,
Cleaning Procedures
To Delay the Start of a Clean Cycle
Be careful not to get water into burner ports
When cool, wash with soapy water, rinse and dry
Use a glass cleaner and a soft cloth
Follow instructions on page 16-17 to set a self-clean cycle
When cool, clean with soap and water, rinse and dry
Maintenance
Warming Drawer
MAINTENANCE,
Removal of GAS Appliance
Storage Drawer
Before YOU Call for Service
If YOU Need Service
JENN-AIR Range Warranty
What is not Covered by These Warranties
Guide
Ne pas toucher à un interrupteur électrique
Instructions DE Sécurité Importantes
Instructions Générales
QUE Faire SI L’ON Sent UNE Odeur DE GAZ
Cuisson ET Sécurité
EN CAS D’INCENDIE
Familiarisation Avec L’APPARIEL
Nettoyage ET Sécurité
Instructions DE Sécurité IMPORTANTES, Suite
Conserver CES Instructions Pour Consultation Ultérieure
Ustensils ET Sécurité
Réglages Suggérés
Commandes DE LA Surface DE Cuisson
Boutons DE Commande DE LA Surface DE Cuisson
Cuisson SUR LA Surface
Surface DE Cuisson
Cuisson SUR LA SURFACE, Suite
Touches D COM- Mande DU Four
Cuisson AU Four
Pour Annuler
Options DE Commande
Réglage DU Bloquage DES Commandes
Cuisson AU FOUR, Suite
Si on préfère que l’heure normale ne soit pas affichée
Allumage Sans Flamme DE Veille
Ventilateur DU Four
Réglage DE LES Bips DE FIN DE Cuisson
’affichage précédent
Conduit ’AÉRATION
Cuisson qu’au four traditionnel
DEMI-GRILLE
Grilles DU Four
Fond DU Four
Positions DES Grilles
Réglage Pour UNE Cuisson AU Gril
Cuisson AU Gril
Tableau DE Cuisson AU Gril
Tableau DE Chauffage
Tiroir DE Chauffage
Cuisson AU Four Contrôlée PAR ’HORLOGE
De déclenchement de la cuisson
Mise EN Marche ET Arrêt AUTO- Matiques
« 0HR00 »
Minutes, l’affichage indique
Les caractères 000, le témoin de cuisson
Appuyer sur la touche Drying
Ouvrir légèrement la Porte du four
Dessiccation
Guide DE Dessiccation
Four Autonettoyant
Nettoyage ET Entretien
Pour Annuler UNE Opération D’AUTONETTOYAGE
Nettoyage ET ENTRETIEN, Suite
Méthodes DE Nettoyage
Retirez LES Chapeaux
Nettoyer avec de l’eau savonneuse
Hublot DU Four
Entretien
Porte DU Four
Tiroir DE Remisage Raccordement Électrique
Déplacement DE LA Cuisiniére
Pieds DE Réglage DE L’APLOMB
Lampe DU Four
Pour Substituer LE Tiroir DE Chauffage
ENTRETIEN, Suite
Tiroir DE Chauffage
Pour Retirer LE Tiroir DE Chauffage
Vérifier que la porte est fermée
Avant DE Contacter UN Réparateur
Orifices du brûleur obstrués
Utilisation d’une lèchefrite souillée
SI L’INTERVENTION D’UN Réparateur EST Nécessaire
Garantie DE LA Cuisinière JENN-AIR
NE Sont PAS Couverts PAR Cette Garantie
Guía
Si tiene alguna pregunta, llame a
Instrucciones Importantes Sobre Seguridad
Instrucciones Generales
Para Evitar UN Incendio Daño Causado POR EL Humo
Seguridad Para Cocinar
EN Caso DE Incendio
Seguridad Para LOS Niños
Generalidades
Conserve Estas Instrucciones Para Referencia Futura
Instrucciones Importantes Sobre SEGURIDAD,
Perillas DE LOS Controles Superiores
Cocinando EN LA Estufa
Ajustes DE Calor Sugeridos
Encendido SIN Piloto
Cubierta
Cocinando EN LA ESTUFA,
Oprima la tecla deseada
Cocinado EN EL Horno
Teclas DE Control
Opciónes DE Control
Para Cancelar
Cocinado EN EL HORNO,
Durante varios segundos hasta que en el indicador aparezca
Ventiladore DEL Horno
Para Restaurar EL Apague Automatico
Para Ajustar EL Termostato
LUZ DEL Horno
Horneado Y ASADO, Y Horneado Y Asado POR Conveción AL Horno
Respiradero DEL Horno
Media Parrilla
Panel Inferior DEL Horno
Parrillas DEL Horno
Posiciones DE LA Parrilla
Tocino
Asar a LA
Parrilla
Tabla Para Asar a LA Parrilla
Fijar LOS Controles
EL Cajón QUE SE Calienta
Horneado Controlado POR Reloj
Cajón QUE SE Calienta
Fijar LOS Controles
Visual y aparecerá 000 y el ícono del horno
De ventilador
Oprima la tecla ‘Cook Time’
La temperatura puede ser fijarado entre 100 y 200 F
Secado
Horno
Oprima la tecla ‘Drying’
Guía DE Secado
De la puerta y alrededor de la
Cierre la puerta del horno Oprima la tecla ‘Clean’
Cuidado Y Limpieza
Autolimpieza DEL Horno
Procedimientos DE Limpieza
Cuidado Y LIMPIEZA,
Seque
Limpie con un paño mojado y seque
Tornillos Niveladores
Mantenimiento
Puerta DEL Horno
Ventana DEL Horno
Cambio DE Lugar DE LA Estufa a GAS
LUZ DEL Horno
Gaveta DE Almacenamiento
Conexión Eléctrica
Para Substituir EL Cajón QUE SE Calienta
MANTENIMIENTO,
Quitar EL Cajón SE Calienta
Verifique si la puerta está cerrada
Antes DE Solicitar Servicio
Verifique para asegurarse de que la estufa está nivelada
Se usó una asadera sucia
SI Necesita Servicio
Garantía DE LA Estufa JENN-AIR
LO QUE no Cubren Estas Garantías