2. CONTROLS, INDICATORS AND CONNECTORS
2-2 Right Side Section
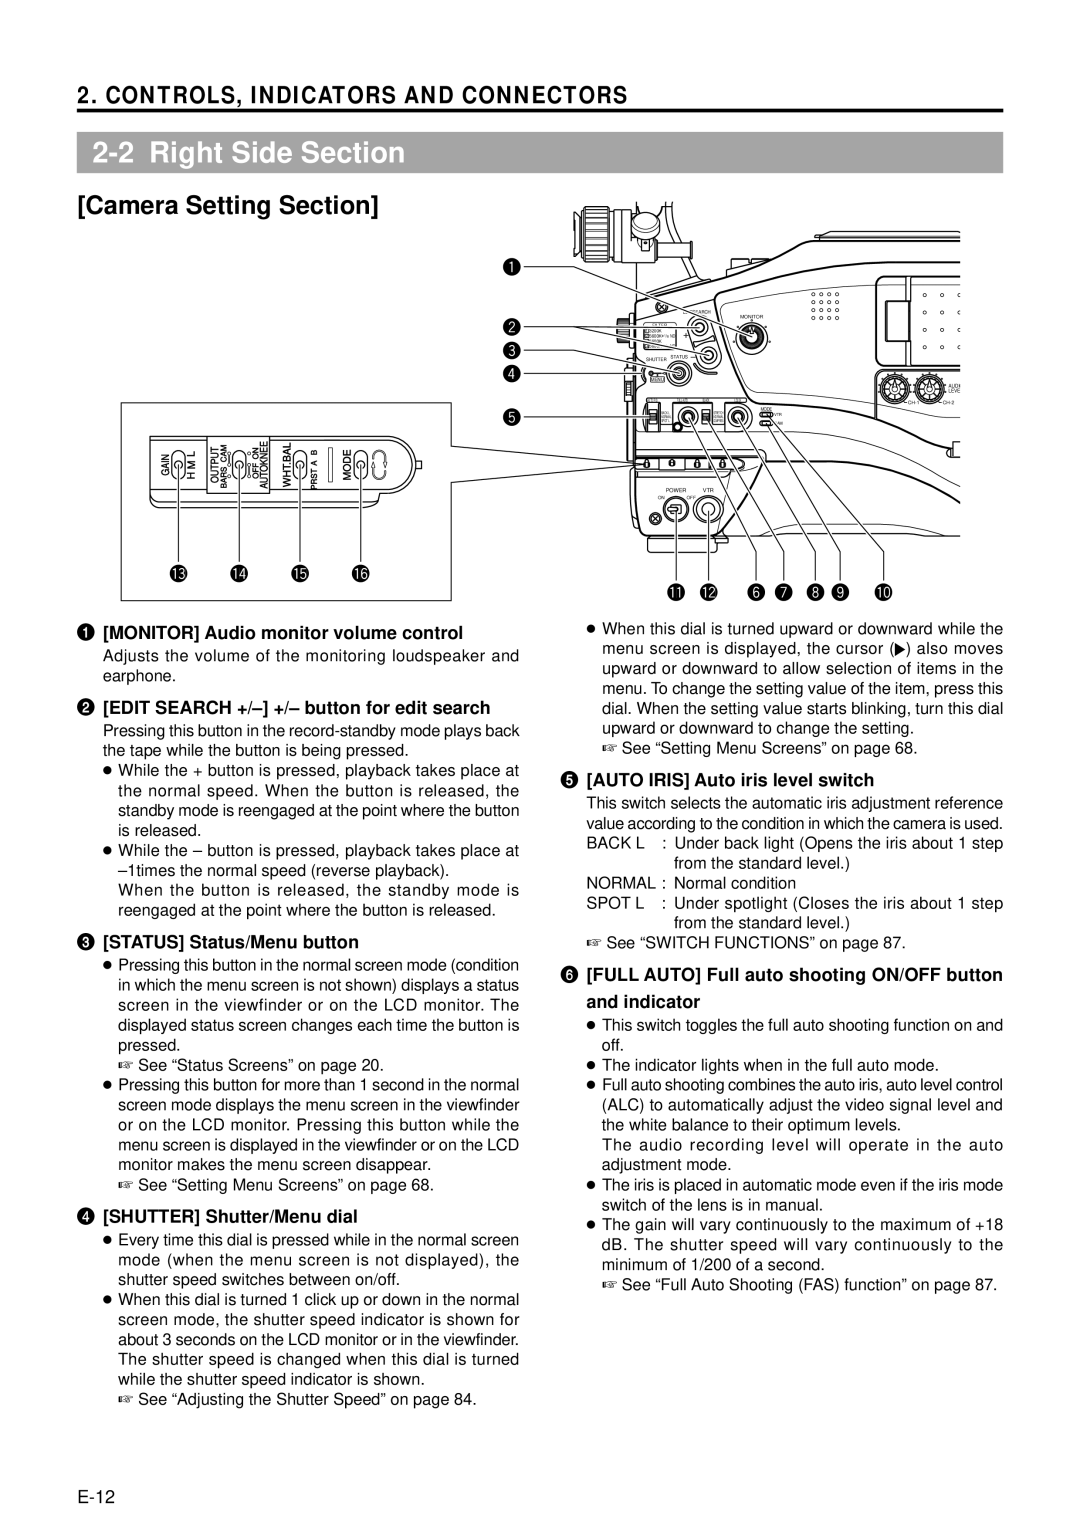
[Camera Setting Section]
GAIN
H M L | OUTPUT BARS CAM |
OFF ON AUTOKNEE | WHT.BAL |
q
w![]() e
e![]() r
r ![]()
t
PRST A B | MODE |
EDITSEARCH
MONITOR
FILTER
13200K
25600K 1/8 ND
.3 5600K
.4 5600K 1/64 ND
SHUTTER STATUS
MENU
AUDIO
LEVE
AUTO IRIS | FULL AUTO | BLACK | LOLUX | ||
|
|
|
|
MODE
BACK L | STRETCH | VTR |
NORMAL | NORMAL | |
SPOT L | COMPRESS | CAM |
|
|
POWER VTR
ON OFF
!3 | !4 | !5 | !6 |
1[MONITOR] Audio monitor volume control
Adjusts the volume of the monitoring loudspeaker and earphone.
2[EDIT SEARCH +/–] +/– button for edit search
Pressing this button in the
●While the + button is pressed, playback takes place at the normal speed. When the button is released, the standby mode is reengaged at the point where the button is released.
●While the – button is pressed, playback takes place at
When the button is released, the standby mode is reengaged at the point where the button is released.
3[STATUS] Status/Menu button
●Pressing this button in the normal screen mode (condition in which the menu screen is not shown) displays a status screen in the viewfinder or on the LCD monitor. The displayed status screen changes each time the button is pressed.
☞See “Status Screens” on page 20.
●Pressing this button for more than 1 second in the normal screen mode displays the menu screen in the viewfinder or on the LCD monitor. Pressing this button while the menu screen is displayed in the viewfinder or on the LCD monitor makes the menu screen disappear.
☞See “Setting Menu Screens” on page 68.
4[SHUTTER] Shutter/Menu dial
●Every time this dial is pressed while in the normal screen mode (when the menu screen is not displayed), the shutter speed switches between on/off.
●When this dial is turned 1 click up or down in the normal screen mode, the shutter speed indicator is shown for about 3 seconds on the LCD monitor or in the viewfinder. The shutter speed is changed when this dial is turned while the shutter speed indicator is shown.
☞ See “Adjusting the Shutter Speed” on page 84.
!1!2 y u i o !0
●When this dial is turned upward or downward while the
menu screen is displayed, the cursor (![]() ) also moves upward or downward to allow selection of items in the menu. To change the setting value of the item, press this dial. When the setting value starts blinking, turn this dial upward or downward to change the setting.
) also moves upward or downward to allow selection of items in the menu. To change the setting value of the item, press this dial. When the setting value starts blinking, turn this dial upward or downward to change the setting.
☞ See “Setting Menu Screens” on page 68.
5[AUTO IRIS] Auto iris level switch
This switch selects the automatic iris adjustment reference value according to the condition in which the camera is used. BACK L : Under back light (Opens the iris about 1 step
from the standard level.)
NORMAL : Normal condition
SPOT L : Under spotlight (Closes the iris about 1 step from the standard level.)
☞ See “SWITCH FUNCTIONS” on page 87.
6[FULL AUTO] Full auto shooting ON/OFF button and indicator
●This switch toggles the full auto shooting function on and off.
●The indicator lights when in the full auto mode.
●Full auto shooting combines the auto iris, auto level control (ALC) to automatically adjust the video signal level and the white balance to their optimum levels.
The audio recording level will operate in the auto adjustment mode.
●The iris is placed in automatic mode even if the iris mode switch of the lens is in manual.
●The gain will vary continuously to the maximum of +18 dB. The shutter speed will vary continuously to the minimum of 1/200 of a second.
☞ See “Full Auto Shooting (FAS) function” on page 87.