On-Screen Displays
Turn on the TV and select the VIDEO channel (or AV mode).
![]()
![]()
![]()
![]()
![]()
![]()
![]()
![]()
![]()
![]()
![]()
![]()
![]()
![]()
![]()
![]()
![]()
![]()
![]()
![]()
![]()
![]()
![]()
![]()
![]()
![]()
![]()
![]()
![]()
![]()
![]()
![]()
![]()
![]()
![]()
![]()
![]()
![]()
![]()
![]()
![]()
![]()
![]()
![]()
![]()
![]()
![]()
![]() EN
EN![]()
![]() 19
19![]()
You can choose whether or not to have various operational indicators appear on screen, by setting this function ON or OFF. Messages appear in the language you selected during Auto Channel Set (☞ pg. 5).
TURN ON THE RECORDER |
1 Press OPERATE. |
ACCESS MODE SELECT |
SCREEN |
•• • • • •• | •• • • • •• | ||
• • | • • | • • | • • |
![]()
![]()
![]()
![]() OPERATE
OPERATE
8 |
OPERATE
2 | Press MODE. The O.S.D./ |
|
B.E.S.T. screen appears. | : ON | |
O.S.D. | ||
B.E.S.T. | : ON | |
| [5°] = [5]: ON/OFF | |
| [MODE] : EXIT |
|
|
|
|
| SELECT MODE |
|
MODE
2
1 2 3
4 | 5 | 6 |
7 8 9
0
3
1
PUSH JOG
The pointer should already be next to “O.S.D.”. If not, |
3 press PUSH JOG%Þ to place it there. |
ENABLE/DISABLE |
|
The default setting is “ON”, so if you want |
displays, leave the setting as is and go to step 5. If you |
4 don’t want the displays to appear, press PUSH JOG% |
to set “O.S.D.” to “OFF”. |
CLOSE MODE SELECT |
SCREEN |
5 Press MODE. |
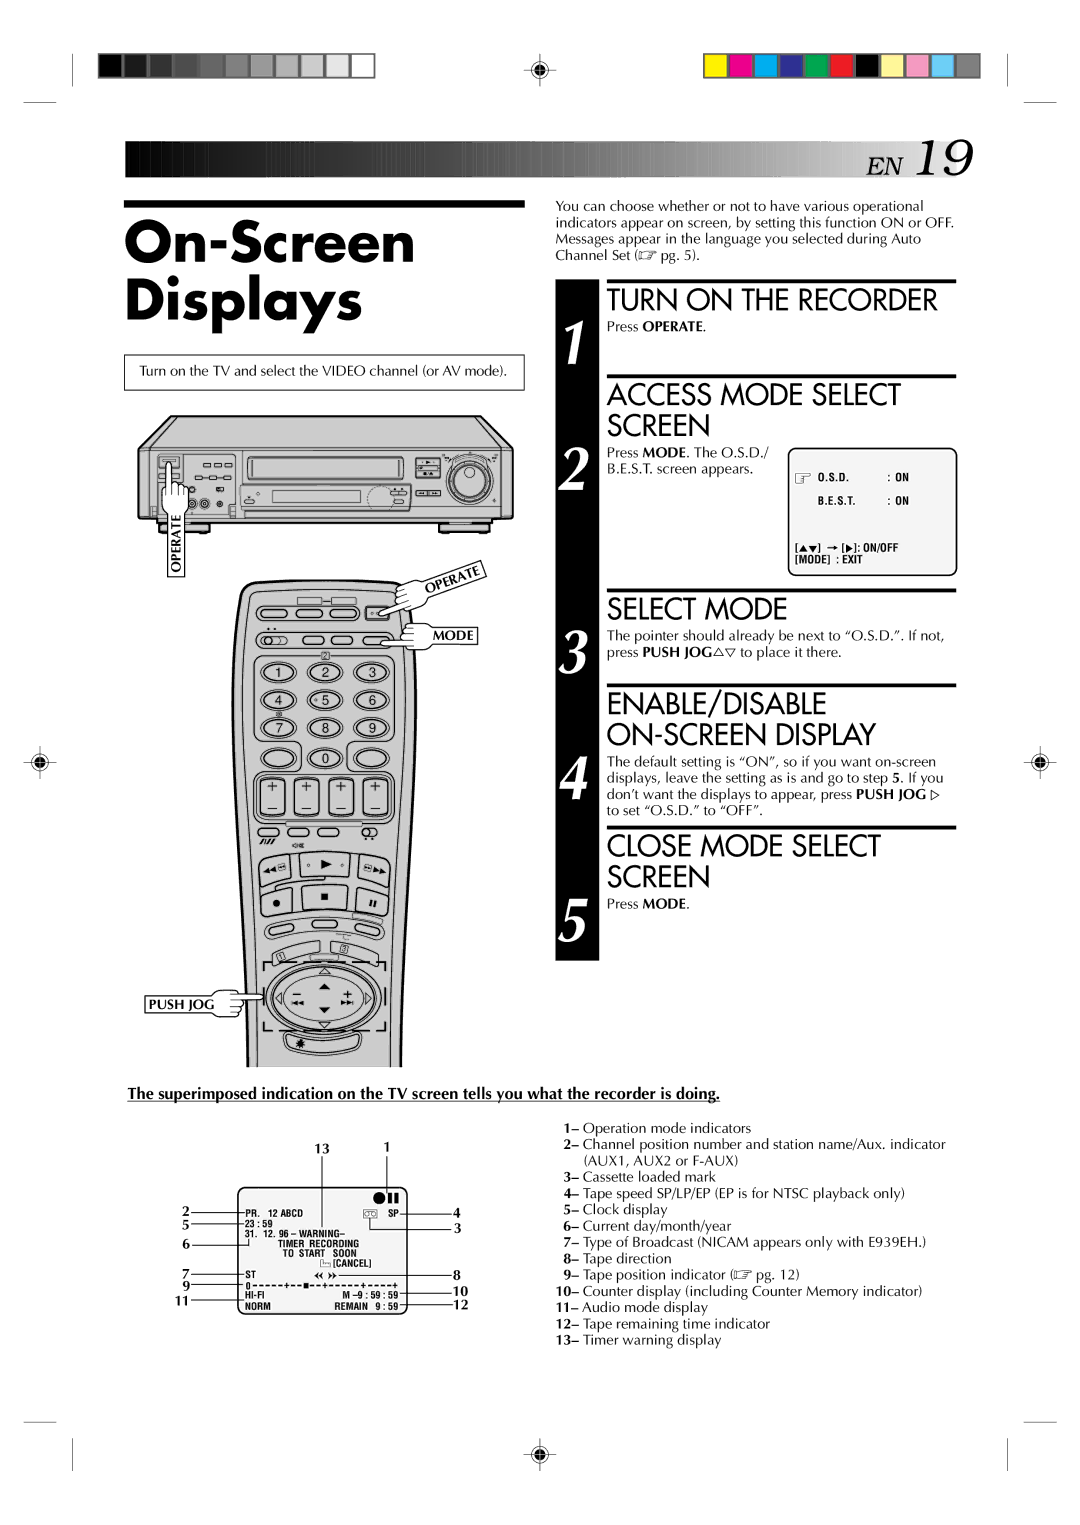
The superimposed indication on the TV screen tells you what the recorder is doing.
|
|
|
|
|
| 13 |
|
| 1 |
|
|
|
|
| ||
|
|
|
|
|
|
|
|
|
|
|
|
|
|
|
|
|
2 |
|
|
|
|
|
|
|
|
| q6 |
|
| 4 | |||
|
|
| PR. | 12 ABCD |
|
|
| ] SP |
|
| ||||||
|
|
|
|
|
|
| ||||||||||
5 |
|
| 23 : 59 |
|
|
|
|
|
|
|
| 3 | ||||
|
|
|
|
|
|
|
|
|
| |||||||
|
| 31. 12. 96 – WARNING– |
|
|
|
| ||||||||||
|
|
|
| |||||||||||||
6 |
|
|
|
| TIMER RECORDING |
|
|
|
|
|
|
| ||||
|
|
|
|
|
|
|
|
|
|
| ||||||
|
|
|
|
| TO START | SOON |
|
|
|
|
|
|
| |||
7 |
|
|
| ST |
|
|
| [CANCEL] |
|
|
|
|
| 8 | ||
|
|
|
|
|
|
|
|
|
|
|
| |||||
|
|
|
|
|
|
|
|
|
|
|
| |||||
9 |
| 0 | + | + | + | + |
|
|
| 10 | ||||||
|
|
|
| |||||||||||||
11 |
|
|
|
|
|
| M |
|
| |||||||
|
|
|
|
|
|
|
| |||||||||
|
| NORM |
|
| REMAIN | 9 : 59 |
|
|
|
| 12 | |||||
|
|
|
|
|
| |||||||||||
1– Operation mode indicators
2– Channel position number and station name/Aux. indicator (AUX1, AUX2 or
3– Cassette loaded mark
4– Tape speed SP/LP/EP (EP is for NTSC playback only) 5– Clock display
6– Current day/month/year
7– Type of Broadcast (NICAM appears only with E939EH.) 8– Tape direction
9– Tape position indicator (☞ pg. 12)
10– Counter display (including Counter Memory indicator) 11– Audio mode display
12– Tape remaining time indicator 13– Timer warning display