46![]()
![]()
![]() EN
EN![]()
![]()
![]()
![]()
![]()
![]()
![]()
![]()
![]()
![]()
![]()
![]()
![]()
![]()
![]()
![]()
![]()
![]()
![]()
![]()
![]()
![]()
![]()
![]()
![]()
![]()
REMOTE CONTROL


 INDEX
INDEX (cont.)


1
2 |
|
| CH SET | STORE | OPERATE | ||||
A B |
|
| CLOCK C.MEMORYDISPLAY |
| MODE | ||||
3 |
|
|
|
| 2 |
|
|
|
|
4 |
|
|
|
|
|
|
|
| |
1 |
|
|
| 2 |
|
| 3 | ||
5 |
|
|
| ADD TIME |
|
|
|
| |
4 |
|
|
| 5 |
|
| 6 | ||
6 |
|
|
| DAILY |
| WEEKLY | |||
7 |
|
|
| 8 |
|
| 9 | ||
|
|
|
|
|
| ||||
7 | C.RESET |
| AUX |
|
|
|
| ||
CANCEL |
|
| 0 |
| TIMER | ||||
|
|
|
| ||||||
8 | START |
| STOP | DATE |
|
| TV | ||
|
| PROG. | |||||||
|
|
|
|
|
|
| |||
9 |
|
| EXPRESS PROGRAMMING |
|
|
| |||
0 | AUDIO MONITOR TV/VIDEO | TV VCR | |||||||
|
|
| (MONITOR) |
|
|
|
| ||
! |
|
|
|
|
|
|
|
|
|
@ |
|
|
|
|
|
|
|
|
|
# | ENE | FINDER |
| PROG C |
| ||||
|
|
|
|
|
| HE | |||
SC |
|
|
|
|
|
|
| CK | |
|
|
| R.A.EDIT | IN | / OU |
| |||
$ |
|
|
| G | 3 | STA | RT | T |
|
|
|
|
|
|
|
| |||
|
| O |
| O |
|
|
| ||
| R | TV | VOL. |
|
|
| |||
1 P |
| K |
|
| |||||
% |
|
|
| PUSH JOG |
|
|
|
| |
^ |
|
|
|
|
|
|
| ||
|
|
|
|
|
|
|
|
| |
& |
|
|
|
| E |
|
|
| |
|
|
|
| ILLUMI GUID |
|
|
|
| |
MULTI BRAND
REMOTE CONTROL UNIT
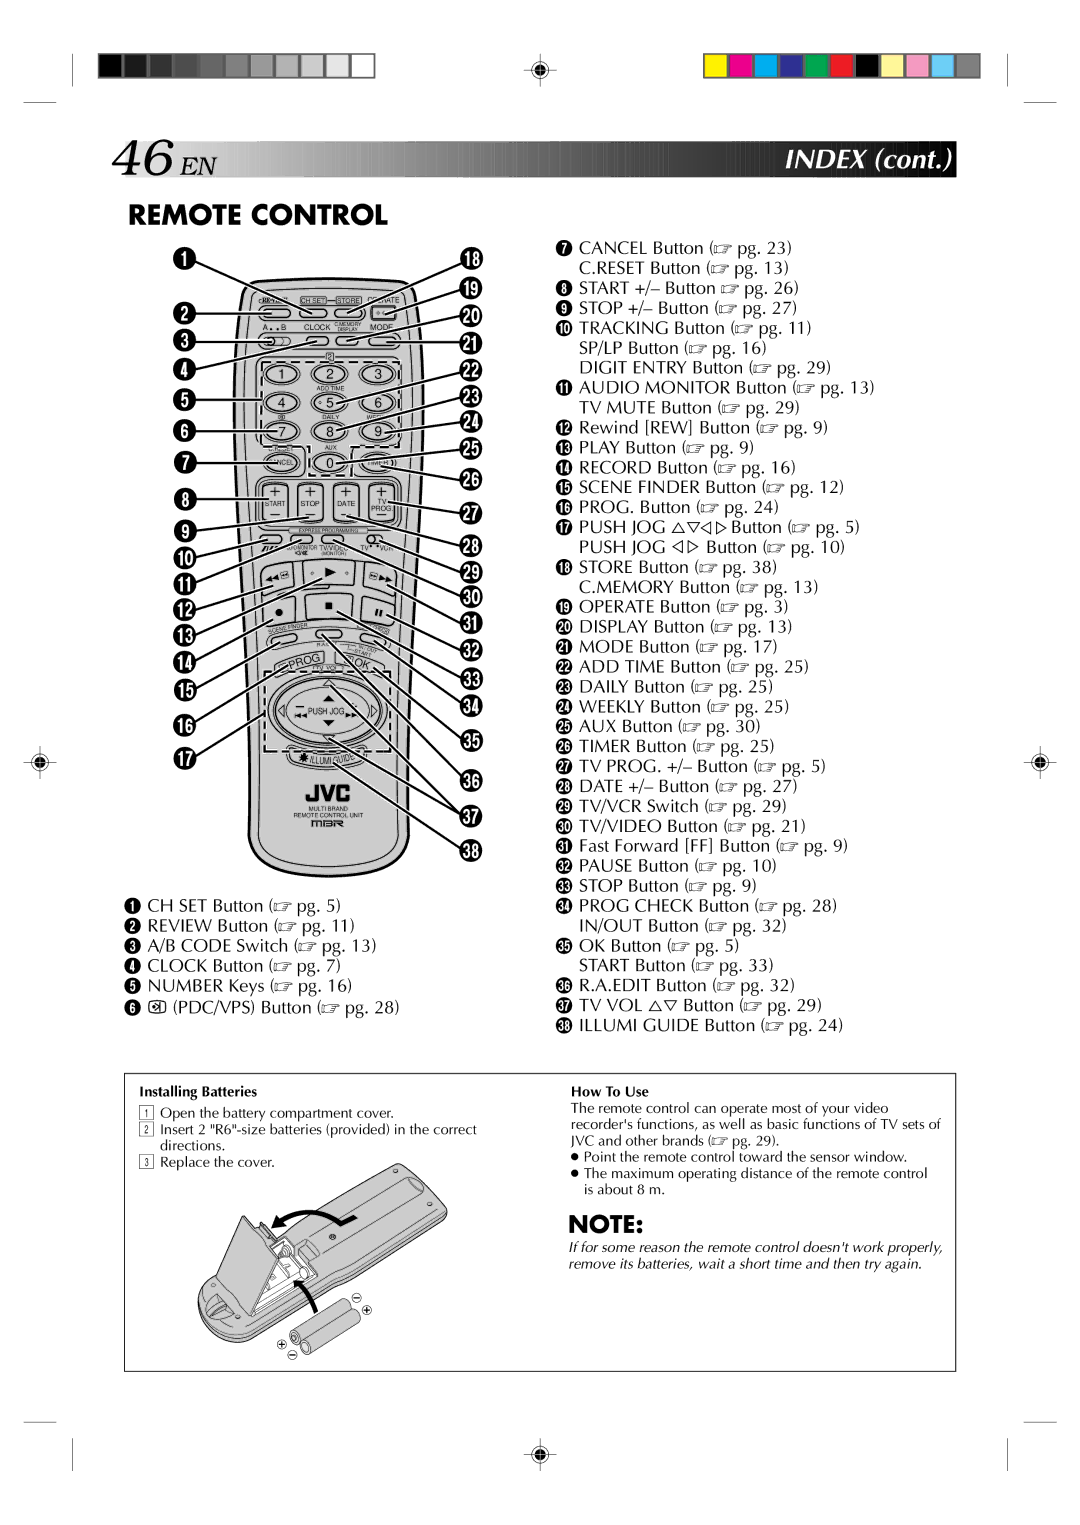
1CH SET Button (☞ pg. 5)
2REVIEW Button (☞ pg. 11)
3A/B CODE Switch (☞ pg. 13)
4CLOCK Button (☞ pg. 7)
5NUMBER Keys (☞ pg. 16)
6![]()
![]()
![]()
![]() (PDC/VPS) Button (☞ pg. 28)
(PDC/VPS) Button (☞ pg. 28)
*
(
)
q w e r t
y u
i o p
Q W E R
T
Y U I
7CANCEL Button (☞ pg. 23) C.RESET Button (☞ pg. 13)
8START +/– Button ☞ pg. 26)
9STOP +/– Button (☞ pg. 27)
0TRACKING Button (☞ pg. 11) SP/LP Button (☞ pg. 16)
DIGIT ENTRY Button (☞ pg. 29)
! AUDIO MONITOR Button (☞ pg. 13) TV MUTE Button (☞ pg. 29)
@ Rewind [REW] Button (☞ pg. 9)
# PLAY Button (☞ pg. 9)
$ RECORD Button (☞ pg. 16)
% SCENE FINDER Button (☞ pg. 12) ^ PROG. Button (☞ pg. 24)
& PUSH JOG %Þ% %Button (☞ pg. 5) PUSH JOG % % Button (☞ pg. 10)
*STORE Button (☞ pg. 38)
C.MEMORY Button (☞ pg. 13) ( OPERATE Button (☞ pg. 3)
) DISPLAY Button (☞ pg. 13)
qMODE Button (☞ pg. 17)
wADD TIME Button (☞ pg. 25)
eDAILY Button (☞ pg. 25)
rWEEKLY Button (☞ pg. 25)
tAUX Button (☞ pg. 30)
yTIMER Button (☞ pg. 25)
uTV PROG. +/– Button (☞ pg. 5)
iDATE +/– Button (☞ pg. 27)
oTV/VCR Switch (☞ pg. 29)
pTV/VIDEO Button (☞ pg. 21)
Q Fast Forward [FF] Button (☞ pg. 9) W PAUSE Button (☞ pg. 10)
E STOP Button (☞ pg. 9)
R PROG CHECK Button (☞ pg. 28) IN/OUT Button (☞ pg. 32)
T OK Button (☞ pg. 5) START Button (☞ pg. 33)
Y R.A.EDIT Button (☞ pg. 32)
U TV VOL %Þ Button (☞ pg. 29)
I ILLUMI GUIDE Button (☞ pg. 24)
Installing Batteries
1Open the battery compartment cover.
2Insert 2
3Replace the cover.
How To Use
The remote control can operate most of your video recorder's functions, as well as basic functions of TV sets of JVC and other brands (☞ pg. 29).
●Point the remote control toward the sensor window.
●The maximum operating distance of the remote control is about 8 m.
NOTE:
If for some reason the remote control doesn't work properly, remove its batteries, wait a short time and then try again.