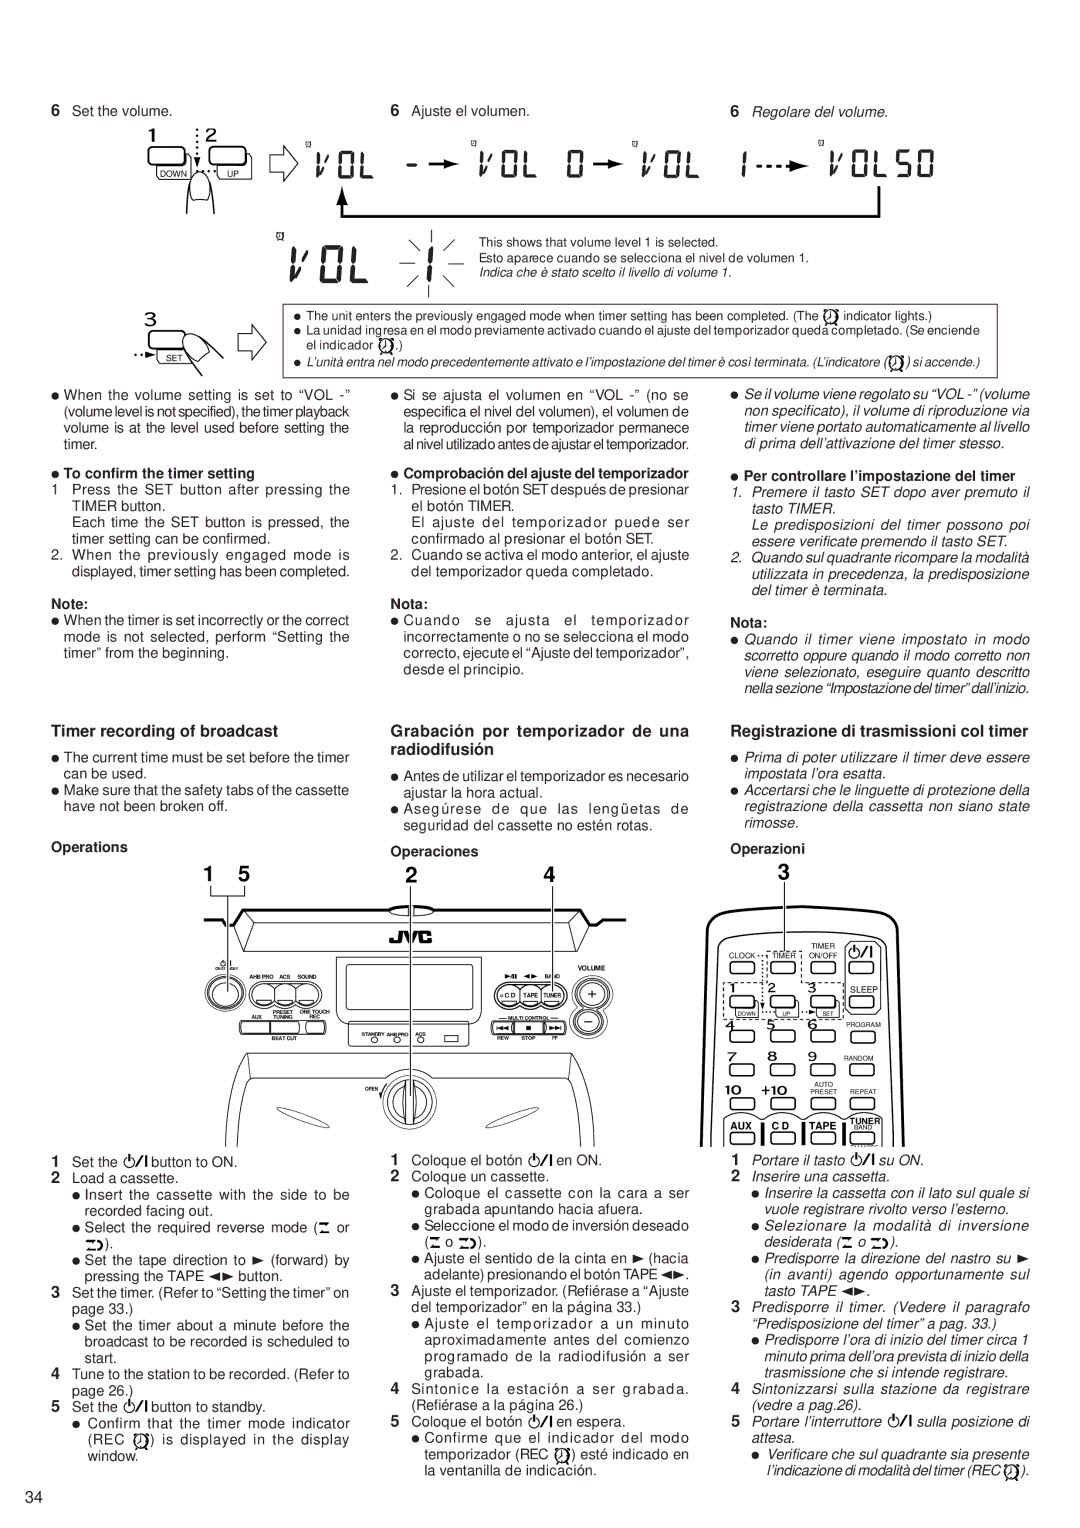
6 Set the volume.

6 Ajuste el volumen.

6 Regolare del volume.

DOWN UP

SET

This shows that volume level 1 is selected.

Esto aparece cuando se selecciona el nivel de volumen 1.

Indica che è stato scelto il livello di volume 1.

ÖThe unit enters the previously engaged mode when timer setting has been completed. (The indicator lights.)

ÖLa unidad ingresa en el modo previamente activado cuando el ajuste del temporizador queda completado. (Se enciende el indicador .)

ÖL’unità entra nel modo precedentemente attivato e l’impostazione del timer è così terminata. (L’indicatore () si accende.)

ÖWhen the volume setting is set to “VOL -” (volume level is not specified), the timer playback volume is at the level used before setting the timer.

ÖTo confirm the timer setting

1Press the SET button after pressing the TIMER button.

Each time the SET button is pressed, the timer setting can be confirmed.

2.When the previously engaged mode is displayed, timer setting has been completed.

Note:

ÖWhen the timer is set incorrectly or the correct mode is not selected, perform “Setting the timer” from the beginning.

ÖSi se ajusta el volumen en “VOL -” (no se especifica el nivel del volumen), el volumen de la reproducción por temporizador permanece al nivel utilizado antes de ajustar el temporizador.

ÖComprobación del ajuste del temporizador 1. Presione el botón SET después de presionar

el botón TIMER.

El ajuste del temporizador puede ser confirmado al presionar el botón SET.

2. Cuando se activa el modo anterior, el ajuste del temporizador queda completado.

Nota:

ÖCuando se ajusta el temporizador incorrectamente o no se selecciona el modo correcto, ejecute el “Ajuste del temporizador”, desde el principio.

ÖSe il volume viene regolato su “VOL -” (volume non specificato), il volume di riproduzione via timer viene portato automaticamente al livello di prima dell’attivazione del timer stesso.

ÖPer controllare l’impostazione del timer

1.Premere il tasto SET dopo aver premuto il tasto TIMER.

Le predisposizioni del timer possono poi essere verificate premendo il tasto SET.

2.Quando sul quadrante ricompare la modalità utilizzata in precedenza, la predisposizione del timer è terminata.

Nota:

ÖQuando il timer viene impostato in modo scorretto oppure quando il modo corretto non viene selezionato, eseguire quanto descritto nella sezione “Impostazione del timer” dall’inizio.

Timer recording of broadcast

ÖThe current time must be set before the timer can be used.

ÖMake sure that the safety tabs of the cassette have not been broken off.

Operations

Grabación por temporizador de una radiodifusión

ÖAntes de utilizar el temporizador es necesario ajustar la hora actual.

ÖAsegúrese de que las lengüetas de seguridad del cassette no estén rotas.

Operaciones

Registrazione di trasmissioni col timer

ÖPrima di poter utilizzare il timer deve essere impostata l’ora esatta.

ÖAccertarsi che le linguette di protezione della registrazione della cassetta non siano state rimosse.

Operazioni

1 5

ON/STANDBY

AHB PRO

ACS

SOUND

PRESET

ONE TOUCH

AUX

TUNING

REC

BEAT CUT

2

STANDBY AHB PRO

ACS

OPEN


4

VOLUME

BAND

C D TAPE TUNER

MULTI CONTROL

REW STOP FF

3

TIMER

CLOCK TIMER ON/OFF

SLEEP

DOWN UP SET

PROGRAM

RANDOM

AUTO

PRESET REPEAT

AUX C D TAPE

TUNER

BAND

FM MODE

1Set the button to ON.

2Load a cassette.

ÖInsert the cassette with the side to be recorded facing out.

ÖSelect the required reverse mode ( or

).

ÖSet the tape direction to 3 (forward) by pressing the TAPE 23 button.

3Set the timer. (Refer to “Setting the timer” on page 33.)

ÖSet the timer about a minute before the broadcast to be recorded is scheduled to start.

4Tune to the station to be recorded. (Refer to page 26.)

5Set the button to standby.

ÖConfirm that the timer mode indicator

(REC ) is displayed in the display window.

1Coloque el botón en ON.

2Coloque un cassette.

ÖColoque el cassette con la cara a ser grabada apuntando hacia afuera.

ÖSeleccione el modo de inversión deseado ( o ).

ÖAjuste el sentido de la cinta en 3 (hacia adelante) presionando el botón TAPE 23.

3Ajuste el temporizador. (Refiérase a “Ajuste del temporizador” en la página 33.)

ÖAjuste el temporizador a un minuto aproximadamente antes del comienzo programado de la radiodifusión a ser grabada.

4Sintonice la estación a ser grabada. (Refiérase a la página 26.)

5Coloque el botón en espera.

ÖConfirme que el indicador del modo

temporizador (REC ) esté indicado en la ventanilla de indicación.

1Portare il tasto su ON.

2Inserire una cassetta.

ÖInserire la cassetta con il lato sul quale si vuole registrare rivolto verso l’esterno.

ÖSelezionare la modalità di inversione desiderata ( o ).

ÖPredisporre la direzione del nastro su 3 (in avanti) agendo opportunamente sul tasto TAPE 23.

3Predisporre il timer. (Vedere il paragrafo “Predisposizione del timer” a pag. 33.)

ÖPredisporre l’ora di inizio del timer circa 1 minuto prima dell’ora prevista di inizio della trasmissione che si intende registrare.

4Sintonizzarsi sulla stazione da registrare (vedre a pag.26).

5Portare l’interruttore sulla posizione di attesa.

ÖVerificare che sul quadrante sia presente l’indicazione di modalità del timer (REC ).

34

Page 34
Image 34
JVC RV-B55 GY/BU/LTD manual Timer recording of broadcast, Grabación por temporizador de una radiodifusión

RV-B55 GY/BU/LTD specifications

The JVC RV-B55 GY/BU/LTD is a portable audio system that has garnered attention for its blend of style and functionality. This versatile device is designed for those who enjoy music on the go, making it an ideal choice for outdoor gatherings, beach trips, and quiet evenings at home.

One of the standout features of the JVC RV-B55 is its powerful sound output. It incorporates high-quality speakers that deliver clear and robust audio across a wide frequency range. This ensures that whether you're playing your favorite tunes or hosting a party, the sound remains crisp and immersive. The built-in amplifier further enhances the audio performance, allowing for a rich sound experience without distortion, even at higher volumes.

The design of the RV-B55 is notable for its robust construction and sleek aesthetics. It comes in a range of colors, including vibrant blue and classic gray, appealing to various tastes. The device is also highly portable, with a built-in handle that makes it easy to carry. Weighing just a few pounds, it’s convenient for users who want to take their music with them wherever they go.

In terms of connectivity, the RV-B55 is equipped with Bluetooth technology, enabling wireless streaming from smartphones, tablets, and other Bluetooth-enabled devices. This feature allows users to enjoy their playlists without the hassle of wires, making it a great choice for those who prioritize convenience. Additionally, the device includes an auxiliary input for traditional wired connections, ensuring compatibility with a variety of audio sources.

Battery life is another crucial aspect of the RV-B55. It comes with a rechargeable battery that provides hours of playtime, making it perfect for outdoor use without the need for a power outlet. This portability is complemented by a sturdy design that can withstand the rigors of outdoor environments, ensuring durability while looking stylish.

Furthermore, the JVC RV-B55 features an FM tuner, enabling users to listen to their favorite radio stations. This adds versatility to the audio options available, making it more than just a Bluetooth speaker. With simple controls and a user-friendly interface, operating the RV-B55 is a breeze, catering to users of all ages.

In summary, the JVC RV-B55 GY/BU/LTD combines powerful sound, portability, and modern technology in a stylish package. Whether you're a casual listener or a music enthusiast, this portable audio system provides an excellent solution for enjoying music anytime, anywhere. With its impressive features and appealing design, it's a worthy consideration for anyone in the market for a portable audio device.