Menu settings | Setting the NETWORK PACK menu screen |
Menu screen settings can be made regardless of whether a card is inserted. Settings will be stored in the
MENU button |
| DISP ( | ) button |
| ) button | |
|
| SEARCH+ ( | ||||
|
|
|
|
| OPERATE |
|
Mini | MENU | DISP RESET | A.DUB | REC | PLAY | PAUSE |
|
|
| PROFESSIONAL |
|
|
|
SET button |
| SEARCH– | SET | SEARCH+ |
|
|
|
|
|
|
|
|
|
|
| EJECT |
| REW | STOP | FF | |
| MIC | HOLD | BLANK | CUE UP |
|
|
|
|
|
|
|
| PHONES | REC LEVEL |
|
|
| AUDIO | INPUT | REMOTE | |
|
|
|
|
|
| COUNTER MONITOR OUTPUT SELECT | ||||
|
|
|
|
|
| CTL | L | DV |
| |
|
|
|
|
|
| TC | MIX | MIX | LINE |
|
|
|
|
| UB | R | Y/C | LOCAL | |||
|
|
|
|
|
| (CPN) | ||||
SEARCH– ( | ) button |
| BLANK ( | ) button |
|
|
|
|
| |
|
|
|
|
|
|
|
| |||
Menu settings | Setting network parameters |
When using a LAN card or LAN terminal, network related settings for
MENU button |
| DISP ( | ) button |
| ) button | |
|
| SEARCH+ ( | ||||
|
|
|
|
| OPERATE |
|
Mini | MENU | DISP RESET | A.DUB | REC | PLAY | PAUSE |
|
|
| PROFESSIONAL |
|
|
|
SET button |
| SEARCH– | SET | SEARCH+ |
|
|
|
|
|
|
|
|
|
|
| EJECT |
| REW | STOP | FF | |
| MIC | HOLD | BLANK | CUE UP |
|
|
|
|
|
|
|
| PHONES | REC LEVEL |
|
|
| AUDIO | INPUT | REMOTE | |
|
|
|
|
|
| COUNTER MONITOR OUTPUT SELECT | ||||
|
|
|
|
|
| CTL | L | DV |
| |
|
|
|
|
|
| TC | MIX | MIX | LINE |
|
|
|
|
| UB | R | Y/C | LOCAL | |||
|
|
|
|
|
| (CPN) | ||||
SEARCH– ( | ) button |
| BLANK ( | ) button |
|
|
|
|
| |
|
|
|
|
|
|
|
| |||
●The NETWORK PACK CONFIG menu screen will not appear during card initial-
ization (flashing ![]() display).
display).
The NETWORK PACK CONFIG menu set- tings cannot be changed when recording to a CF Memory Card or transmitting data via LAN.
TOP MENU screen
M E N U
S Y S T E M . .
R E MO T E . .
AU D I O . .
V I D E O . .
T C / U B / C L O C K . .
D I S P L A Y S E T . .
![]() N E TWO R K P A C K C ON F I G . .
N E TWO R K P A C K C ON F I G . .
MO V I E C L I P . .
E X I T
Cursor
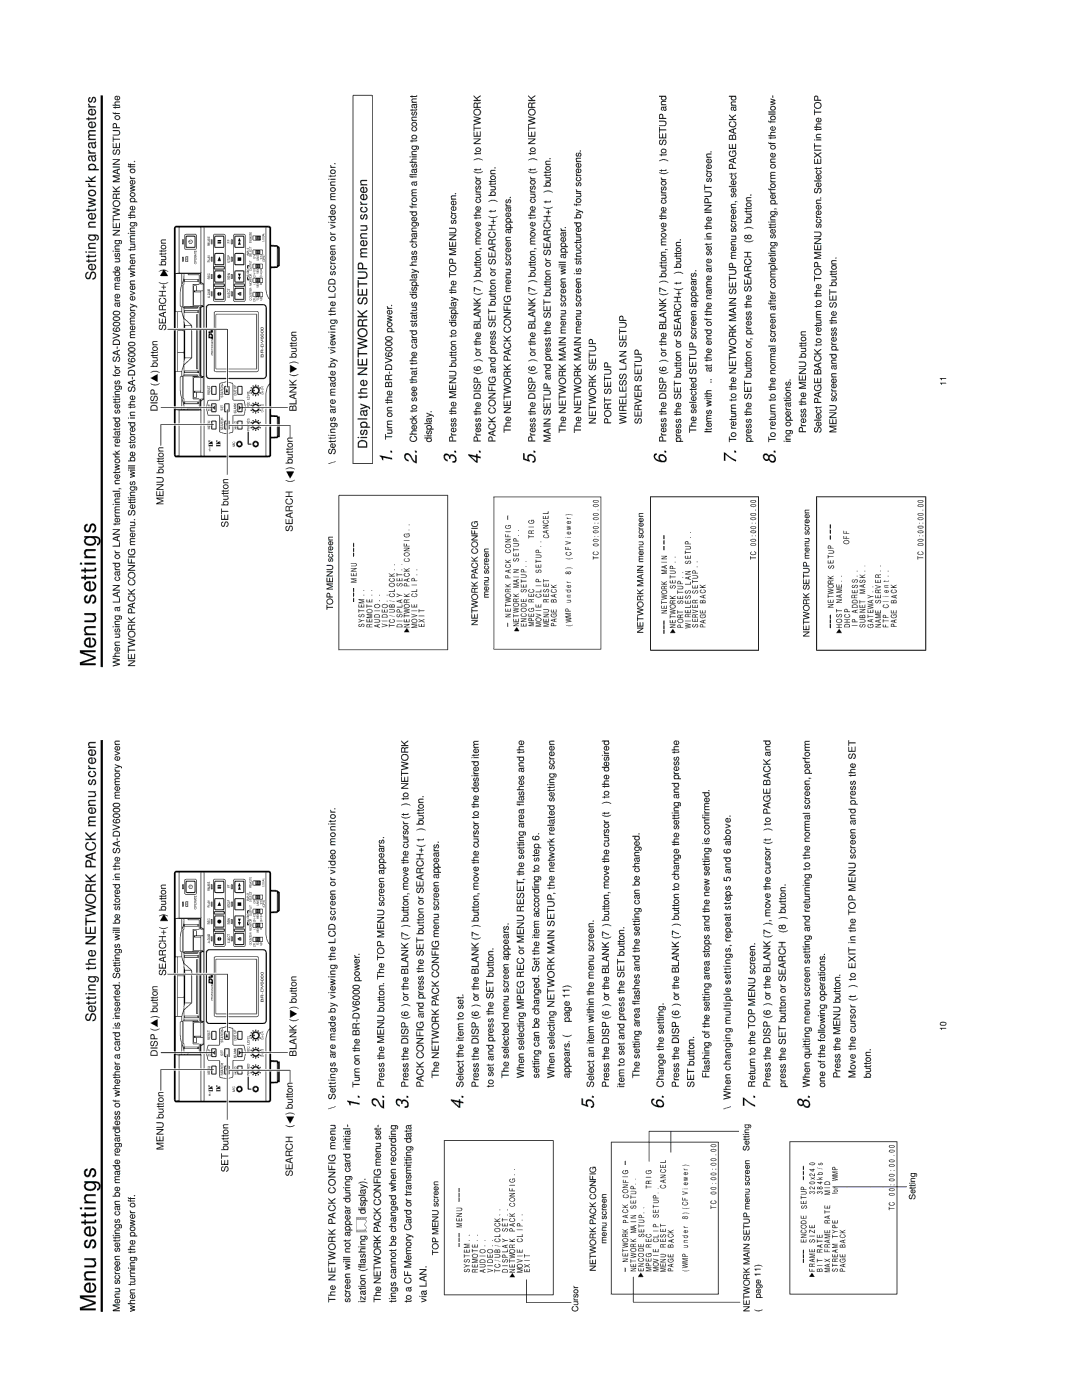
\Settings are made by viewing the LCD screen or video monitor.
1. Turn on the
2. Press the MENU button. The TOP MENU screen appears.
3. Press the DISP (6) or the BLANK (7) button, move the cursor (t) to NETWORK PACK CONFIG and press the SET button or SEARCH+ (t) button.
●The NETWORK PACK CONFIG menu screen appears.
4.Select the item to set.
Press the DISP (6) or the BLANK (7) button, move the cursor to the desired item to set and press the SET button.
●The selected menu screen appears.
●When selecting MPEG REC or MENU RESET, the setting area flashes and the setting can be changed. Set the item according to step 6.
●When selecting NETWORK MAIN SETUP, the network related setting screen appears. (☞ page 11)
TOP MENU screen
M E N U
S Y S T E M . .
R E MO T E . .
AU D I O . .
V I D E O . .
T C / U B / C L O C K . .
D I S P L A Y S E T . .
![]() N E TWO R K P A C K C ON F I G . . MO V I E C L I P . .
N E TWO R K P A C K C ON F I G . . MO V I E C L I P . .
E X I T
NETWORK PACK CONFIG
menu screen
N E T WO R K P A C K C O N F I G ![]() NE T WOR K MA I N S E T U P . . E N C O DE S E T U P . .
NE T WOR K MA I N S E T U P . . E N C O DE S E T U P . .
MP E G | R E C | T R I G |
MOV I E | C L I P | S E T U P . . |
ME N U R E S E T | CA N CE L | |
PA GE | B A CK |
|
( WMP u n d e r 8 ) ( C F V i e w e r ) | ||
\Settings are made by viewing the LCD screen or video monitor.
Display the NETWORK SETUP menu screen
1. Turn on the
2. Check to see that the card status display has changed from a flashing to constant display.
3. Press the MENU button to display the TOP MENU screen.
4. Press the DISP (6) or the BLANK (7) button, move the cursor (t) to NETWORK PACK CONFIG and press SET button or SEARCH+ (t) button.
● The NETWORK PACK CONFIG menu screen appears. |
5. Press the DISP (6) or the BLANK (7) button, move the cursor (t) to NETWORK |
MAIN SETUP and press the SET button or SEARCH+ (t) button. |
● The NETWORK MAIN menu screen will appear. |
The NETWORK MAIN menu screen is structured by four screens. |
NETWORK PACK CONFIG
menu screen
N E T WO R K P A C K C O N F I G
NE T WOR K MA I N S E T U P . .
E N C O DE S E T U P . .
MP E G | R E C | T R I G |
|
MOV I E | C L I P | S E T U P . . | |
ME N U R E S E T | C AN C E L | ||
PA GE | B A CK |
|
|
( WM P | u n d e r 8 ) ( C F V i e w e r ) | ||
T C 0 0 : 0 0 : 0 0 . 0 0
NETWORK MAIN SETUP menu screen Setting (☞ page 11)
E N COD E | S E T UP | 0 x 2 4 0 |
F R AME S I Z E | 3 2 | |
B I T R A T E | 3 8 4 k b / s | |
MA X F R AME R A T E M I D | ||
S T R E AM T Y P E | for | WMP |
P AG E B A C K |
|
|
5. Select an item within the menu screen.
Press the DISP (6) or the BLANK (7) button, move the cursor (t) to the desired item to set and press the SET button.
●The setting area flashes and the setting can be changed.
6.Change the setting.
Press the DISP (6) or the BLANK (7) button to change the setting and press the SET button.
●Flashing of the setting area stops and the new setting is confirmed.
\When changing multiple settings, repeat steps 5 and 6 above.
7. Return to the TOP MENU screen.
Press the DISP (6) or the BLANK (7), move the cursor (t) to PAGE BACK and press the SET button or SEARCH– (8) button.
8. When quitting menu screen setting and returning to the normal screen, perform one of the following operations.
●Press the MENU button.
●Move the cursor (t) to EXIT in the TOP MENU screen and press the SET button.
TC 0 0 : 0 0 : 0 0 . 0 0 |
NETWORK MAIN menu screen
NE TWORK MA I N
![]() NE TWORK S E T U P . .
NE TWORK S E T U P . .
P ORT S E T U P . .
W I RE L E S S L A N S E T U P . .
S ERV E R S E T U P . .
PA GE B A C K
TC 0 0 : 0 0 : 0 0 . 0 0
NETWORK SETUP menu screen
NE TWORK | S E T U P |
HO S T N A ME . . | O F F |
DH C P | |
I P AD D R E S S . . |
|
S UB N ET M A S K . .
G AT EWA Y . .
NETWORK SETUP |
PORT SETUP |
WIRELESS LAN SETUP |
SERVER SETUP |
6. Press the DISP (6) or the BLANK (7) button, move the cursor (t) to SETUP and |
press the SET button or SEARCH+ (t) button. |
● The selected SETUP screen appears. |
Items with “..” at the end of the name are set in the INPUT screen. |
7. To return to the NETWORK MAIN SETUP menu screen, select PAGE BACK and |
press the SET button or, press the SEARCH– (8) button. |
8. To return to the normal screen after completing setting, perform one of the follow- |
ing operations. |
● Press the MENU button |
● Select PAGE BACK to return to the TOP MENU screen. Select EXIT in the TOP |
MENU screen and press the SET button. |
T C 0 0 : 0 0 : 0 0 . 0 0
Setting
N AME | S E R V E R . . |
F T P C l i e n t . . | |
PAGE | B A C K |
TC 0 0 : 0 0 : 0 0 . 0 0
10 | 11 |