Recording on a CF card Specifying the range of a DV tape and recording to a CF memory card
Recording to a CF Memory Card can be made by specifying the range of video recorded on a DV cassette tape.
Operation
1. | Insert a CF memory card into the network pack. | |||
2. | Turn on the power of |
| mark appears on the LCD screen. (When the power is first turned | |
C F | ||||
| on, | mark will flash during initialization.) | ||
3. | Insert the DV cassette tape to play back. | |||
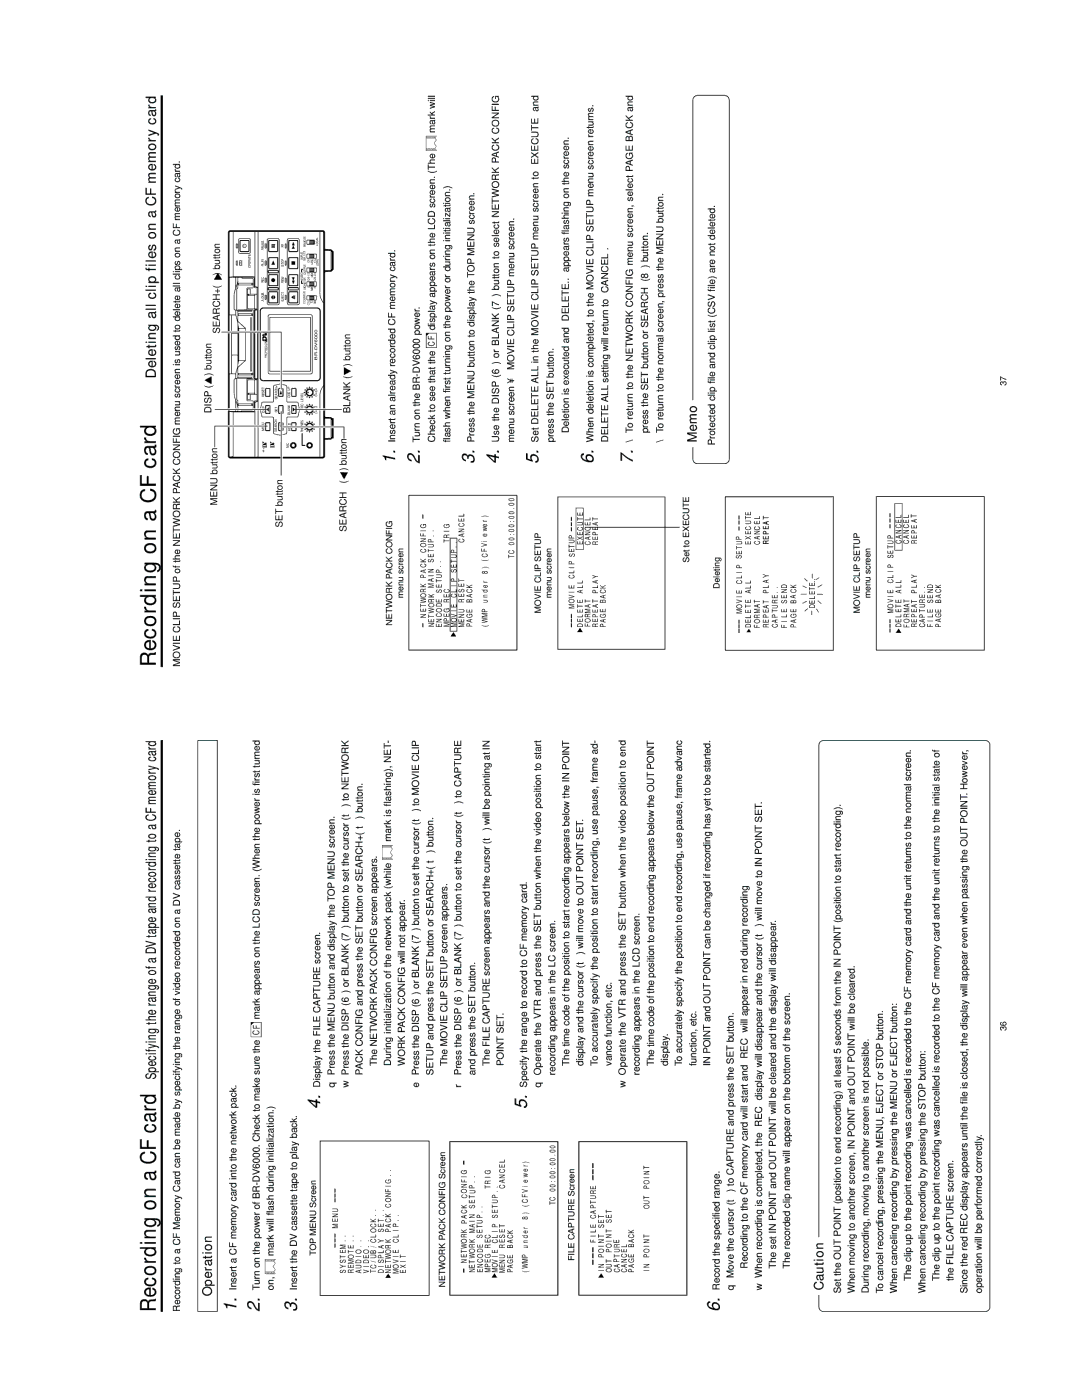
TOP MENU Screen | 4. Display the FILE CAPTURE screen. |
M E N U | q Press the MENU button and display the TOP MENU screen. |
| |
S Y S T E M . . | w Press the DISP (6) or BLANK (7) button to set the cursor (t) to NETWORK |
R E MO T E . . | PACK CONFIG and press the SET button or SEARCH+ (t) button. |
AU D I O . . | |
V I D E O . . | ● The NETWORK PACK CONFIG screen appears. |
T C / U B / C L O C K . . | |
D I S P L A Y S E T . . |
|
Recording on a CF card | Deleting all clip files on a CF memory card |
MOVIE CLIP SETUP of the NETWORK PACK CONFIG menu screen is used to delete all clips on a CF memory card.
MENU button |
| DISP ( | ) button |
| ) button | |
|
| SEARCH+ ( | ||||
|
|
|
|
| OPERATE |
|
Mini | MENU | DISP RESET | A.DUB | REC | PLAY | PAUSE |
|
|
| PROFESSIONAL |
|
|
|
SET button |
| SEARCH– | SET | SEARCH+ |
|
|
|
|
|
|
|
|
|
|
| EJECT |
| REW | STOP | FF | |
| MIC | HOLD | BLANK | CUE UP |
|
|
|
|
|
|
|
| PHONES | REC LEVEL |
|
|
| AUDIO | INPUT | REMOTE | |
|
|
|
|
|
| COUNTER MONITOR OUTPUT SELECT | ||||
|
|
|
|
|
| CTL | L | DV |
| |
|
|
|
|
|
| TC | MIX | MIX | LINE |
|
|
|
|
| UB | R | Y/C | LOCAL | |||
|
|
|
|
|
| (CPN) | ||||
SEARCH– ( | ) button |
| BLANK ( | ) button |
|
|
|
|
| |
|
|
|
|
|
|
|
| |||
| N E TWO R K P A C K C ON F I G . . | ● During initialization of the network pack (while | mark is flashing), NET- | |||
| MO V I E | C L I P . . | WORK PACK CONFIG will not appear. |
| ||
| E X I T |
|
|
| ||
|
|
|
|
| e Press the DISP (6) or BLANK (7) button to set the cursor (t) to MOVIE CLIP | |
|
|
|
|
| SETUP and press the SET button or SEARCH+ (t) button. | |
| NETWORK PACK CONFIG Screen | |||||
| ● The MOVIE CLIP SETUP screen appears. |
| ||||
| N E T WO R K P A C K C O N F I G | r Press the DISP (6) or BLANK (7) button to set the cursor (t) to CAPTURE | ||||
| and press the SET button. |
| ||||
| NE T WOR K M A I N S E T U P . . |
| ||||
| E N C O DE S E T U P . . | ● The FILE CAPTURE screen appears and the cursor (t) will be pointing at IN | ||||
| MP E G | R E C | T R I G | |||
| MOV I E | C L I P | S E T U P . . | POINT SET. |
| |
| ME N U | R E S E T | C AN C E L |
| ||
| PA GE B A CK |
| 5. Specify the range to record to CF memory card. |
| ||
| ( WMP | u n d e r | 8 ) ( C F V i e w e r ) |
| ||
|
|
|
|
| q Operate the VTR and press the SET button when the video position to start | |
|
|
|
| TC 0 0 : 0 0 : 0 0 . 0 0 | recording appears in the LC screen. |
|
| FILE CAPTURE Screen | ● The time code of the position to start recording appears below the IN POINT | ||||
| display and the cursor (t) will move to OUT POINT SET. | |||||
|
|
|
|
| ||
| I N |
| F I L E | C A P T U RE | ● To accurately specify the position to start recording, use pause, frame ad- | |
| P O I N T S E T | vance function, etc. |
| |||
| OU T | P O I N T | S E T |
| ||
| CA P T U RE |
| w Operate the VTR and press the SET button when the video position to end | |||
| CA NC E L |
| ||||
| P AG E | BAC K |
| recording appears in the LCD screen. |
| |
|
|
|
|
|
| |
| I N P O I N T | OU T P O I N T | ● The time code of the position to end recording appears below the OUT POINT | |||
|
|
|
|
| ||
|
|
|
|
| display. |
|
|
|
|
|
| ● To accurately specify the position to end recording, use pause, frame advanc | |
|
|
|
|
| function, etc. |
|
|
|
|
|
|
| |
6. Record the specified range. | ● IN POINT and OUT POINT can be changed if recording has yet to be started. | |||||
|
| |||||
| q Move the cursor (t) to CAPTURE and press the SET button. |
| ||||
●Recording to the CF memory card will start and “REC” will appear in red during recording
w When recording is completed, the “REC” display will disappear and the cursor (t) will move to IN POINT SET.
●The set IN POINT and OUT POINT will be cleared and the display will disappear.
●The recorded clip name will appear on the bottom of the screen.
NETWORK PACK CONFIG
menu screen
N E T WOR K | P A C K C O N F I G | ||
NE T WOR K M A I N S E T U P . . | |||
E N C O DE S E T U P . . | |||
MP E G | R E C | T R I G | |
MOV I E | C L I P | S E T U P . . | AN C E L |
ME N U R E S E T | C | ||
PAGE | B A CK |
|
|
( WMP u n d e r 8 ) ( C F V i e we r )
TC 0 0 : 0 0 : 0 0 . 0 0
MOVIE CLIP SETUP
menu screen
MOV I E C L I P S E T U P
D E L E T E A L L | E X E C U T E | |
F ORMA T | C A N C | E L |
R E P E A T P L A Y | R E P E | A T |
P AG E B A C K |
|
|
Set to EXECUTE
Deleting
MO V I E C L I P SE T U P
DE L E T E A L L | E X E C U TE | |
F OR M AT | CA NC E L | |
RE P EA T P L A Y | RE P E A T | |
CA P TU R E . . |
| |
F I L E | S E ND |
|
P AG E | B A CK |
|
1. | Insert an already recorded CF memory card. |
| ||
2. | Turn on the |
| ||
| Check to see that the |
| display appears on the LCD screen. (The | mark will |
| C F | |||
flash when first turning on the power or during initialization.)
3. Press the MENU button to display the TOP MENU screen.
4. Use the DISP (6) or BLANK (7) button to select NETWORK PACK CONFIG menu screen ¥ MOVIE CLIP SETUP menu screen.
5. Set DELETE ALL in the MOVIE CLIP SETUP menu screen to “EXECUTE” and press the SET button.
●Deletion is executed and “DELETE..” appears flashing on the screen.
6.When deletion is completed, to the MOVIE CLIP SETUP menu screen returns. DELETE ALL setting will return to “CANCEL”.
7.\ To return to the NETWORK CONFIG menu screen, select PAGE BACK and press the SET button or
\To return to the normal screen, press the MENU button.
Memo
●Protected clip file and clip list (CSV file) are not deleted.
Caution
●Set the OUT POINT (position to end recording) at least 5 seconds from the IN POINT (position to start recording).
●When moving to another screen, IN POINT and OUT POINT will be cleared.
●During recording, moving to another screen is not possible.
●To cancel recording, pressing the MENU, EJECT or STOP button. When canceling recording by pressing the MENU or EJECT button:
→The clip up to the point recording was cancelled is recorded to the CF memory card and the unit returns to the normal screen. When canceling recording by pressing the STOP button:
→The clip up to the point recording was cancelled is recorded to the CF memory card and the unit returns to the initial state of the FILE CAPTURE screen.
●Since the red REC display appears until the file is closed, the display will appear even when passing the OUT POINT. However, operation will be performed correctly.
DE L E TE..
MOVIE CLIP SETUP
menu screen
MO V I E C L I P SE T U P
DE L E T E A L L | C A N C E L | |
F O R MAT | C A N C E L | |
RE P E A T P L A Y | R E P E A T | |
C AP T U RE . . |
| |
F I L E | S E N D |
|
P AGE | B A CK |
|
36 | 37 |