Machine a Surfilage
Important Safety Instructions
Instrucciones Importantes DE Seguridad
TIS Sement
Kenmore Serger Warranty
Todas estas Partes
Sad Re,,.elie
Longueur du poin! montant de !enlrahemem
Specification
Description
U.S.A
Protection Agreements
Table of Contents
Indice
Prise
Accessoirs et fiesdisTonibles
Branchez
Que Vous Utilisez vot1, machine Consignes
Names of Parts
Section I. Name of Parts
Nombres de las Piezas
81o5
Available Accessories and Attachments
Accesorios y refacciones disponibles
18 6 o91oo
For Your Safety
Connecting Machine to Power Supply
Before Using Your Serger
De costura
Para Coser
To open Push the side cover to the left
Opening and Closing the Side Cover
Antihoraire
Girar
Comment Tourner Le volant
Tourner Toujours Le volant vers sol dans le sens
Attaching the Spool Holder Cap and Net
Position of Thread Guide Bar
@ Barre de guich@il @ Guidef?l @ Buldes @ Bnche 0 bobine
Raising or Lowering the Presser Foot
Changing Needle
Cambiar la aguja
Attaching the Presser Foot
Turn off the power switch and unplug the machine
Removing the Presser Foot
Le s or
Terlerlupteteddbraci La machine
Oqille du pied
Depied
Adjustment of Differential Feed Ratio
Adjustment of Stitch Length
Ajuste del largo de puntada
To Deactivate the Upper Knife
Stopper
Para desactivar Cuchilla
Lowerknifeiii to
Adjustment Cutting Width
Ajuste del ancho de corte
Iiiiiii!ii!!iiiii!i!iii!ii!i
Plate Setting knob
Ajuste de la perila de graduaci6n de la plancha de aguja
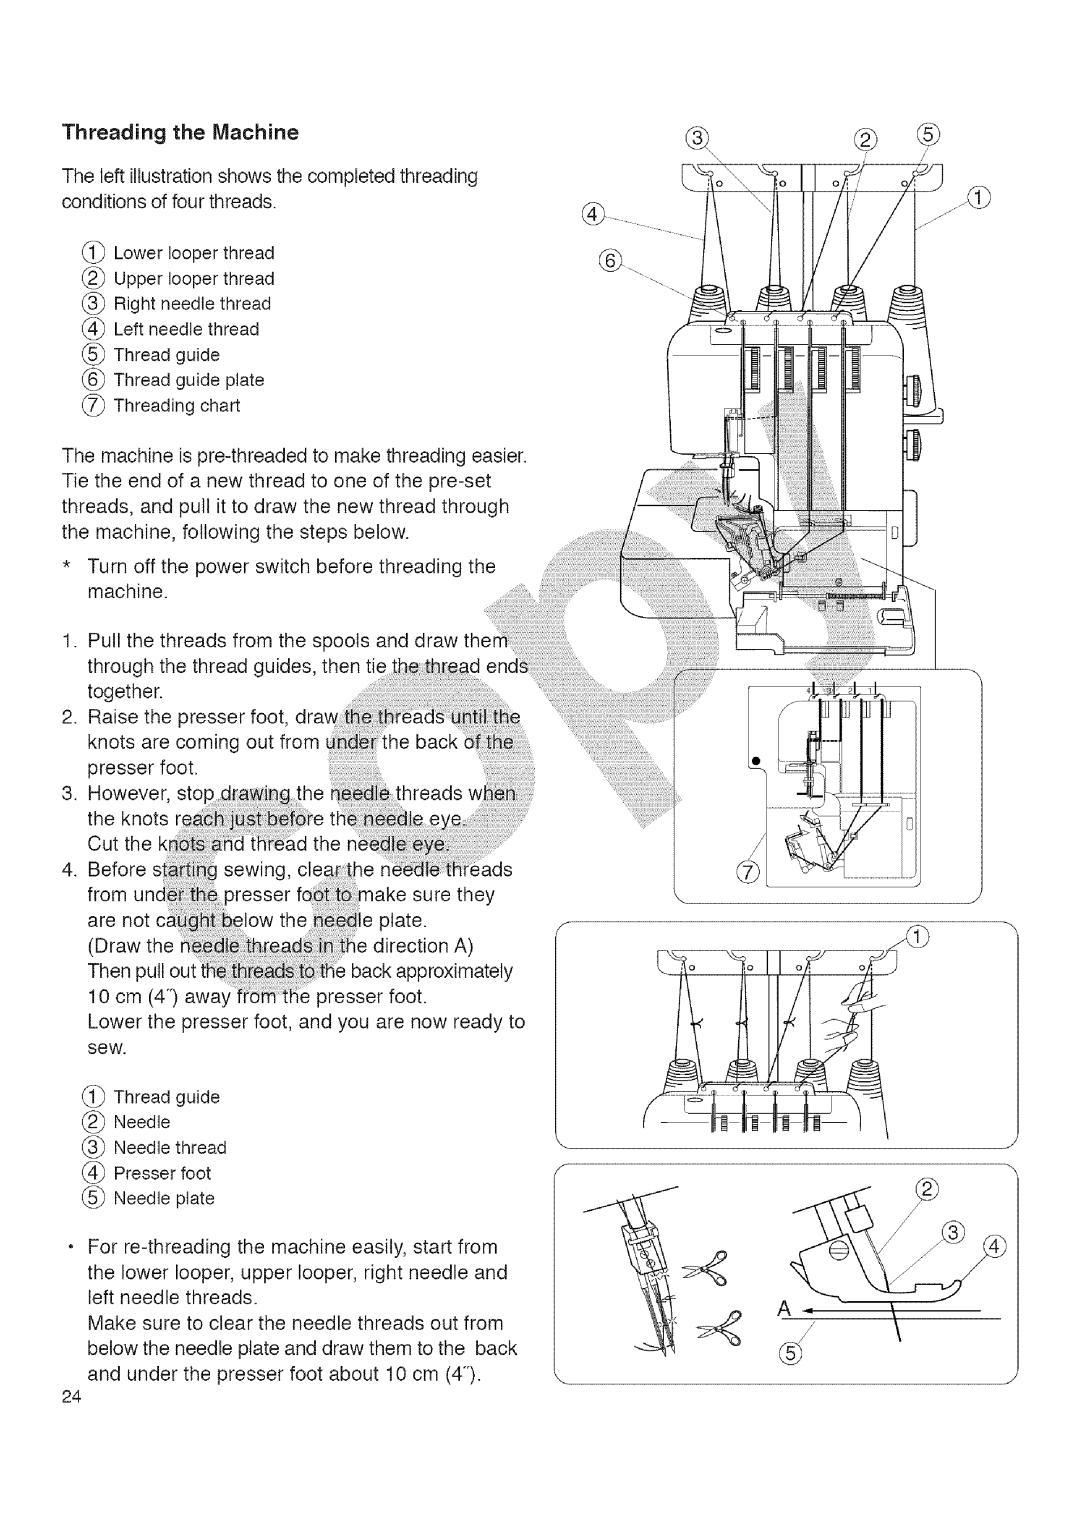
Threading Machine
Antes de elnp Ax cose Extraiga
4L3L2L,L
@ Plaque guide,fil
Enfiler Le f!l dans Les tvus de droite de la plaque
Guide-ill
Illustrd
\\@
Passer Le f Classic UMe
Accrochar Lafil
Dans Le guide¢it Boucle
Gm&@l
Page
Inffrieur sur lO cm 4?/aidedune pince
¸ iiiil
4131
@ Plaque guMefil
Oel
Le deuri&ne guide-jil gtportir de la
Guide
Le,,ier
Accrocher lefil sur Posser lefil Da,zs le guideTfi!d Boucle
41.31
@ Plaque guidefil
Enfilage de laiguille droite
Tirer Le deuri8m Guide-ill
Si le fl sort de lencoch
6,7
Du couvercle Avan
56rsaoirjacMeofidu
Role du l
Yqlsrieuide-jil Ducoere
Threading the Needle on the Left
Lejql Dans le trou Du guide-ill
Tirer left,s Le guide-ill Gauche, de Larrire vers
Avant
Le fil Sort de Lencoche Du guide-f!l Enfiler gt
0o, o
La prdparation de couture est gprdsent terminde
Finishing Sewing
How to use Guide Lines
Ro 5 cm 2 de ch
Lesf!sgii!ide Illustre
Ends
Securing
C6mo asegurar los cabos
Thread Tension 4 threads
Avee les bons r,,lages De tension Cependont Rqlage
Tensi6n
Bonne Tension
Lillustration Gauche Mont1, les rdsultats
@Upper Ion
De hilo Enhebrador Estfi eqmhbrada La
La tensi6n del hilo del enhebrador no estfi equilibrada
Threading the Machine 3 threads
Vtsd,,pe-aiguill Droi
Usando la aguja de la derecha solamente
@ Aiguille droile @ Vis de pince-aiguille gauche
Aigleguhe
Thread Tension 3 threads
It tt
Ls itre rdglde b laide
Nsio
Wooii ister For
Thread and Needle Chart
Proporcidn del
Tipo de tela
Lower Woo,ypo!r
Machine Setting and Thread, Fabric and Range Tension Dial
Hilo de la
Graduacidn de
Dobladiilo enroliado
Proporcidn Del avance diferencial
Tension Du fil
Fil de
Hdtique Aiguille Fils des
Page
Thread Tension
@ d. t,o.cm
Looper thread
For Better Results
Picot
Para Obtener mejores
Thread Fabric
Machine Setting
Ser@reraurpages55,57et61pourlerqlagede
Tis.su Fil
Glage d Ue aiguille . S
Haut
Thread and Fabric
PIN Tucking
Superteur a sa posttton d omg me
Fil et Tissu
Riglage de la machine @ Retirer
Ouvrir le pli gplat et relasser les nervures dun c3t
Tig6 Be hex
Cleaning Upper Knife Area
Osition Lus Basso
Ieu¢ En o he du
Yoii Evolant
Coutau
Replacing the Light Bulb
Turnoffthe ito anpthemach*neug
Ampo ul+o
Reemplazo de la bombilla de luz
Vers iate
La vis de
Carrying the Machine
Oiling the Machine
Ouvrir le couvec!e latdrae tpliquer de lhuile
50and54,62
Lamquinanoestaenhebrada
De problemas
Avanza
Puntadas
La machin La machine Rdrer Gtla/age
Recherche des pannes Condition Cause Le tissu Nest
25-43et
Call anytime, day or night U.S.A. only
LE-FOYER Mc
SU-HOGAR SM
Call anytime, day or night U.S.A. and Canada