Setting the Auto Break Deduction (continued)
Example |
|
|
|
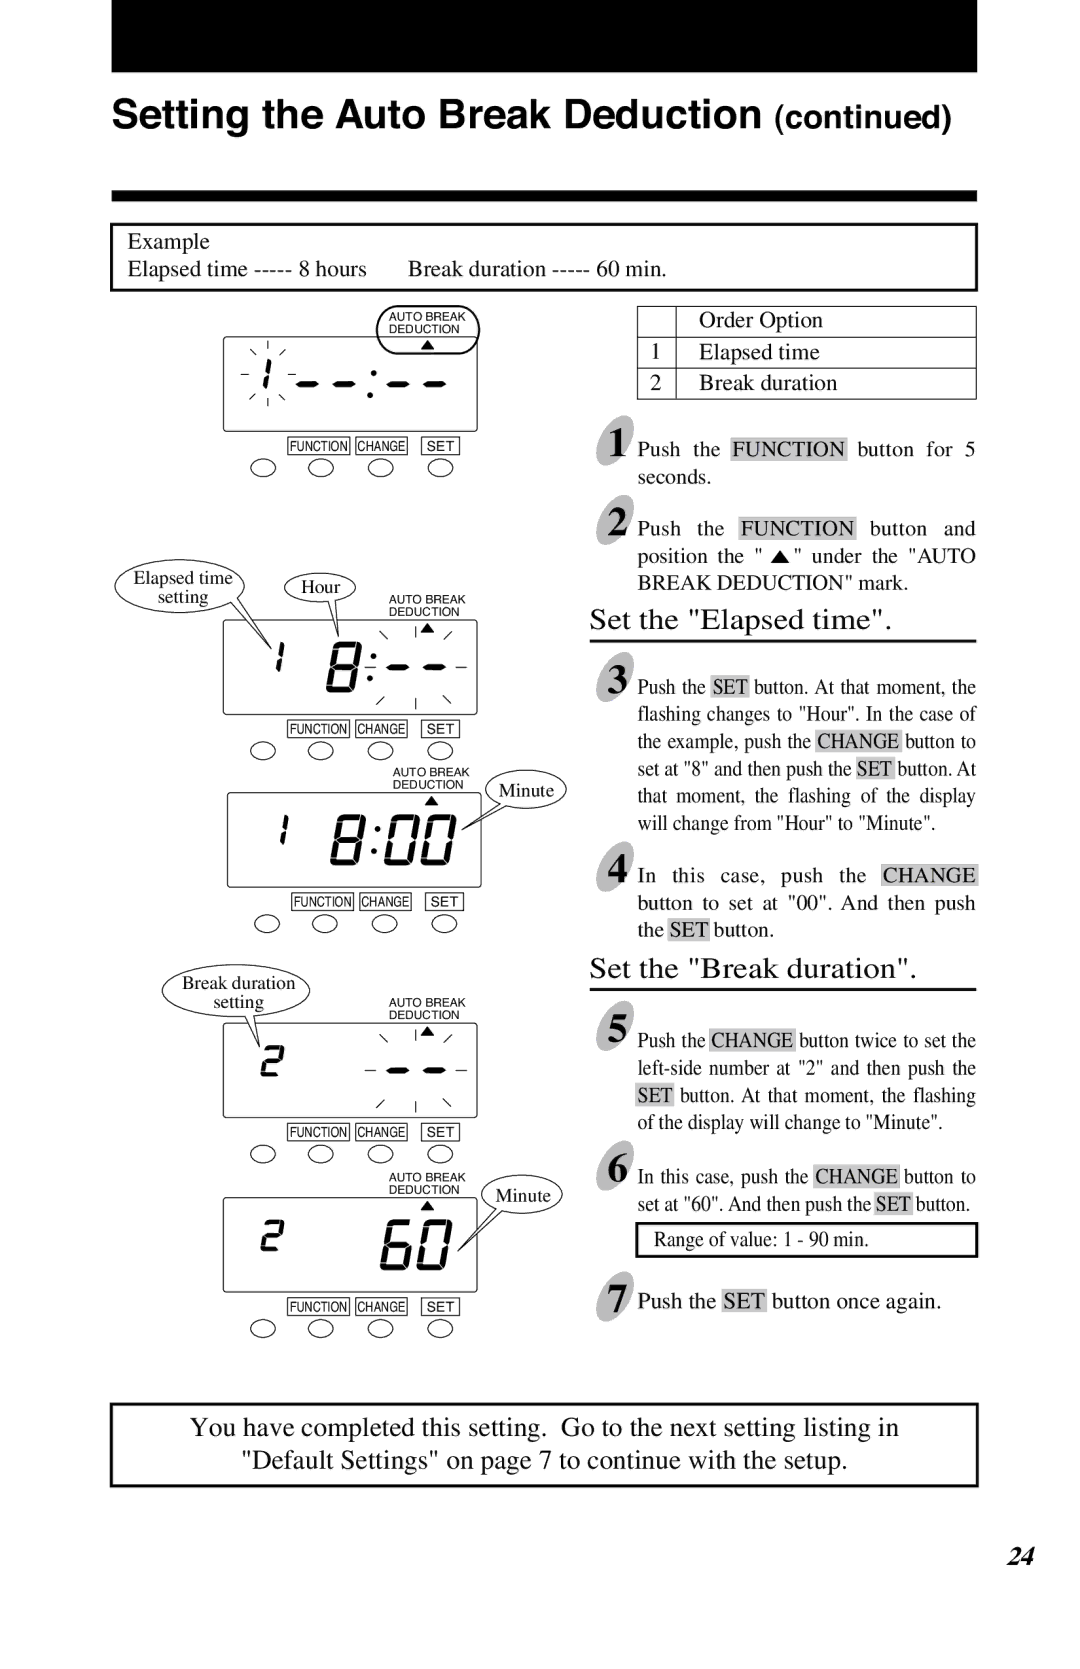
Elapsed time | 8 hours | Break duration | 60 min. |
AUTO BREAK DEDUCTION
Order Option
1Elapsed time
2Break duration
| FUNCTION |
|
|
|
|
|
|
|
| 1 Push the |
|
|
|
|
|
| button for 5 | |||||||||||||||||||
| CHANGE |
| SET |
|
|
| FUNCTION |
| ||||||||||||||||||||||||||||
|
|
|
|
|
|
|
|
|
|
| ||||||||||||||||||||||||||
|
|
|
|
|
|
|
|
|
|
|
|
|
| seconds. | ||||||||||||||||||||||
|
|
|
|
|
|
|
|
|
|
|
|
| 2 Push the |
|
|
|
| button and | ||||||||||||||||||
|
|
|
|
|
|
|
|
|
|
|
|
| FUNCTION | |||||||||||||||||||||||
Elapsed time |
|
|
|
|
|
|
|
|
|
|
|
|
| position the " " under the "AUTO | ||||||||||||||||||||||
Hour |
| AUTO BREAK |
|
| BREAK DEDUCTION" mark. | |||||||||||||||||||||||||||||||
setting |
|
|
|
|
|
|
|
|
|
|
|
|
|
|
|
|
|
|
|
|
|
|
|
|
|
|
|
|
|
| ||||||
|
|
|
|
|
| DEDUCTION |
| Set the "Elapsed time". | ||||||||||||||||||||||||||||
|
|
|
|
|
|
|
|
|
|
|
|
| ||||||||||||||||||||||||
|
|
|
|
|
|
|
|
|
|
|
|
| 3 Push the |
|
|
|
| button. At that moment, the | ||||||||||||||||||
|
|
|
|
|
|
|
|
|
|
|
|
| SET | |||||||||||||||||||||||
|
|
|
|
|
|
|
|
|
|
|
|
|
| flashing changes to "Hour". In the case of | ||||||||||||||||||||||
| FUNCTION |
|
|
| CHANGE |
| SET |
|
|
|
|
|
|
|
|
|
|
|
|
|
|
|
|
|
|
|
|
|
|
|
|
|
|
|
| |
|
|
| the example, push the | CHANGE | button to | |||||||||||||||||||||||||||||||
|
|
|
|
|
|
|
|
|
|
|
|
|
| |||||||||||||||||||||||
|
|
|
|
|
|
|
|
|
|
|
|
|
| set at "8" and then push the |
|
|
|
| button. At | |||||||||||||||||
|
|
|
|
|
| AUTO BREAK |
|
| SET | |||||||||||||||||||||||||||
|
|
|
|
|
| DEDUCTION | Minute |
| that moment, the flashing of the display | |||||||||||||||||||||||||||
|
|
|
|
|
|
|
|
|
|
|
|
| ||||||||||||||||||||||||
|
|
|
|
|
|
|
|
|
|
|
|
|
| will change from "Hour" to "Minute". | ||||||||||||||||||||||
|
|
|
|
|
|
|
|
|
|
|
|
| 4 In this case, push the |
|
|
| ||||||||||||||||||||
|
|
|
|
|
|
|
|
|
|
|
|
| CHANGE | |||||||||||||||||||||||
|
|
|
|
|
|
|
| button to set at "00". And then push | ||||||||||||||||||||||||||||
| FUNCTION | CHANGE | SET |
|
|
| ||||||||||||||||||||||||||||||
|
|
|
|
|
|
|
|
|
|
|
|
|
| the | SET | button. | ||||||||||||||||||||
Break duration |
|
|
|
|
|
|
|
| Set the "Break duration". | |||||||||||||||||||||||||||
|
|
|
|
|
|
|
|
|
|
|
|
|
|
|
|
|
|
|
|
|
|
|
|
|
|
|
|
|
|
|
| |||||
setting |
|
|
|
|
| AUTO BREAK |
| 5 Push the |
|
|
|
|
|
|
|
|
|
|
|
|
|
|
|
|
|
|
|
| ||||||||
|
|
|
|
|
| DEDUCTION |
|
|
|
|
|
|
|
|
|
|
|
|
|
|
|
|
|
|
|
|
| |||||||||
|
|
|
|
|
|
|
|
|
|
|
|
| CHANGE | button twice to set the | ||||||||||||||||||||||
|
|
|
|
|
|
|
|
|
|
|
|
|
| |||||||||||||||||||||||
|
|
|
|
|
|
|
|
|
|
|
|
|
| SET | button. At that moment, the flashing | |||||||||||||||||||||
|
|
|
|
|
|
|
|
|
|
|
|
|
| of the display will change to "Minute". | ||||||||||||||||||||||
| FUNCTION |
|
|
| CHANGE |
| SET |
|
| |||||||||||||||||||||||||||
|
|
|
|
|
|
|
|
|
|
|
|
|
|
|
|
|
|
|
|
|
|
|
|
|
|
|
|
| ||||||||
|
|
|
|
|
|
|
|
|
|
|
|
| 6 In this case, push the |
|
|
|
|
|
|
|
| button to | ||||||||||||||
|
|
|
|
|
| AUTO BREAK |
| CHANGE | ||||||||||||||||||||||||||||
|
|
|
|
|
| DEDUCTION | Minute |
|
|
|
|
|
|
|
|
|
|
|
|
|
|
|
|
|
|
|
|
|
|
|
| |||||
|
|
|
|
|
| set at "60". And then push the | SET | button. | ||||||||||||||||||||||||||||
|
|
|
|
|
|
|
|
|
|
|
|
| ||||||||||||||||||||||||
|
|
|
|
|
|
|
|
|
|
|
|
|
| |||||||||||||||||||||||
|
|
|
|
|
|
|
|
|
|
|
|
|
|
| ||||||||||||||||||||||
|
|
|
|
|
|
|
|
|
|
|
|
|
| Range of value: 1 - 90 min. | ||||||||||||||||||||||
|
|
|
|
|
|
|
|
|
|
|
|
|
|
|
|
| ||||||||||||||||||||
|
|
|
|
|
|
|
|
|
|
|
|
| 7 Push the |
|
|
|
| button once again. | ||||||||||||||||||
|
|
|
|
| SET |
| SET | |||||||||||||||||||||||||||||
| FUNCTION |
| CHANGE |
| ||||||||||||||||||||||||||||||||
You have completed this setting. Go to the next setting listing in
"Default Settings" on page 7 to continue with the setup.
23 | 24 |