Instant EtherFast® Series
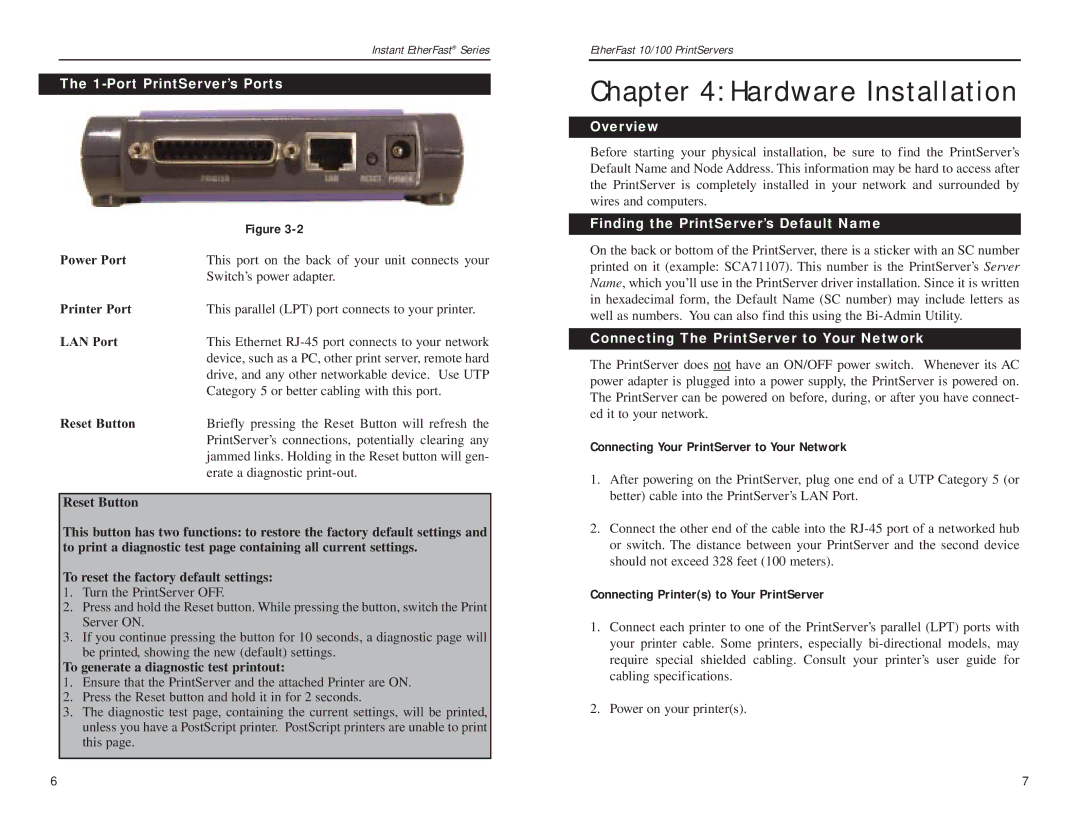
The 1-Port PrintServer’s Ports
| Figure |
Power Port | This port on the back of your unit connects your |
| Switch’s power adapter. |
Printer Port | This parallel (LPT) port connects to your printer. |
LAN Port | This Ethernet |
| device, such as a PC, other print server, remote hard |
| drive, and any other networkable device. Use UTP |
| Category 5 or better cabling with this port. |
Reset Button | Briefly pressing the Reset Button will refresh the |
| PrintServer’s connections, potentially clearing any |
| jammed links. Holding in the Reset button will gen- |
| erate a diagnostic |
Reset Button
This button has two functions: to restore the factory default settings and to print a diagnostic test page containing all current settings.
To reset the factory default settings:
1.Turn the PrintServer OFF.
2.Press and hold the Reset button. While pressing the button, switch the Print Server ON.
3.If you continue pressing the button for 10 seconds, a diagnostic page will be printed, showing the new (default) settings.
To generate a diagnostic test printout:
1.Ensure that the PrintServer and the attached Printer are ON.
2.Press the Reset button and hold it in for 2 seconds.
3.The diagnostic test page, containing the current settings, will be printed, unless you have a PostScript printer. PostScript printers are unable to print this page.
EtherFast 10/100 PrintServers
Chapter 4: Hardware Installation
Overview
Before starting your physical installation, be sure to find the PrintServer’s Default Name and Node Address. This information may be hard to access after the PrintServer is completely installed in your network and surrounded by wires and computers.
Finding the PrintServer’s Default Name
On the back or bottom of the PrintServer, there is a sticker with an SC number printed on it (example: SCA71107). This number is the PrintServer’s Server Name, which you’ll use in the PrintServer driver installation. Since it is written in hexadecimal form, the Default Name (SC number) may include letters as well as numbers. You can also find this using the
Connecting The PrintServer to Your Network
The PrintServer does not have an ON/OFF power switch. Whenever its AC power adapter is plugged into a power supply, the PrintServer is powered on. The PrintServer can be powered on before, during, or after you have connect- ed it to your network.
Connecting Your PrintServer to Your Network
1.After powering on the PrintServer, plug one end of a UTP Category 5 (or better) cable into the PrintServer’s LAN Port.
2.Connect the other end of the cable into the
Connecting Printer(s) to Your PrintServer
1.Connect each printer to one of the PrintServer’s parallel (LPT) ports with your printer cable. Some printers, especially
2.Power on your printer(s).
6 | 7 |