ENGLISH

NAMESAND FUNCTIONS

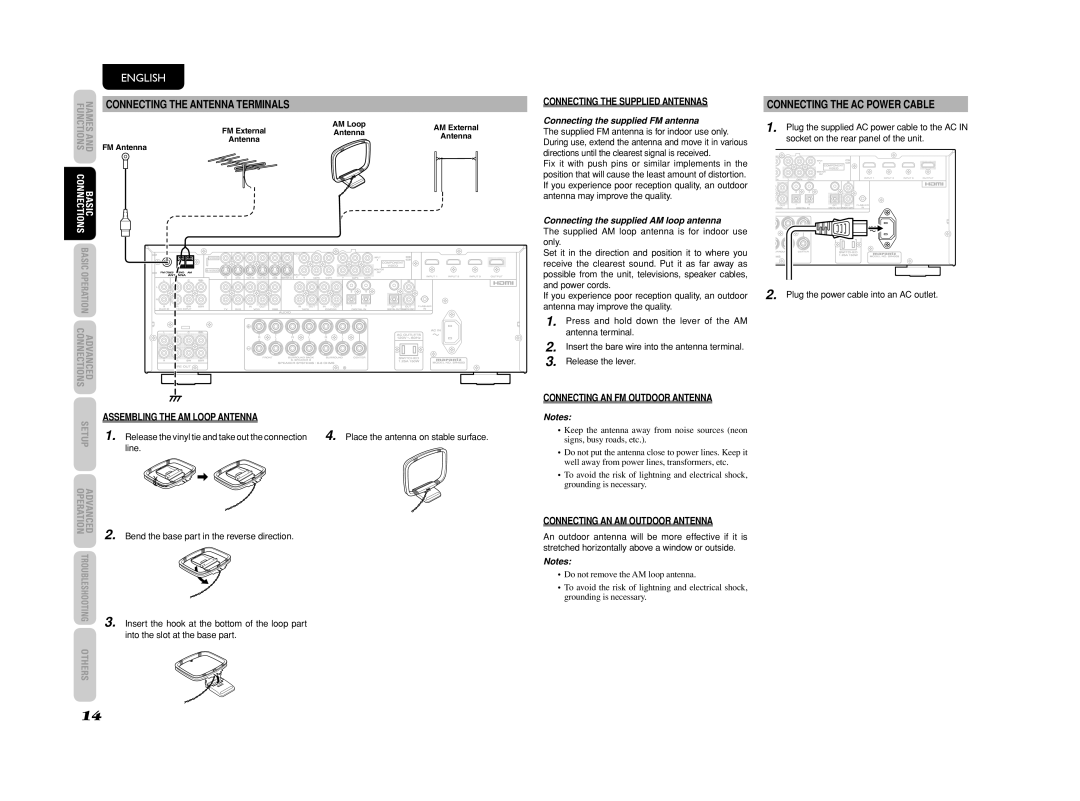
CONNECTING THE ANTENNA TERMINALS


FM Antenna


FM External


AM Loop


AM External


Antenna


Antenna


Antenna


BASIC CONNECTIONS


BASIC


INPUT


VIDEO


1


INPUT


3


COMPONENT


VIDEO


OPERATION


S-VIDEO


MONITOR


FM (75Ω)

GND AM


AUDIO


OUT


ANTENNA


INPUT


INPUT 1INPUT 2INPUT 3OUTPUT


TV

DVD

VCR IN VCR OUT

DSS

MONITOR OUT 2 Y

CB/PB

CR/PR

Y

CB/PB

CR/PR


L

SL

C

SBL


IN


L


3

4


R


R

SR

SW

SBR


IN OUT


IN

OUT

IN

OUT

1

2

OPTOUT

FLASHER

ADVANCED CONNECTIONS

(AUX 2)

7.1CH INPUT

TV

DVD

VCR

DSS

TAPE

CD/CDR

DIGITAL IN

DIGITAL OUT REMOTE CONT.


IN

L

SL

C

SBL


AC IN


AC OUTLETS


R

L

R

L

R

L


120V 60Hz


FRONT

SURROUND BACK

SURROUND

CENTER

SWITCHED


R

SR

SW

SBR


S. SPEAKER B


1.25A 150W


SPEAKER SYSTEMS : 6-8 OHMS


MODEL NO. SR4003


PRE OUT


SETUP

ASSEMBLING THE AM LOOP ANTENNA


1. Release the vinyl tie and take out the connection


4.

Place the antenna on stable surface.


line.


ADVANCED OPERATION

2. Bend the base part in the reverse direction.


TROUBLESHOOTING

3. Insert the hook at the bottom of the loop part


into the slot at the base part.


OTHERS


CONNECTING THE SUPPLIED ANTENNAS

Connecting the supplied FM antenna

The supplied FM antenna is for indoor use only. During use, extend the antenna and move it in various directions until the clearest signal is received.

Fix it with push pins or similar implements in the position that will cause the least amount of distortion. If you experience poor reception quality, an outdoor antenna may improve the quality.

Connecting the supplied AM loop antenna

The supplied AM loop antenna is for indoor use only.

Set it in the direction and position it to where you receive the clearest sound. Put it as far away as possible from the unit, televisions, speaker cables, and power cords.

If you experience poor reception quality, an outdoor antenna may improve the quality.

1. Press and hold down the lever of the AM antenna terminal.

2. Insert the bare wire into the antenna terminal.

3. Release the lever.

CONNECTING AN FM OUTDOOR ANTENNA

Notes:

Keep the antenna away from noise sources (neon signs, busy roads, etc.).

Do not put the antenna close to power lines. Keep it well away from power lines, transformers, etc.

To avoid the risk of lightning and electrical shock, grounding is necessary.

CONNECTING AN AM OUTDOOR ANTENNA

An outdoor antenna will be more effective if it is stretched horizontally above a window or outside.

Notes:

Do not remove the AM loop antenna.

To avoid the risk of lightning and electrical shock, grounding is necessary.

CONNECTING THE AC POWER CABLE

1. Plug the supplied AC power cable to the AC IN socket on the rear panel of the unit.

INPUT

3

COMPONENT

VIDEO

MONITOR

OUT

/PR

Y

CB/PB

CR/PR


INPUT 1

INPUT 2

INPUT 3

OUTPUT


IN


3

4


OUT


1

2

OPT

OUT

FLASHER


D/CDR


DIGITAL IN

DIGITAL OUT REMOTE CONT.

IN


AC IN

L

URROUND

CENTER

SWITCHED


MS


1.25A 150W

MODEL NO. SR4003


2. Plug the power cable into an AC outlet.

14

Page 17
Image 17
Marantz SR4003 manual Connecting the AC Power Cable, Connecting the Supplied Antennas, Connecting AN FM Outdoor Antenna

SR4003 specifications

The Marantz SR4003 is a versatile home theater receiver that exemplifies the high standards of quality and performance for which Marantz is known. Designed specifically for audio enthusiasts, the SR4003 incorporates a range of advanced technologies and features that enhance the overall listening experience.

One of the standout features of the SR4003 is its robust amplification system. It delivers an impressive 100 watts per channel across seven channels, ensuring that even the most demanding audio signals are handled with ease. The receiver is also equipped with advanced circuitry that minimizes distortion, providing a cleaner and more dynamic sound. This makes the SR4003 an ideal choice for both music lovers and movie buffs alike.

The SR4003 supports a wide array of audio and video formats, including Dolby Digital, DTS, and signals up to 1080p. It features multiple HDMI inputs, allowing seamless connectivity with various high-definition devices such as Blu-ray players and gaming consoles. The inclusion of HDMI pass-through functionality gives users the convenience of switching between devices without having to change cables, all while maintaining high-quality video output.

Another noteworthy feature of the SR4003 is its multi-room capabilities. With zone 2 output, users can easily distribute audio throughout their home, allowing for separate listening experiences in different rooms. This is particularly useful for entertaining guests or having different family members enjoy their preferred media simultaneously.

Marantz has also placed a strong emphasis on user-friendly design in the SR4003. The intuitive interface, combined with an easy-to-navigate remote control, allows users to customize settings and configurations effortlessly. The built-in digital signal processing (DSP) features also provide users with multiple sound modes, ensuring an optimized experience for any type of content.

In terms of build quality, the SR4003 is a testament to Marantz's commitment to craftsmanship. Its robust chassis minimizes vibrations, while the high-grade components ensure durability and longevity. The aesthetic design features a sleek, timeless look that complements any home entertainment setup.

Overall, the Marantz SR4003 is a well-rounded home theater receiver that combines power, versatility, and premium sound quality. Its array of features makes it a powerful centerpiece for any audio or home theater system, catering to the demands of modern home entertainment. Whether for casual listening or immersive movie nights, the SR4003 delivers a truly exceptional audio experience.