Reference Manual
Trademark Information
AVC Patent Portfolio License
Page
Confirming the Package Contents
Read This First
About This Manual
Symbols and conventions
Symbol
Iii
Life-Long Learning
Information and Precautions
Use Only Nikon Brand Electronic Accessories
Before Taking Important Pictures
Disposing of Data Storage Devices
Items prohibited by law from being copied or reproduced
Handle the camera strap with care
Turn off in the event of malfunction
Do not disassemble
Never place the strap around the neck An infant or child
Observe caution when handling the battery
Vii
Viii
Nikon Inc
Modifications
Interface Cables
Tel
Following apply only to users in European countries
Table of Contents
Table of Contents
Xii
Xiii
Xiv
E94
E92
E93
E95
Xvi
Camera features
Parts of the Camera
Operating the Touch Panel
Parts of the Camera
Camera Body
Pressing the Shutter-release Button
Attaching the Camera Strap
Parts of the Camera
Dragging
Operating the Touch Panel
Tapping
Dragging and Dropping
Spreading/pinching
Spread two fingers apart/pinch two Fingers together
Indicators and Operations of the Monitor/Touch Panel
Shooting Mode Information Indicators
Tap a to display it again
Shooting Mode Operation Controls
Indicators and Operations of the Monitor/Touch Panel
Shooting mode1
Playback Mode Information Display
Current frame number
Album icon
Playback Mode Operation Controls
Playback mode 10, 30
Switching Between Shooting Mode and Playback Mode
Shooting-mode selection menu
Playback-mode selection menu
Using Menus dTab
During Shooting
During Playback
Basic Steps for Shooting and Playback
Inserting the Battery Correctly
Preparation 1 Insert the Battery
EN-EL19 battery Rechargeable Li-ion Battery
Insert the included
Removing the Battery
Preparation 1 Insert the Battery
High Temperature Caution
Prepare the included Charging AC Adapter EH-69P
Preparation 2 Charge the Battery
Power-on lamp
Keep the camera turned off
Understanding the Power-on Lamp
Charging Using Computer or Battery Charger
AC Power Source
Inserting the Memory Card
Preparation 3 Insert a Memory Card
Insert the memory card
Formatting a Memory Card
Removing Memory Cards
Internal Memory and Memory Cards
Approved Memory Cards
Preparation 3 Insert a Memory Card
Open the slide cover to turn on the camera
Battery Level Indicator
Turn the Camera On
Number of Exposures Remaining
Turn the Camera On
Power Saving Function Auto Off
Turning the Camera On and Off
No operations Performed
Setting Display Language, Date and Time
Tap
Changing the Language or Date and Time Setting
Clock Battery
Daylight Saving Time
Select a Shooting Mode
Tap the shooting mode icon
Tap the desired shooting mode icon
Select a Shooting Mode
Features That Are Available in Each Shooting Mode
Available Shooting Modes
Hold the camera steadily in both hands
Using a Tripod
Frame a Picture
Frame the picture
Digital Zoom and Interpolation
Using the Zoom
Digital Zoom
Digital zoom Zoom Optical zoom Zoom out
Focus and Shoot
Shutter speed Aperture value
If you press the shutter-release button with too much
Touch Shutter
During Recording
Subjects Not Suitable for Autofocus
AF-assist Illuminator and Flash
Viewing Pictures
Tap the playback mode icon c
Play Back Pictures
More Information
Playback Zoom
Pinch two fingers together when using playback mode
Changing How Pictures Are Displayed
Thumbnail Playback
Tap the desired delete option
Delete Unwanted Pictures
Play back a picture to be deleted, tap the dtab, and tap c
Tap Yes on the delete confirmation dialog
Delete Unwanted Pictures
Operating the Erase Selected Images Screen
Tap a picture to display y
Selecting Certain Types of Pictures for Deletion
Page
Shooting Features
Portrait Landscape Night portrait Night landscape
GEasy Auto Mode
Changing the GEasy Auto Mode Settings
Close-up Backlighting Other shooting scenes
AAuto Mode
Adjusting the a Auto Mode Settings
A auto mode, the following options can be changed
Shooting Menu Options in AAuto Mode
Auto Mode
Functions That Cannot Be Used Simultaneously
Press the shutter-release button halfway
Shooting Subjects Not Suitable for Autofocus
Picture
Shutter-release button is
To View a Description Help Information of Each Scene
Scene Mode Shooting Suited to the Scene
On the screen shown at the left
Portrait Landscape Sports Night portrait
Scene Mode Shooting Suited to the Scene
Changing the Scene Mode Settings
Adjusting Scene Effect
Food More blue More red Landscape, k Close-up Less vivid
Selecting a Scene Mode to Take Pictures Features
Frame per second fps when image mode is set to l4608×2592
Night portrait
Sunset
Dusk/dawn
Night landscape
Fireworks show
Draw
BWide
OPet portrait
Viewing Pictures That Were Taken Using Pet Detection
When no pet faces are detected, the camera
Focus is acquired Up to five faces can be detected. When
Digital zoom is not available
Stop shooting
Smart Portrait Mode Shooting Smiling Faces
Set Smile timer to Off
Close the slide cover to turn off the camera
Self-timer Lamp
Smart Portrait Mode Shooting Smiling Faces
Auto Off in Smile Timer Mode
Releasing the Shutter Manually
Changing the Smart Portrait Mode Settings
Smart Portrait Menu Options
Smart portrait mode, the following options can be changed
Basic Shooting Settings
Functions Available for Each Shooting Mode
Frame the subject and take a picture
Using the Flash Flash Modes
Tap the desired flash mode icon
Effective Range of the Flash
Flash Mode Setting
Available Flash Modes
Red-eye Reduction
Tap Yor Z
Using the Self-timer
Tap the self-timer icon
Frame the picture and press
To stop the timer before a picture
Press the shutter-release button the rest of the way down
Tap o
Using Macro Mode
Macro Mode Setting
Zoom position
Tap Cor Dto change the exposure compensation value
Adjusting Brightness Exposure Compensation
Tap the exposure compensation icon
Press the shutter-release button to take a picture
Default Settings
Basic Shooting Settings
AChanging the Image Size Image Mode
Image Mode Settings Image Size and Quality
Image Mode
Changing the Image Size Image Mode
Image Mode Setting and Monitor Display
Number of Exposures Remaining
When Touch shooting is set to Subject
Features That Cannot Be Applied Simultaneously
Some shooting settings cannot be used with other functions
Tracking, Self-timer is disabled
Focus area
When the camera is pointed at a human face
Face Detection
Portrait and Night portrait scene
Viewing Pictures That Were Taken Using Face Detection
Face Detection
Skin Softening
Page
Playback Features
Selecting Certain Types of Pictures for Playback
Available Playback Modes
Tap an album, category or shooting date
Switching Between Playback Modes
Tap the desired playback mode icon
Selecting Certain Types of Pictures for Playback
Setting the Picture Rating
Playing Back Pictures by Rating
Retouch, I D-Lighting,P Stretch, O Perspective
Features Available in Playback Mode Playback Menu
Option Description Favorite
Control, i Filter effects, j Glamour retouch,
Features Available in Playback Mode Playback Menu
Option Description Choose key
Connecting the Camera to a Television, Computer, or Printer
Compatible Operating Systems
Using ViewNX
Installing ViewNX
Windows
Using ViewNX
Start the installer
Remove the ViewNX 2 Installer CD-ROM from the CD-ROM Drive
Follow the on-screen instructions to install the software
Import File using Nikon Transfer 2 and click OK
Connecting the USB Cable
When using Windows
Transferring Images to the Computer
Terminate the connection
Viewing Images
Transfer images to the computer
Start ViewNX
Retouching Photographs
Editing Movies
Printing Images
You can record movies by setting the shooting mode to Movie
Playback mode, tap R to play a movie
Button all the way down to Start recording
Recording Movies
Press the shutter-release
Record movies with sound
Recording Movies
Recording Movies
Maximum Movie Length
Changing Movie Recording Settings
Following options can be changed when recording movies
Movie Menu Options
Operations During Movie Playback
Select the desired movie in playback mode A30 and tap R
Movie Playback
Deleting Movie Files
General Camera Setup
Setup Menu
Setup menu, the following options can be changed
When Continuous H, Continuous L, or BSS is
Setup Menu
All data stored in the internal memory or on
Memory card is deleted during formatting
DBlink warning
Adapter EH-69P. Additionally, when charging by
Takes more time to charge the battery
Display options
E16
E10
E14
E20
Using the Draw Option
Set the shooting mode to Draw
Tap H
Using Easy Panorama Shooting and Playback
Shooting with Easy Panorama
BWide 360 is selected after shooting starts
Using Easy Panorama Shooting and Playback
Example of Camera Movement
Changing the Shooting Range
Playing Pictures Taken with Easy Panorama Scroll Playback
Using Panorama Assist
Indicator
Tap H when shooting is completed
Using Panorama Assist
Take the next picture
Taking 3D Pictures
Set the shooting mode to 3D photography
To cancel shooting, tap H
Frame the subject and release
Set the playback mode to 3D playback A70
Taking 3D Pictures
Taking 3D Pictures
E10
Favorite Pictures Mode
Adding Pictures to Albums
Favorite pictures screen is displayed
Viewing Pictures in an Album
E11
Favorite Pictures Mode
Removing Pictures from Albums
E12
Tap the desired album
Changing Icons Assigned to Albums
Album selection screen E11, tap K
E13
Auto Sort Mode
Auto Sort Mode Categories
E14
Auto Sort Mode
E15
List by Date Mode
E16
Playing Pictures in a Sequence
E17
To return to key picture only display, tap J
E18
Playback Menu Options Available When Using Sequence
Setting the Ratings for a Sequence of Pictures
Sequence Display Options
Deleting Pictures in a Sequence
E19
E20
Editing Pictures Still Pictures
Editing Functions
Fisheye, and Miniature effect
Restrictions on Picture Editing
E21
Editing Pictures Still Pictures
Original and Edited Pictures
E22
Paint
Paint pictures
To the last five operations can be undone
Write and Draw on Pictures
Using the Paint Tools
E23
Erase Paint Tool Additions
Add a Frame
E24
Add Decorations
Decoration type
Tap k
Tap the dtab in full-frame playback mode and tap M
KQuick Retouch Enhancing Contrast and Saturation
Choose the degree of enhancement and tap
Lighting Enhancing Brightness and Contrast
E26
Tap P
Tap or drag the slider to adjust stretch
PStretch Stretching Pictures
Effects Tap
Perspective control Tap
OPerspective Control Adjust a Sense of Perspective
Tap or drag the slider to adjust
E28
IFilter Effects Digital Filters
E29
E30
Adjust the effects
Tap the icon of the desired effects
Color options Select the color and tap
Preview the result of the effects
Tap j
Tap All or Skin softening
E31
E32
Tap the desired small copy size icon and tap
GSmall Picture Making Smaller Pictures
Tap g
E33
Refine copy composition
Enlarge the desired picture in full-frame playback mode A31
OCrop Creating a Cropped Copy
E34
Connecting the Camera to a TV Playback on a TV
When using the included audio/video cable
E35
Tune the television to the video channel
Connecting the Camera to a TV Playback on a TV
When using a commercially available Hdmi cable
E36
Operations with TV Connection
Connecting the Cable
Using a TV Remote Control Hdmi Device Control
E37
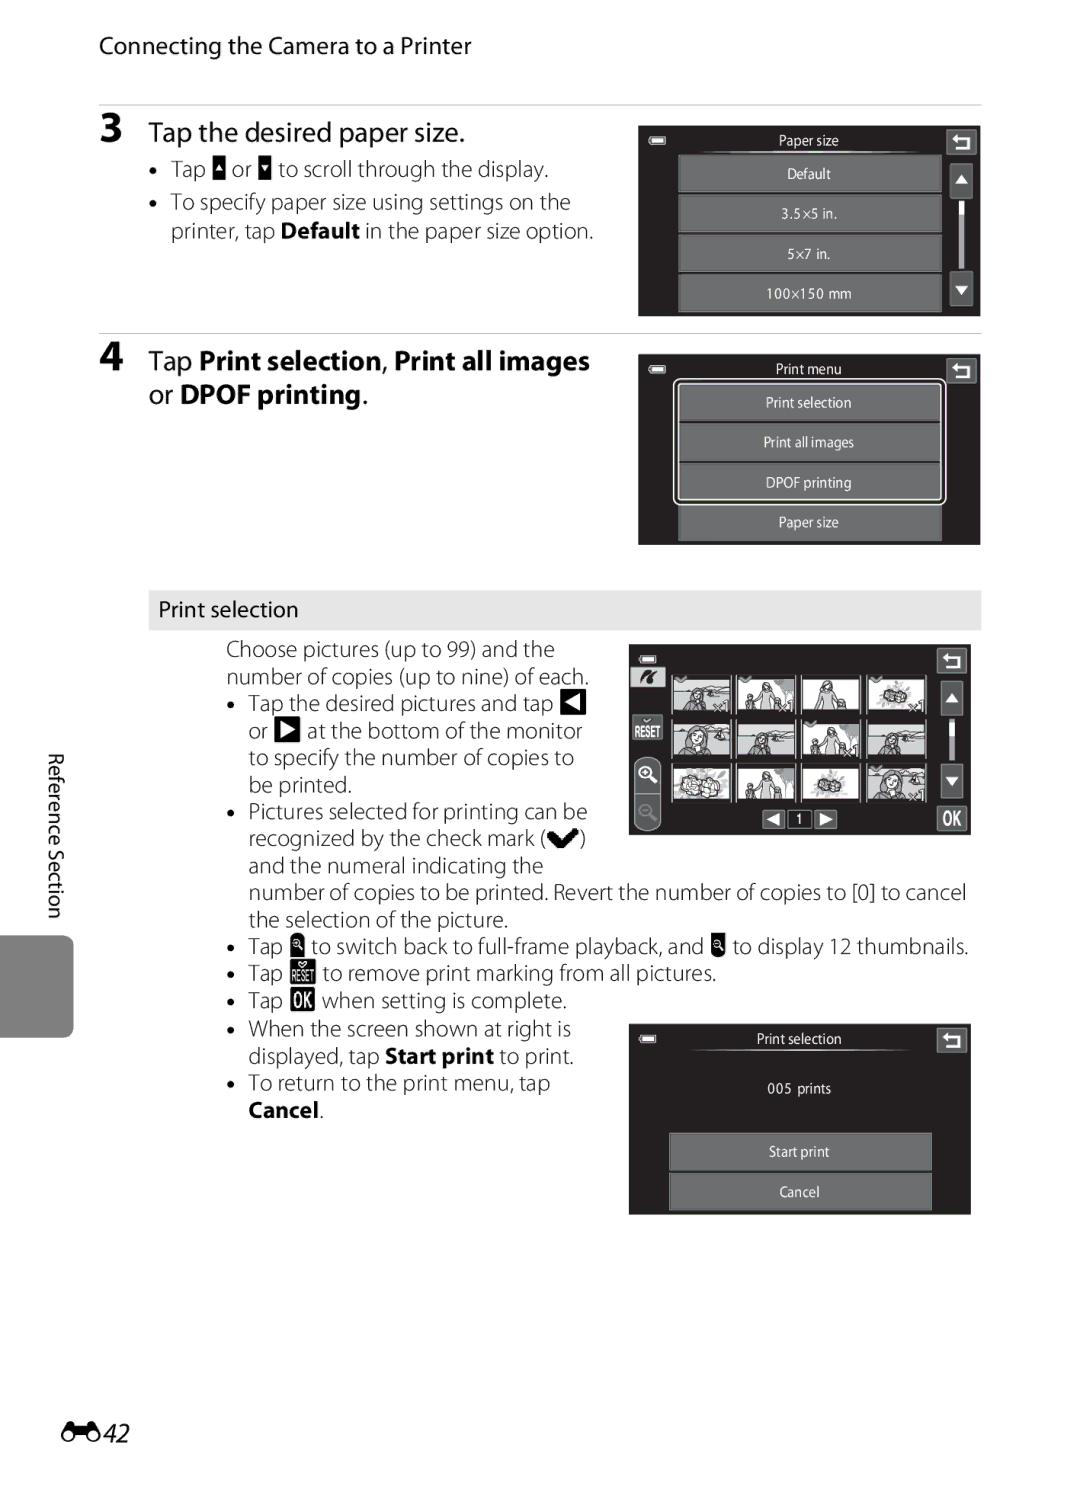
Connecting the Camera to a Printer
E38
Printing Pictures
Camera is automatically turned on
Connecting the Camera to a Printer
Connecting the Camera to a Printer
E39
Tap Paper size
Printing Pictures One at a Time
Tap Copies
E40
Tap Start print
When the print selection screen is displayed, tap F
Printing Multiple Pictures
Printing begins
To return to the print menu, tap Cancel
Tap Print selection, Print all images or Dpof printing
E42
E43
Paper Size
E44
Set the shooting mode to movie and tap the dtab
Tap Dand tap an HS movie option
See HS Movie E46 for more information
E45
Press the shutter-release button to start recording
Press the shutter-release button to end recording
Recording Movies in Slow Motion and Fast Motion HS Movie
Recording 10 s Playback 80 s Slow motion playback No sound
E46
HS Movie
Recording Min Playback Fast motion playback No sound
Editing Movies
E47
E48
Editing Movies
Edited movie is saved To exit without saving, tap No
Shooting Menu for AAuto Mode
RTouch Shooting
E49
QTapping the Monitor to Release the Shutter Touch Shutter
Shooting Menu for a Auto Mode
Touch Shooting Setting
Tap the desired subject to take a picture
E51
Shooting Modes That Support Touch Shutter
E52
SSubject Tracking Focusing on a Moving Subject
Subject tracking is enabled only in a auto mode
Select a auto Mdtab MqsrTouch shooting Ms
E53
E54
RTapping the Monitor to Focus Touch AF/AE
Tap the subject at which the camera focuses
Select a auto Mdtab MqsrTouch shooting Mr
Shooting Modes That Enable Touch AF/AE Function
E55
Xiso Sensitivity
E56
Enable continuous shooting or BSS best shot selector
Continuous
E57
Pictures Taken in Continuous Shooting Mode
E58
E59
WWhite Balance Adjusting Hue
Select a auto mode Mdtab MWWhite balance
E60 for more information
Preset Manual
E60
ESkin Softening
ASmile Timer
Smart Portrait Menu
DBlink Proof
Tap Start
Playback Menu
BSlide Shows
E62
Playback Menu
Slide show begins
E63
End End slide show
E64
Protect
Protecting One Picture
Selected picture is protected,
Removing Protection from Pictures
Protecting Multiple Pictures
Tap the desired pictures to be Protected
E65
Tap the desired number of copies up to nine and tap
APrint Order Creating a Dpof Print Order
Creating a Print Order for One Picture
E66
E67
Tap I to complete the print order
Shooting date and photo information
Creating a Print Order for Multiple Pictures
Choose whether or not to print
E68
Canceling Print Order
E69
Print Date
Tap Jor
FRotate Image
Tap f
E70
Recording Voice Memos
Tap the dtab in full-frame playback mode and tap E
Voice Memo
Tap Wto record a voice memo
Deleting Voice Memos
Playing Voice Memos
Tap Rto play the voice memo
E72
HCopy Copy Between Internal Memory and Memory Card
E73
E74
Enter playback mode Mdtab MxChoose key picture
XChoose Key Picture
Memory contains no images. Message
Normal Speed Movie Options
Movie Menu
Movie Options
E75
HS Movie Options
E76
Movie Menu
YOpen with HS Footage
ZAutofocus Mode
Select the autofocus method used when recording movies
E77
Select whether wind noise is reduced when recording movies
YWind Noise Reduction
E78
Welcome Screen
E79
Tap xTravel destination
Time Zone and Date
Selecting Travel Destination Time Zone Tap Time zone
E80
WHome Time Zone
Tap Eor Fto choose the travel destination time zone and tap
E81
Daylight Saving Time
E82
Time Zones
UTC + Location
Set the options below
Monitor Settings
E83
Auto Monitor Boost
E84
Dtab Mz setup menu Mf Print date
Print Date Imprinting Date and Time
Print Date and Print Order
Vibration Reduction
E85
Digital Zoom
Enable or disable digital zoom
AF Assist
E86
Sound Settings
Adjust the following sound settings
E87
Dtab Mz setup menu Mk Auto off
Auto Off
E88
Formatting a Memory Card
Format Memory/Format Card
Formatting the Internal Memory
E89
Dtab Mz setup menu Mn Language
Language
E90
E91
TV Settings
Adjust settings for connection to a television
Hdmi and HDMI-CEC
Charge by Computer
Dtab Mz setup menu MVCharge by computer
Using power supplied by the computer
E92
Power-on Lamp
Blink Warning
E93
Sequence Display Options
Operating the Blink Warning Screen
E94
Reset All
E95
Movie Menu
Setup Menu
E96
Shutter sound E87 Auto off E88 Min Hdmi E91
E97
Dtab Mz setup menu MrFirmware version
Firmware Version
Others
File and Folder Names
E98
Dscn 0001 .JPG
E99
Optional Accessories
Rechargeable Li-ion Battery EN-EL191
Charging AC Adapter EH-69P1
Error Messages
E100
E101
Panorama or 3D
Photography,
Error Messages
E102
E103
E104
Troubleshooting Specifications
Index
F17
Maximizing Camera Life and Performance
Battery
Maximizing Camera Life and Performance
Charging AC Adapter Information
Memory Cards
Cleaning
Storage
Do not use alcohol, thinner, or other volatile chemicals
Maximizing Camera Life and Performance
Troubleshooting
Power Supply, Display, and Settings
Troubleshooting
Auto info is selected for Photo info
Print date
Electronically Controlled Cameras
Shooting
Increase ISO sensitivity value
When Portrait, Night portrait, Night
Continuous setting
F10
Playback
F11
F12
F13
Specifications
F14
Nikon Coolpix S100 Digital Camera
ISO 125, 200, 400, 800, 1600
Specifications
F15
Supported languages
Charging AC Adapter EH-69P
Rechargeable Li-ion Battery EN-EL19
Specifications
F16
Supported Standards
F17
Numerics
Symbols
Index
F18
F19
Movie editing 86, E47 Movie menu 85, E75
Scene mode 40, 42 Self-timer 56 Self-timer lamp 2, 51
F20
F21
WAV E98
F22
Page
YP1G0211