Operating Instructions
Contents
Before use
How to turn the power of the remote cameras on
How to turn the power of the remote cameras on and off
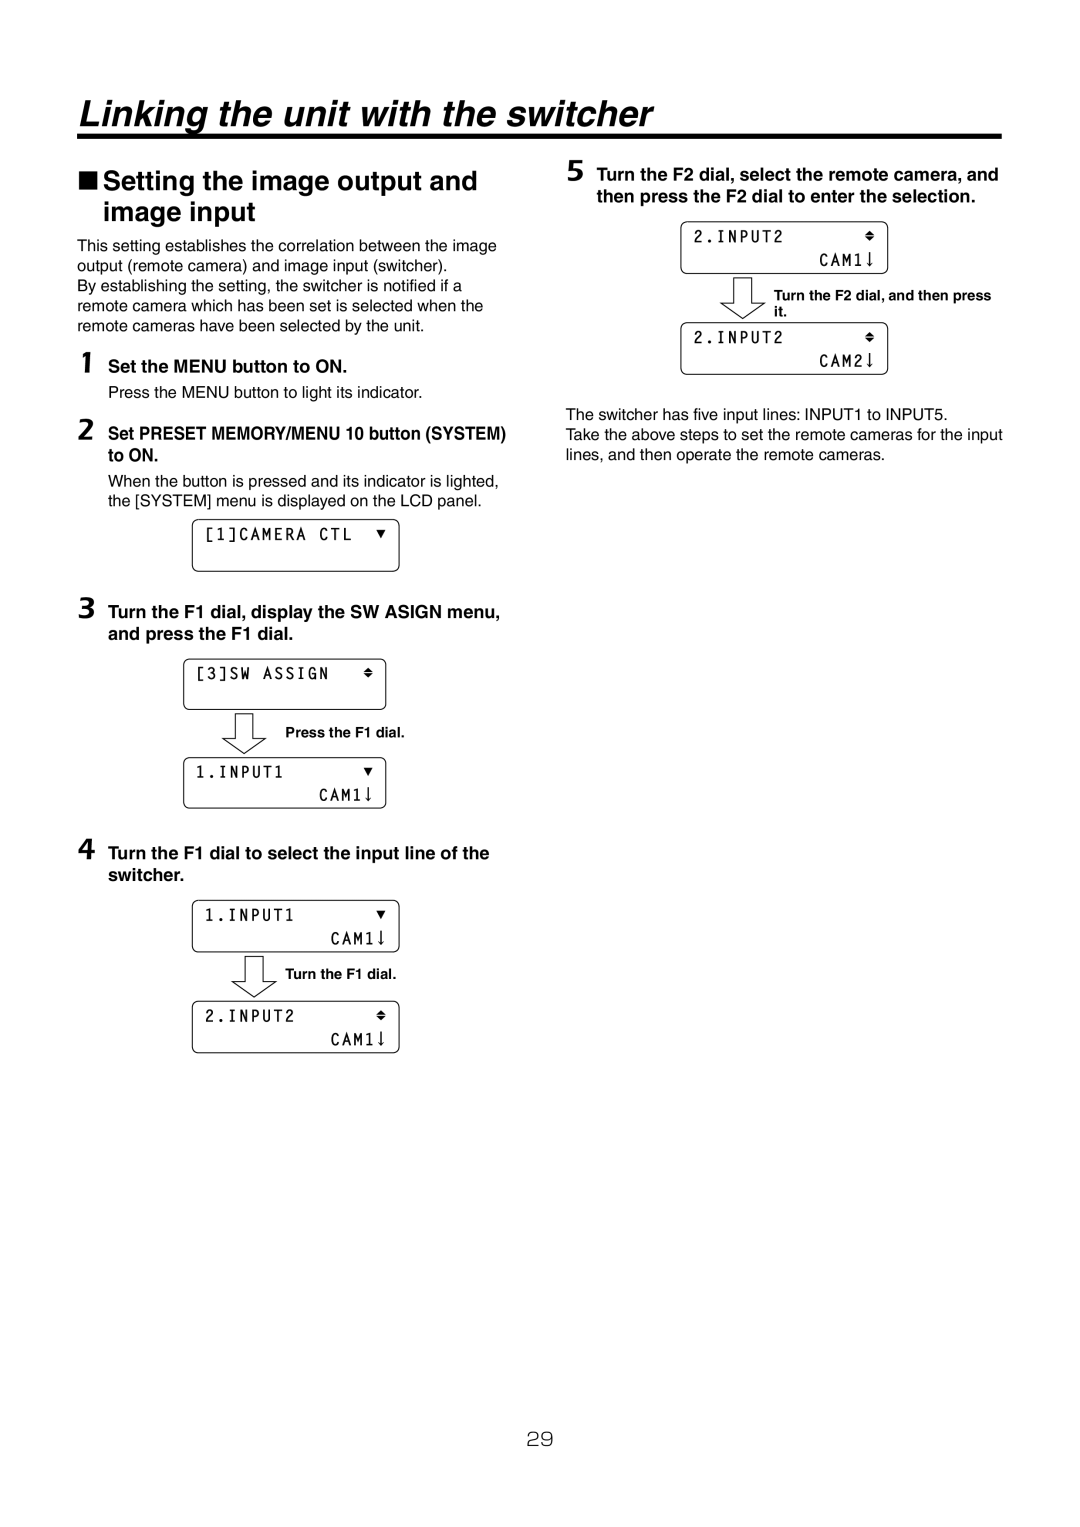
Registering data in the preset memories
Setting and operating the preset memories
Hold down the Preset MEMORY/MENU button of the number on
Preset numbers and registered pages
Hold down the Preset MEMORY/MENU button for the number on
Executing the preset data
Deleting the preset memory data
Setting the pedestal
Selecting the settings for a selected remote camera
Setting the gain
Setting the R and B pedestal
Setting the R and B gain values
Set the Preset MEMORY/MENU 2 button R/B Gain to on
Set the Preset MEMORY/MENU 3 button R/B PED to on
Set the Preset MEMORY/MENU 4 button AWB/ABB to on
Setting the white balance
Turn the F1 dial to select the white balance mode
Selecting the white balance mode
Turn the F2 dial to select AWB, and press the F2 dial
Automatically adjusting the white balance
AWB Mode AWB a SET
Automatic color temperature tracking ATW
Manually adjusting the white balance
AWB Mode ATW SET
Turn the F1 dial to select ATW
Automatically adjusting the black balance
Setting the black balance
AWB Mode AWB B SET ABB
Manually adjusting the black balance
Setting the detail
Setting the shutter speed
Set the Preset MEMORY/MENU 5 button Shutter to on
Turn the F1 dial to select the shutter mode
Set the Preset MEMORY/MENU 7 button SCENE/MODE to on
Setting the shooting mode
Turn the F1 dial to select the shooting mode
Specifying the color bars
Table of operations
Operating the menu items of the selected remote camera
Set the Preset MEMORY/MENU 9 button Setup to on
Setting the User buttons
Registering functions User buttons
Swlink
Turn the F1 dial to select the target menu item
Setting the functions
Setting the pan, tilt, zoom and focus operation directions
Setting the remote camera operations
Zoom DIR Normal
Focus DIR Normal
Speed with Z Off
Selecting the control items pan, tilt, zoom and focus
Speed Target
Z/F
Setting the PAN/TILT lever inclination and speed
Switching from focus control to iris control or vice versa
FOCUS/IRIS Normal
T Curv
Diag Speed
Scope Mode a
Setting the lower limit
Setting the upper limit
Setting the right limit
Setting the left limit
Home Position SET
Returning the remote cameras to their home position
6FUNCTION
Adjusting the minimum lens zoom start speed
Adjusting the minimum pan/tilt start speed
T MIN Speed Start
MIN Speed
10MENU CTL Setting button operation enable or disable
8GPI Setting the preset numbers
Menu Control Enable
Locking the button operations
Switcher network settings
Linking the unit with the switcher
Set Preset MEMORY/MENU 10 button System to on
Ipsw
Turn the F1 dial to select the input line of the switcher
Setting the image output and image input
1CAMERA CTL
3SW Assign
Set Preset MEMORY/MENU 9 button Setup to on
Switcher settings
Turn the F1 dial to select the menu item to be set
2SW Link
Camsel Off
BUS AUX
Fasist Off
Self
Tallyip Off
T Lever
Setting all the information displays together
Setting for the information to be displayed on the OSD
Turn the F1 dial to and select the menu item to be set
3SW Disp
Setting each information item to be displayed
8ALARM
Checking the equipment alarm information
Power No Alarm
Turn the F2 dial to display the remote camera item
Returning the unit to its factory status
Turn the F2 dial to select the initializing mode
Press the F2 dial to initialize the settings
Sub 15-pin, female, inch thread
Control interface for external devices
Example of GPIOut connections
Current Max mA AW-RP50
Installing the software
RP setting tool
IP settings
Software provided on the CD-ROM
Changing the IP addresses
Auto IP setting
Changing the camera numbers
Click Renew
Displaying the camera names
Alarm displays
Initializing the IP addresses
Acquiring information
Saving and loading data
Saving the setting files
System section, click Save under From AW-RP50
Input the filename, and click Save
Saving the log files
Loading the setting files
Pedestal AW-HE50
Table of menu items
Video
Setup
Setup PTZ ADJ MIN Speed Start Limit UP AW-HE50
F0410Y0
Operating Instructions Basics
FCC Note
Safety precautions
Important Safety Instructions
Before use Overview
Before use
Characteristics
Pan-tilt heads supported
Accessories
Pan-tilt heads and cameras supported
CPU
Required personal computer environment
Connecting the power supply
Installation precautions
Choosing the best installation location
Handle carefully
Operating precautions
Alarm indicator Alarm
Power indicator Power F1 dial, F2 dial
Parts and their functions
Control panel
Camera OSD button Camera OSD
Preset MEMORY/MENU buttons
Exit button Exit
User buttons USER1, USER2
FOCUS/PUSH OAF dial FOCUS/PUSH OAF
Auto focus button Auto
Iris dial Iris
Auto iris button Auto
Ground terminal Signal GND
Power switch Power DC in socket DC 12
Service switch SV/NM
LAN connector LAN RJ-45 10BaseT/100BaseTX
Basic operations of the unit
Select the target menu
Change the settings using the F1 dial and F2 dial
Basic operations for the menus
Setting the unit
Network settings
MAC Address
000
Connections with the AW-HE50 and AW-HS50
Connections
Example of IP connections
Connection with the AW-HE100
Example of serial connections
Connection with the AW-HE50
Max m 3280 ft
Connections with the AW-PH400 and camera
Connections with the AW-PH405 and camera
Connection with the AW-PH650
IP connection
Settings for connection with the remote cameras
Serial connection
When setting the IP addresses for the first time
Setting the IP addresses automatically auto IP setting
Auto Setup Renew
YES
Turn the F2 dial, select Yes, and then press the F2 dial
Auto Setup Keep
IP Duplicate ERR
Changing the IP addresses of the remote cameras
Setting the IP addresses
Selecting the camera group
Group Select
Auto Setup ALL Clear
Changing the IP address of the switcher
Changing the camera numbers
Clearing the IP address control tables
Selecting the remote cameras to be operated
Set the Preset MEMORY/MENU 8 Button Camera to on
Indicator lighting statuses and remote camera statuses
To cool down
Maintenance
Power plug from the power outlet, and allow the unit
Unit mm inch
Appearance
AC adapter
Specifications
Input/Output connector
F0410Y0