STEP 3 Set up to match your television and remote control
Getting started
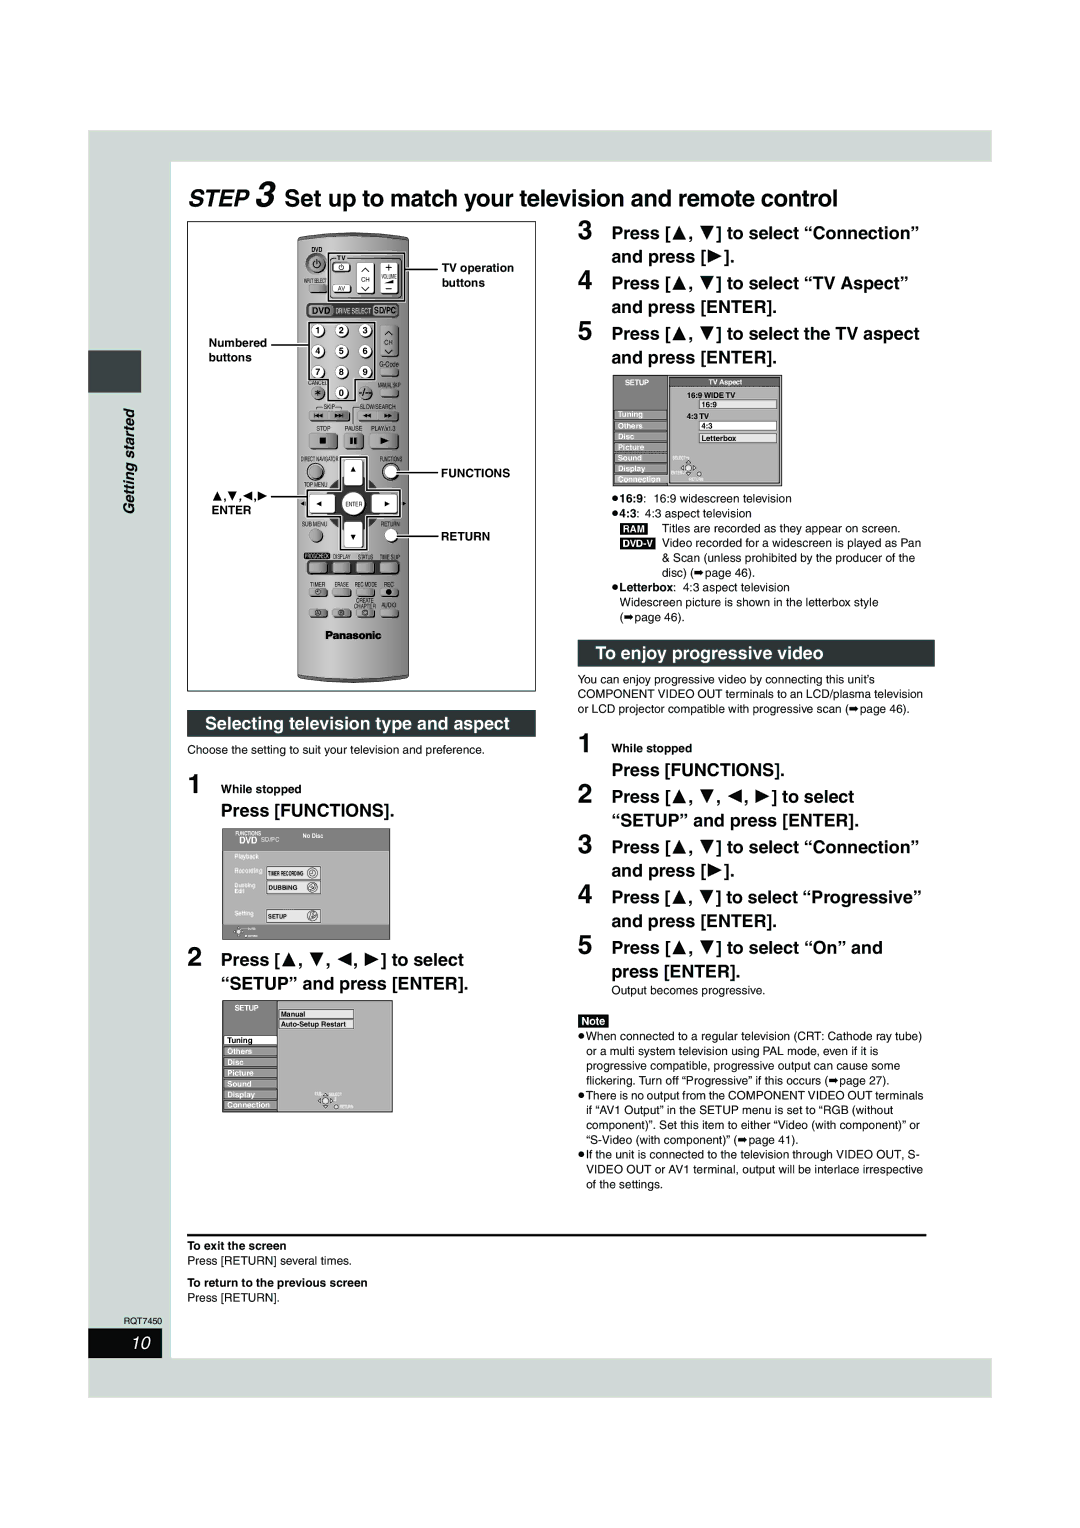
Numbered buttons
3,4,2,1
ENTER
DVD |
|
|
|
| TV | TV operation | |
|
|
| |
INPUT SELECT |
| CH | VOLUME |
| buttons | ||
| AV |
| |
DVD DRIVE SELECT SD/PC | |||
1 | 2 | 3 |
|
4 | 5 | 6 | CH |
| |||
7 | 8 | 9 | |
| |||
CANCEL |
|
| MANUAL SKIP |
| 0 | ||
SKIP |
| SLOW/SEARCH | |
STOP |
| PAUSE | PLAY/x1.3 |
DIRECT NAVIGATOR |
| FUNCTIONS | |
|
|
| FUNCTIONS |
TOP MENU
| ENTER |
| |
SUB MENU |
|
| RETURN |
|
|
| RETURN |
PROG/CHECK | DISPLAY | STATUS | TIME SLIP |
TIMER | ERASE | REC MODE | REC |
F |
|
|
|
|
| CREATE | AUDIO |
|
| CHAPTER | |
A | B | C |
|
3 Press [3, 4] to select “Connection” and press [1].
4 Press [3, 4] to select “TV Aspect” and press [ENTER].
5 Press [3, 4] to select the TV aspect and press [ENTER].
SETUP | TV Aspect | |
| 16:9 WIDE TV | |
| 16:9 | |
Tuning | 4:3 TV | |
| ||
Others | 4:3 | |
Disc | Letterbox | |
Picture |
| |
Sound | SELECT | |
Display | ENTER | |
Connection | ||
RETURN |
≥16:9: 16:9 widescreen television
≥4:3: 4:3 aspect television
[RAM] Titles are recorded as they appear on screen.
&Scan (unless prohibited by the producer of the disc) (➡page 46).
≥Letterbox: 4:3 aspect television
Widescreen picture is shown in the letterbox style (➡page 46).
To enjoy progressive video
You can enjoy progressive video by connecting this unit’s COMPONENT VIDEO OUT terminals to an LCD/plasma television or LCD projector compatible with progressive scan (➡page 46).
Selecting television type and aspect
Choose the setting to suit your television and preference.
1 While stopped
Press [FUNCTIONS].
FUNCTIONS |
| No Disc | |
DVD | SD/PC | ||
| |||
Playback |
|
| |
Recording TIMER RECORDING | |||
Dubbing | DUBBING |
| |
Edit |
| ||
|
| ||
Setting SETUP
![]() ENTER
ENTER
![]() RETURN
RETURN
2 Press [3, 4, 2, 1] to select “SETUP” and press [ENTER].
SETUP
Manual
Tuning
Others
Disc
Picture
Sound
Display | TAB SELECT |
Connection | RETURN |
1 While stopped
Press [FUNCTIONS].
2 Press [3, 4, 2, 1] to select “SETUP” and press [ENTER].
3 Press [3, 4] to select “Connection” and press [1].
4 Press [3, 4] to select “Progressive” and press [ENTER].
5 Press [3, 4] to select “On” and press [ENTER].
Output becomes progressive.
[Note]
≥When connected to a regular television (CRT: Cathode ray tube) or a multi system television using PAL mode, even if it is progressive compatible, progressive output can cause some flickering. Turn off “Progressive” if this occurs (➡page 27).
≥There is no output from the COMPONENT VIDEO OUT terminals if “AV1 Output” in the SETUP menu is set to “RGB (without component)”. Set this item to either “Video (with component)” or
≥If the unit is connected to the television through VIDEO OUT, S- VIDEO OUT or AV1 terminal, output will be interlace irrespective of the settings.
RQT7450
To exit the screen
Press [RETURN] several times.
To return to the previous screen
Press [RETURN].
10